
Mother Shahraz is the seventh boss in Black Temple and one of the most preparation-heavy encounters in TBC Anniversary. The fight requires three tanks to share Saber Lash, seven or eight healers to cover continuous tank and raid damage, and a planned Shadow Resistance set for every non-tank. Blizzard includes Mother Shahraz among the nine encounters in the official Black Temple Phase 3 overview.
The encounter has one continuous phase built around Fatal Attraction, repeating Shadow damage beams, Silencing Shriek, and Prismatic Shield. The most reliable progression plan is 174 unbuffed Shadow Resistance on every non-tank, 70 additional resistance from Prayer of Shadow Protection, three tanks stacked in front of the boss, and immediate movement whenever Fatal Attraction teleports three players together.
Mother Shahraz Raid Requirements
Mother Shahraz is primarily a resistance, positioning, and reaction check. The raid should confirm every requirement before reaching the boss because replacing missing resistance gear or changing tank assignments inside the raid wastes valuable progression time.
| Requirement | Recommended setup | Reason |
|---|---|---|
| Raid size | 25 players | Standard Black Temple raid size |
| Tanks | 3 | Saber Lash must be divided between three intended targets |
| Healers | 7 to 8 | The raid takes repeated Shadow damage while all three tanks require constant healing |
| DPS | 14 to 15 | Enough damage is required to control fight length and finish the final Enrage |
| Non-tank Shadow Resistance | 174 unbuffed and 244 with the level 70 Priest buff | This is the standard progression target for reducing Fatal Attraction and beam damage |
| Tank Shadow Resistance | Not normally required | Saber Lash grants protection from the Shadow mechanics when all three tanks remain inside the attack |
| Caster and healer range | More than 18 yards from the boss | Silencing Shriek silences players within 18 yards for 10 seconds |
| Fatal Attraction escape distance | At least 25 yards between linked players | The links remain active until the affected players separate |
Mother Shahraz Shadow Resistance Requirements
The recommended progression target is 174 total Shadow Resistance before temporary raid buffs. This number includes resistance from equipment, enchants, gems, racial effects, and the Medallion of Karabor. Prayer of Shadow Protection adds 70, bringing the final value to 244. At this breakpoint, non-binary Shadow spells can no longer deal an unmitigated full-damage result, although the amount resisted by each individual hit still varies.
| Preparation level | Unbuffed Shadow Resistance | Buffed total | Recommended use |
|---|---|---|---|
| Standard progression | 174 | 244 | Best balance between survivability and normal role performance |
| Conservative progression | 200 to 220 | 270 to 290 | Useful when Fatal Attraction reactions or raid healing remain inconsistent |
| Aggressive farm setup | Below 174 | Below 244 | Only for experienced groups with fast movement and strong healing |
| Resistance cap | 295 with the 70 resistance buff | 365 | Maximum practical resistance against a level 73 boss but usually costs too much damage or healing |
| Saber Lash tanks | 0 additional resistance required | Normal tank gear | Use health, armor, avoidance, and threat instead of a raid Shadow Resistance set |
Prayer of Shadow Protection and Shadow Resistance Aura do not stack. Assign a level 70 Priest to apply the 70 resistance version to every party and verify the final value on each character sheet. If the raid uses a lower rank of the Priest buff, players must compensate with additional equipment.
How to Build a Shadow Resistance Set
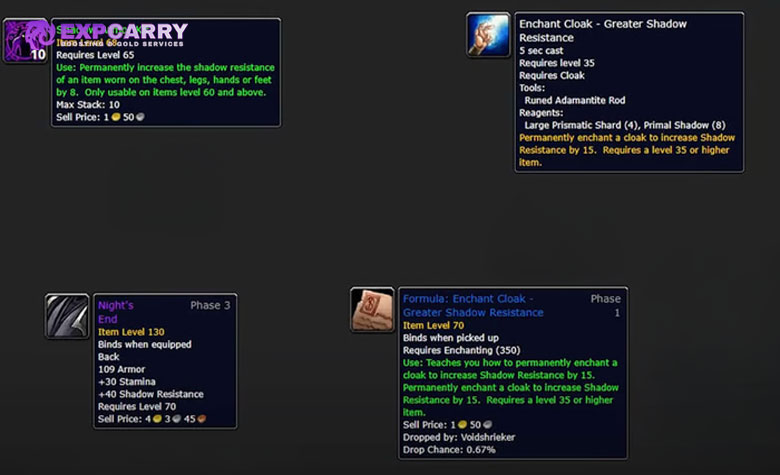
The most efficient set reaches the target while replacing as few high-value combat items as possible. Preserve important set bonuses, the active meta gem, hit requirements, and enough stamina to survive overlapping damage. The following sources can be combined according to profession access and Heart of Darkness supply.
| Source | Shadow Resistance | Slot | Preparation note |
|---|---|---|---|
| Medallion of Karabor | 40 | Neck | Obtained through the personal Black Temple attunement questline |
| Night's End | 40 | Back | Crafted by a Tailor with the required Ashtongue Deathsworn recipe |
| Enchant Cloak Greater Shadow Resistance | 15 | Back | Raises Night's End to 55 resistance |
| Crafted armor legs | 72 | Legs | Available for plate, mail, leather, and cloth armor users |
| Crafted armor bracers | 40 | Wrist | Provides the best armor-piece resistance per Heart of Darkness |
| Crafted armor belt or boots | 54 | Waist or feet | Useful when stronger normal items occupy other slots |
| Glyph of Shadow Warding | 20 | Head | Requires Honored reputation with Lower City |
| Shadow Armor Kit | 8 | Chest, legs, hands, or feet | Use on an available resistance or spare raid item |
| Void Sphere | 4 to all resistances | Gem socket | Useful in spare Tier gear or older socketed equipment |
| Shadow Protection random enchant gear | Varies | Multiple slots | Practical before crafted Phase 3 items become widely available |
A compact post-unlock setup is Medallion of Karabor for 40, Night's End with the cloak enchant for 55, crafted legs for 72, and one Shadow Armor Kit for 8. The combined result is 175 unbuffed Shadow Resistance and requires four Hearts of Darkness before other crafting materials. Early progression groups should also keep green Shadow Protection items and socketed backup gear because every crafted recipe may not be available before the first Mother Shahraz attempts.
Explore services related to this guide, selected from our TBC Raids catalog.
View All TBC Raids Services


Crafted Shadow Resistance Gear and Hearts of Darkness
Black Temple provides Hearts of Darkness and Ashtongue Deathsworn reputation required for the main crafted sets. Each armor family follows the same resistance values and Heart costs. Guilds that need faster access to the recipe tiers can include Ashtongue Deathsworn progression in their wider Phase 3 preparation plan.
| Armor type | Crafted set | Available slots | Full set resistance |
|---|---|---|---|
| Plate | Shadesteel | Bracers, belt, boots, and legs | 220 |
| Shackled Souls | Bracers, belt, boots, and legs | 220 | |
| Leather | Redeemed Soul | Bracers, belt, boots, and legs | 220 |
| Cloth | Soulguard | Bracers, belt, boots, and legs | 220 |
| Craft | Shadow Resistance | Hearts of Darkness | Resistance per Heart |
|---|---|---|---|
| Night's End | 40 | 1 | 40 |
| Bracers | 40 | 1 | 40 |
| Belt | 54 | 2 | 27 |
| Boots | 54 | 2 | 27 |
| Legs | 72 | 3 | 24 |
Do not craft identical full sets for all 25 players. The three Saber Lash tanks normally remain in standard tank equipment, while non-tanks need only enough pieces to reach the raid target. Allocate Hearts to complete functional sets before spending them on minor performance upgrades or crafting gear for substitutes who are not scheduled for progression.
Recommended Raid Composition and Roles
A balanced progression roster uses three tanks, seven or eight healers, and fourteen or fifteen DPS. Class stacking is less important than reliable healing coverage, a Priest with the correct resistance buff, fast Fatal Attraction reactions, and enough ranged players to maintain damage while the room becomes difficult to navigate.
| Role | Recommended count | Primary assignment |
|---|---|---|
| Main tank | 1 | Control the boss position, facing, and threat while remaining aligned with both off-tanks |
| Off-tanks | 2 | Stand directly with the main tank and share every Saber Lash |
| Tank healers | 3 | Maintain the main tank and both Saber Lash partners through melee combinations |
| Raid healers | 3 to 4 | Recover beam damage and stabilize the ranged and melee groups |
| Fatal Attraction healer | 1 | Track teleported players and heal them while they separate |
| Melee DPS | Varies | Attack from behind the boss and never enter the Saber Lash area |
| Ranged DPS | Varies | Stay beyond Silencing Shriek range and preserve open movement lanes |
| Priest | At least 1 | Apply Prayer of Shadow Protection to every party and assist with raid healing where appropriate |
| Hunter | At least 1 recommended | Use Misdirection to deliver the boss cleanly to the tank position |
Mother Shahraz Abilities
The encounter uses a repeating group of abilities rather than separate conventional phases. The numerical values below follow the established Mother Shahraz encounter mechanics for TBC Classic.
| Ability | Effect | Required response |
|---|---|---|
| Saber Lash | Large frontal physical attack divided between up to three targets and used approximately every seven seconds | Keep all three tanks stacked in front of the boss for every cast |
| Fatal Attraction | Teleports three players together and causes each linked player to emit approximately 3000 Shadow damage per second | Run in different safe directions until every linked player is at least 25 yards apart |
| Silencing Shriek | Silences players within 18 yards of the boss for 10 seconds | Healers and caster DPS remain outside the effect |
| Sinful Beam | Deals approximately 6938 to 8062 Shadow damage to affected players | Raid healers recover the targets immediately |
| Sinister Beam | Deals approximately 2000 Shadow damage and knocks affected players into the air | Use safe walls or overhead geometry to limit travel and fall damage |
| Vile Beam | Deals approximately 2500 Shadow damage every two seconds for eight seconds | Apply sustained healing until the damage effect expires |
| Wicked Beam | Deals approximately 4000 Shadow damage and burns 1000 mana | Recover health immediately and use mana restoration according to the healer plan |
| Prismatic Shield | Changes approximately every 15 seconds and reduces one damage school while increasing another | Elemental damage dealers change spell priorities when their normal school is reduced |
| Enrage | At 10 percent health the boss temporarily gains damage and attack speed | Use planned tank cooldowns, focused healing, and remaining offensive cooldowns |
Prismatic Shield Damage Schools
Prismatic Shield does not require the entire raid to stop attacking. Physical damage continues normally, while classes with access to more than one spell school should avoid repeatedly casting into the reduced school. Do not use an inefficient spell solely because its school is increased if it would still perform worse than the normal rotation.
| Reduced damage school | Increased damage school | Practical response |
|---|---|---|
| Arcane | Nature | Arcane users reduce expensive casts where an effective alternative exists |
| Nature | Arcane | Nature damage users change priorities if their class has another viable school |
| Fire | Frost | Mages can favor Frost options while Fire is reduced |
| Frost | Fire | Mages can return to Fire options while Frost is reduced |
| Shadow | Holy | Warlocks and Shadow Priests avoid wasting major cooldowns during the reduction |
| Holy | Shadow | Holy damage dealers continue only when no stronger alternative is available |
Mother Shahraz Positioning and Pull
Positioning must protect the tank trio from accidental players while leaving enough open space for Fatal Attraction. Ranged groups should remain within practical healing range but outside the 18-yard silence. Safe walls and overhead structures can reduce the danger of Sinister Beam, but the raid must not block every escape direction.
- Place the three tanks together at the selected wall with the boss facing away from the raid.
- Keep pets, melee DPS, and every non-tank behind the boss so Saber Lash hits only the intended trio.
- Place melee directly behind the boss without overlapping the tank hitbox.
- Position healers and caster DPS more than 18 yards away from Mother Shahraz.
- Spread ranged groups across assigned areas while keeping clear routes toward open parts of the room.
- Place the Fatal Attraction healer where most of the room remains within healing range.
- Use Hunter Misdirection for the pull and wait until the boss reaches the tank position before starting full damage.
Full Mother Shahraz Strategy
The fight follows the same mechanical loop from the pull until 10 percent health. Consistency is more important than maximum opening damage because one failed Saber Lash stack or slow Fatal Attraction reaction can end the attempt immediately.
- Pull Mother Shahraz into the predetermined tank position with all three tanks already stacked.
- Wait for stable threat and the first Saber Lash before allowing every DPS player to use major cooldowns.
- Keep the boss completely stationary and facing away from the raid unless an emergency movement is required.
- Heal all three tanks continuously because melee attacks and Saber Lash can land close together.
- Recover every beam quickly and give additional healing to players affected by Vile Beam.
- When Fatal Attraction occurs, the three linked players stop attacking or casting and separate immediately.
- Keep healers and casters beyond 18 yards so Silencing Shriek does not interrupt tank or raid healing.
- Adjust elemental damage to Prismatic Shield without delaying Fatal Attraction movement or defensive actions.
- At 10 percent health, stabilize the tanks, activate the planned final cooldowns, and finish the boss without abandoning positioning.
How to Handle Fatal Attraction
Fatal Attraction is the main wipe mechanic. Three players are teleported to the same location, and their overlapping Shadow damage begins immediately. The links end only after the affected players create enough distance from one another. Shadow Resistance reduces the damage but does not remove the movement requirement.
- Stop the current cast or attack as soon as the teleport occurs.
- Check the boss and tank position before choosing an escape direction.
- Run in three different open directions instead of following another linked player.
- Never cross the Saber Lash tank group or move through a large ranged camp.
- Use Blink, Sprint, Dash, Rocket Boots, or another reliable movement ability when available.
- Continue moving until the Fatal Attraction debuff and link have ended.
- Use a Healthstone or personal defensive if health falls faster than assigned healers can recover it.
- Return to the assigned position only after all links are broken.
If the teleport places the group near a wall, one player should move along the wall while the others use separate open angles. Waiting for another player to choose a direction causes additional damage ticks and is more dangerous than taking an imperfect but immediate route.
Tank Tactics
The three tanks form a single Saber Lash unit. The main tank controls the boss, but the two off-tanks are equally important because missing one target can turn the next Lash into lethal damage for the remaining tanks.
- Stack tightly enough that all three tanks are inside every Saber Lash cone.
- Use normal mitigation gear with high health, armor, avoidance, and stable threat.
- Do not replace important tank gear with the standard non-tank Shadow Resistance set.
- Keep the boss stationary and never rotate the frontal attack through the raid.
- Prevent pets, temporary guardians, and non-tanks from standing in front of the boss.
- Coordinate personal and external defensive cooldowns for the 10 percent Enrage.
- If one tank dies, use battle resurrection immediately and apply emergency cooldowns before the next Saber Lash.
Healer Tactics
Healing assignments should separate constant tank coverage from beam recovery and Fatal Attraction response. Telling every healer to cover everything creates duplicated casts on safe targets while teleported players die outside the main raid group.
- Assign approximately three healers to the tank group and keep all three tanks within range.
- Assign three or four healers to raid groups and repeated beam recovery.
- Give one mobile healer primary responsibility for Fatal Attraction targets.
- Remain more than 18 yards from the boss to avoid Silencing Shriek.
- Use healing over time effects before predictable beam sequences and on players moving away with Fatal Attraction.
- Prioritize players affected by Vile Beam because its damage continues for eight seconds.
- Plan Mana Tide Totem, Innervate, Shadow Priest mana support, and consumables around Wicked Beam mana loss.
- Reserve external tank cooldowns and the strongest direct healing for the final Enrage.
DPS Tactics
DPS players must preserve enough combat stats in their resistance sets to keep the encounter within a manageable duration. Survival remains the first priority because a dead player contributes no damage and can remove an important Fatal Attraction escape route for the rest of the raid.
- Wait for the boss to reach the final tank position before using major attacks.
- Melee players remain behind Mother Shahraz and never enter the Saber Lash cone.
- Casters remain beyond 18 yards to avoid losing 10 seconds of casting to Silencing Shriek.
- Players with multiple damage schools adjust their rotation when Prismatic Shield reduces their main school.
- Fatal Attraction targets stop damage immediately and separate before resuming their rotation.
- Use personal defensive abilities for beam overlaps rather than expecting healers to cover every avoidable risk.
- Save an agreed portion of offensive cooldowns for the Enrage at 10 percent health.
Final Enrage and Cooldown Plan
Mother Shahraz temporarily enrages at 10 percent health, increasing her attack speed and damage. The raid should enter this point with all three tanks alive, healers in their assigned positions, and no active Fatal Attraction group moving through the tank area.
- Use Bloodlust or Heroism at the pull for maximum uptime or save it for 10 percent if final-phase tank deaths are the main problem.
- Rotate tank defensive cooldowns instead of activating every option at the same moment.
- Assign Paladin and Priest external cooldowns before the pull where the available TBC toolkit allows them.
- Use remaining offensive potions only after survival and mana requirements are secure.
- Continue handling Fatal Attraction and beams normally because the mechanics do not stop during the Enrage.
Consumables and Preparation Checklist
Shadow Resistance gear is the foundation of progression, while consumables provide additional protection against unlucky overlaps. Protection potions absorb damage but do not replace the required movement for Fatal Attraction.
| Preparation | Who needs it | Purpose |
|---|---|---|
| Prayer of Shadow Protection | Every non-tank party | Adds 70 Shadow Resistance when the correct level 70 version is used |
| Major Shadow Protection Potion | Non-tanks | Absorbs part of the next Shadow damage and can be supplied through a raid cauldron |
| Flask of Chromatic Wonder | Players needing more resistance | Adds resistance and attributes but replaces the normal flask or elixir plan |
| Stamina food | Progression raiders | Increases the health buffer against beam and Fatal Attraction overlaps |
| Healthstone and healing potion | Every player | Provides emergency recovery when teleported away from healers |
| Mana potion and Dark Rune | Healers and mana users | Offsets long fight duration and Wicked Beam mana loss |
| Rocket Boots | Engineers | Helps create Fatal Attraction distance quickly but does not replace resistance or correct direction |
| Repair and ammunition check | Every relevant player | Prevents avoidable performance losses during repeated progression attempts |
Common Mother Shahraz Mistakes
Most wipes are caused by assignment failures rather than a lack of theoretical damage. Review the cause of each death before adding more resistance or replacing a DPS player with another healer.
- Counting 174 as the buffed target instead of the unbuffed equipment target.
- Assuming Prayer of Shadow Protection stacks with Shadow Resistance Aura.
- Using a lower rank of the Priest buff without increasing personal resistance.
- Putting Shadow Resistance gear on tanks and weakening their physical mitigation.
- Allowing one off-tank to stand outside the Saber Lash area.
- Placing pets or non-tanks in front of the boss.
- Keeping healers within the 18-yard Silencing Shriek radius.
- Blocking every Fatal Attraction escape route with tightly packed ranged groups.
- Waiting for another linked player to move first after Fatal Attraction.
- Running through the tank group while trying to break a link.
- Ignoring Vile Beam targets after the initial damage is healed.
- Using all defensive and offensive cooldowns at the pull with nothing available for the 10 percent Enrage.
Mother Shahraz Loot
Mother Shahraz is the first Black Temple boss to award Tier 6 armor tokens. Her tokens are exchanged for Tier 6 shoulder pieces, making the encounter a valuable weekly progression target after the raid has learned the movement pattern.
| Item | Type | Primary use |
|---|---|---|
| Pauldrons of the Forgotten Conqueror | Tier 6 shoulder token | Paladin, Priest, and Warlock |
| Pauldrons of the Forgotten Protector | Tier 6 shoulder token | Warrior, Hunter, and Shaman |
| Pauldrons of the Forgotten Vanquisher | Tier 6 shoulder token | Druid, Rogue, and Mage |
| Blade of Savagery | One-handed sword | Physical damage dealers |
| Tome of the Lightbringer | Paladin relic | Holy Paladins |
| Heartshatter Breastplate | Plate chest | Plate damage dealers |
| Leggings of Devastation | Cloth legs | Caster damage dealers |
| Nadina's Pendant of Purity | Neck | Healers |
| Shadowmaster's Boots | Leather feet | Rogues and other suitable leather users |
The shoulder tokens make weekly Black Temple clears relevant even after the raid has completed its first Mother Shahraz kill. Establish token priority before the pull so loot decisions do not delay progression toward the Illidari Council.
Final Mother Shahraz Strategy
The reliable Mother Shahraz plan is 174 unbuffed Shadow Resistance on every non-tank, a level 70 Priest resistance buff for a 244 total, three tanks stacked for every Saber Lash, and seven or eight healers with separate tank, raid, and Fatal Attraction assignments. Keep healers and casters beyond 18 yards, preserve open movement lanes, and make immediate separation the only priority for teleported players. If the raid maintains those rules through the 10 percent Enrage, Mother Shahraz becomes a controlled resistance encounter instead of an unpredictable progression wall.