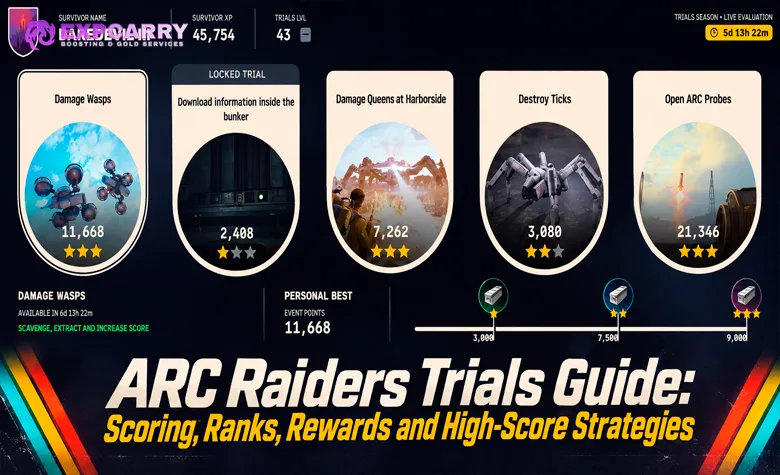
ARC Raiders Trials are weekly scoring challenges that reward successful extractions, high individual scores, and competitive leaderboard placement. Unlocked at Raider Level 15, the system provides five rotating objectives covering activities such as damaging ARC enemies, searching containers, using specific weapons, and interacting with equipment or environmental objects. Each challenge keeps your highest score from a single successful raid, while your five personal bests determine your weekly leaderboard standing. Three reward milestones are currently set at 1,000, 2,000, and 3,000 points, but earning three stars is only the beginning if your goal is a higher Trials Rank.
The system is active in ARC Raiders Live Update 2.6.0, released November 17, 2026. Trials Season 6, Frozen Trials, runs until January 12, 2027, introducing objectives involving newer ARC enemies, equipment, and Pendola Pass locations. This guide focuses on the scoring rules, ranks, rewards, solo and squad tactics, and repeatable high-score strategies rather than a single week's challenge rotation.
Short answer: Complete the five weekly Trials by performing their specified actions and extracting alive. Reach 3,000 points in each challenge for all three reward tiers, then improve your highest single-raid scores to climb the weekly leaderboard and earn higher seasonal ranks.
ARC Raiders Trials Scoring: Weekly Challenges and Personal Bests
Trials unlock at Raider Level 15 and appear in the dedicated Trials menu. Every week, five challenges become available, each awarding points for particular actions performed during normal Topside raids. The required actions and their point values can change between rotations, so players should read the current objective before selecting a map or loadout.
Embark's official Trials explanation establishes the most important rule: progress must be earned during a single raid and secured through extraction. The current community Trials database also confirms that only the best extracted score for each challenge is retained. A failed extraction loses that run's Trial progress, while a successful run that scores below an existing personal best does not reduce the saved result.
Single-Raid Scoring and the Extraction Requirement
Trials do not work like ordinary cumulative tasks. If you score 1,500 points on one challenge and extract, then score another 2,000 in a later raid, your saved result becomes 2,000 rather than 3,500. To reach three stars, you must earn the required 3,000 points within one successful raid for that challenge.
The five challenges are tracked separately. You can establish a personal best for one objective in one raid and improve another objective during a completely different run. Your competitive score is the combined total of those five saved personal bests, so there is no requirement to complete all five objectives in the same deployment.
Extraction is the deciding step. A strong run that ends with your Raider dying does not secure the accumulated Trial points, regardless of how many targets were destroyed or containers were searched. When the objective is already complete, continuing to chase ordinary loot introduces additional risk without necessarily improving the challenge score.
Calculating Points from Damage, Kills and Interactions
Each Trial has its own scoring rule. Some award points for damaging a particular ARC type, others require destroying enemies, opening specific containers, collecting objects, or using a designated weapon. Damage-based objectives may convert damage into points at different rates, while interaction objectives generally award a defined amount for each qualifying action.
The calculation for a repeatable interaction is straightforward: divide the desired score by the points awarded for one qualifying action, then round up to a whole action. For a hypothetical container challenge worth 200 points per opening, reaching 3,000 points would require 15 qualifying containers during one successful raid. That example is not a permanent value for every container Trial; the live objective determines its scoring rate.
Damage Trials require extra attention because damage dealt and Trial points earned are not necessarily identical. A challenge limited to one weapon type may use a different point conversion from a general ARC-damage challenge. Players should examine the live score counter after the first qualifying action rather than assuming that one point always equals one damage.
Trials Star Rewards: 1,000, 2,000 and 3,000 Points
Each weekly Trial offers three reward milestones. Current Season 6 data lists one star at 1,000 points, two stars at 2,000 points, and three stars at 3,000 points. These milestones award progressively higher-rarity items or Blueprints and can be collected once per challenge tier during the weekly rotation.
Older official Season 3 documentation used thresholds of 1,000, 2,500, and 4,000 points. Those figures should not be copied into current strategies: the Season 6 thresholds are lower, as reflected in the updated Trials database and November 2026 community guides. The in-game Trials screen remains the final reference if a future season adjusts the values again.
| Milestone | Score required | Reward pool |
|---|---|---|
| 1 Star | 1,000 points | Random Uncommon item or Blueprint. |
| 2 Stars | 2,000 points | Random Rare item or Blueprint. |
| 3 Stars | 3,000 points | Random Epic item or Blueprint. |
With five weekly challenges and three reward tiers each, there are up to 15 challenge-tier rewards available during a complete rotation. Rewards are granted after a qualifying extraction, and repeating a previously completed tier does not create another copy of that tier's reward. A Blueprint is a possible reward, not a guaranteed result, and the exact item remains subject to the applicable reward pool.
Three-Star Completion Versus Leaderboard Scoring
Three stars represent the maximum standard reward tier for an individual challenge, not the maximum score that can be recorded. A Raider who earns 7,000 points in a Trial still receives no additional fourth-star reward, but the higher personal best can significantly improve their leaderboard standing. This creates two different goals: reaching 3,000 points for weekly items and pushing considerably higher for competitive rank progression.
Players interested only in the reward pools can prioritize completing each challenge safely and stop once the required score is secured. Competitive players should instead examine the scores above them on their leaderboard and determine which objective offers the greatest realistic improvement. The weekly Trials objective assistance available for selected challenges is separate from the broader task of achieving a particular seasonal rank.
ARC Raiders Trials Ranks: Rookie to Cantina Legend
Trials use a competitive ranking system rather than a fixed progression bar based only on earning stars. Once a Raider records points during the week, they enter a division containing up to 100 players at the same rank, except at Hotshot and Cantina Legend, where the global leaderboard applies. Placement depends on the combined score of the five saved personal bests, and the weekly leaderboard determines promotion, retention, or demotion.
There are 14 ranks, including the numbered divisions of Rookie, Tryhard, Wildcard, and Daredevil, followed by Hotshot and Cantina Legend. New players begin at Rookie I, while returning players can start a new season two ranks below their previous final placement. Raiders progress through the ladder by performing well against others at their level. The higher ranks become more competitive, with Cantina Legend reserved for the top 1,000 players in the Hotshot global standings.
| Rank group | Sub-ranks | Competition |
|---|---|---|
| Rookie | I, II, III | Entry-level divisions and initial promotions. |
| Tryhard | I, II, III | Weekly placement determines advancement or possible demotion. |
| Wildcard | I, II, III | Higher personal-best totals are required to compete successfully. |
| Daredevil | I, II, III | Stronger competition with more demanding promotion placements. |
| Hotshot | One rank | Global leaderboard competition. |
| Cantina Legend | One rank | Top 1,000 players in Hotshot standings. |
Weekly Promotions, Demotions and Multiple-Rank Advances
The ranking system compares Raiders against their current competition rather than awarding promotion automatically at a universal score threshold. Players near the top of a division may advance multiple sub-ranks, while lower placements can result in remaining at the current level or being demoted. The exact placement bands vary between rank groups, which is why a score sufficient for promotion in Rookie may not be enough in Daredevil.
Division placement begins after a Raider first records points during the weekly rotation. Players are grouped as divisions fill, and rank changes are processed on Mondays, but entering later does not guarantee an easier leaderboard. The useful information is the actual current standing, the scores around the promotion boundary, and how much time remains before the weekly reset.
As an example, a Raider with three strong challenge scores and two very weak ones may gain more leaderboard points by improving the weaker objectives than by further optimizing an already exceptional result. The total comes from five separate best scores, so balanced performance can be more effective than repeating only the easiest challenge. Promotion remains competitive, however, and no specific combined score guarantees advancement across every division.
Frozen Trials Season 6: Maestro Outfit and Seasonal Cosmetics
Embark's official Frozen Trials announcement confirms that Season 6 began on October 8, 2026, and ends on January 12, 2027. The main seasonal reward is the Maestro Outfit, with additional customization options for players reaching higher ranks. Hotshot and Cantina Legend unlock the Yellow and Red outfit colors, respectively, while the season also features the Sheriff Badge backpack charm, Infrared Transmitter attachment, Pumped Dance emote, and Pop Helmet for Scrappy.
Seasonal cosmetic rewards are separate from the weekly items earned through three-star challenges. Your final seasonal rank determines which rank-linked rewards become available, while the particular weekly objectives only influence how many points you can contribute to that ranking. Players aiming for a defined competitive placement can distinguish this objective from Trials rank progression assistance, which concerns the seasonal ladder rather than a guaranteed random Blueprint reward.
Explore services related to this guide, selected from our ARC Raiders catalog.
View All ARC Raiders Services
Best Trials for Solo Raiders and Squads
Different Trial types favor different approaches. Solo players can control their own route and extraction timing without coordinating several inventories or combat roles. Squads can cover more ground, manage dangerous ARC enemies more safely, and complete objectives requiring specialized equipment, although they may also attract attention and create disputes over which actions award credit.
Embark has previously acknowledged concerns about squad-size advantages in Trials. Community testing also indicates that teammates' contributions can benefit some objectives, but this should not be treated as a universal rule for every action. The exact credit behavior is worth checking during a short test run before building an entire high-score strategy around shared progress.
| Trial type | Solo approach | Squad approach |
|---|---|---|
| Open containers or search objects | Choose a compact location with many qualifying interactions. | Coordinate routes and check whether teammate interactions count. |
| Search specific ARC wrecks | Farm accessible targets and search them immediately. | Clear threats together and organize safe access to wrecks. |
| Damage common ARC enemies | Choose repeatable targets that can be damaged safely. | Protect the damage dealer and manage additional enemies. |
| Damage large ARC targets | Use a controlled engagement with reliable escape options. | Assign damage, healing and threat-management roles. |
| Use a specific weapon or gadget | Bring the required equipment and sufficient ammunition. | Coordinate qualifying attacks and verify individual credit. |
| Interact in a named location | Follow a compact route inside the required area. | Coordinate movement, security and extraction. |
Solo Strategies for Containers, Probes and Search Objectives
Search-based Trials are often attractive for solo Raiders because they can be completed without fighting large ARC enemies or coordinating several players. Start by checking whether the objective names a particular location, a container category, or an unrestricted search action. Then choose a map and route with enough qualifying objects to reach the target score before extraction.
For fixed-location objectives, remain inside the specified area until the counter confirms that the interactions count. Opening a nearby container outside the objective boundary may provide ordinary loot without advancing the Trial. Avoid spending excessive time searching a location that has already been cleared by other Raiders; move to another qualifying cluster or extract with the progress you have secured.
The community's discussion about Snitches and probes illustrates the importance of understanding each action's point value. Different interactions can award substantially different scores, so the number of targets needed for three stars is not fixed across every rotation. Inspect the in-game counter after the first valid interaction and calculate the remaining amount before extending the route.
Squad Strategies for ARC Damage and Heavy Targets
Damage challenges involving Queens, Matriarchs, or other dangerous ARC machines are better suited to coordinated groups when a solo character cannot safely sustain the encounter. Assign one player to deliver qualifying damage while teammates manage surrounding enemies, recovery, and threats from other Raiders. The objective is to keep the damage source active long enough to establish a strong score without allowing the fight to become an uncontrolled battle.
Check whether the challenge tracks damage dealt, units destroyed, a specific component, or attacks made with a required weapon. These are different conditions: destroying an enemy with an unsuitable weapon may contribute little or nothing to a weapon-specific Trial. Likewise, dealing damage to a target does not establish that the player received credit for a destruction objective unless the score counter confirms it.
For repeated attempts involving demanding ARC enemies, prioritize suitable equipment and enough ammunition to complete the planned run. ARC Raiders Blueprint acquisition concerns obtaining equipment recipes, while Trials require using whatever eligible gear the active challenge specifies. A strong weapon is useful only when its damage or interactions count toward the selected objective.
Shared Squad Credit and Competitive Fairness
Some players report that squadmates' actions contribute to Trial scores, creating an advantage when multiple Raiders can work toward the same objective. Embark acknowledged squad-size fairness concerns in its Season 4 Trials announcement, but that statement did not establish one permanent shared-credit formula for all future challenge types. It is therefore unsafe to assume that every container opened or every point of damage dealt by a teammate is added to everyone's score.
For a squad run, compare each player's counter after a controlled action before committing expensive equipment. If the credit is shared, teammates can divide responsibilities while preserving the group's score potential. If the action requires individual participation, each Raider must perform the qualifying activity personally. In both cases, every player still needs a successful extraction to secure their own progress.
High-Score Strategies for Efficient Trials Runs
High-score attempts should be planned around one primary objective and a reliable extraction route. Trying to complete every weekly challenge during one deployment can work when several objectives overlap, but it often results in wasted movement and unnecessary danger. Competitive runs are strongest when the selected map, equipment, target density, and planned extraction all serve the same score.
Prioritize Score per Action and Target Availability
Before deploying, compare the scoring rate with how frequently qualifying targets can be found. A container challenge may be easier than a boss challenge when the map offers many accessible interactions, while a concentrated group of suitable ARC enemies may provide faster damage scoring than searching several distant locations. A theoretically valuable target is inefficient if it requires excessive travel, ammunition, or waiting for a spawn.
The most useful measure is expected score during a survivable raid, not the largest number possible under ideal conditions. Players should consider the time needed to reach the objective, the amount of eligible activity available, and the distance to extraction. If two locations provide similar scoring opportunities, the safer and more compact route is generally the better starting choice.
Loadouts for Damage, Search and Gadget Challenges
Trials that specify a weapon or gadget require that equipment to be included in the loadout before deployment. For damage objectives, carry enough ammunition to reach the desired score and keep a practical way to handle enemies that are not suitable targets for the challenge. An expensive weapon is unnecessary when the task is simply opening containers or searching wrecks, where movement and survival are more important than maximum damage.
Match the equipment investment to the value of the planned attempt. A first three-star completion can often be approached with an affordable functional kit, while a competitive high-score run against stronger ARC threats may justify specialized weapons, healing, and utility. Avoid carrying more valuable equipment than the objective requires, since a failed extraction loses both the run's Trial progress and the gear at risk.
Extraction Timing: Securing Stars Versus Pushing a Personal Best
The correct extraction decision depends on the goal. If a challenge has reached 3,000 points and the player only wants weekly rewards, leaving safely is usually preferable to risking the entire run for additional score that produces no further star reward. If the player is competing for promotion, continuing may be worthwhile when more qualifying targets are nearby and the route to extraction remains manageable.
A personal best is only improved when a higher score is extracted. Repeating a weaker run cannot reduce an earlier best, so unsuccessful attempts do not erase previously secured weekly results. The downside is losing time and the equipment used in the attempt, which becomes especially important when testing several high-risk routes late in the weekly rotation.
Repeatable High-Score Run Plan
Use the following sequence for any weekly rotation. It separates objective planning from the actual raid so that the player can spend more time scoring and less time adjusting strategy after spawning Topside.
- Select the objective: identify the weekly Trial with the greatest realistic score improvement.
- Read the scoring conditions: confirm the required enemy, weapon, location, interaction, or damage type.
- Calculate the target: estimate how many qualifying actions or how much damage is needed to beat the saved personal best.
- Choose the map: prioritize target density, access routes, and extraction availability.
- Prepare the loadout: include required equipment, enough ammunition, recovery, and appropriate utility.
- Test the first action: confirm that the score counter increases as expected before continuing.
- Concentrate on qualifying targets: avoid unrelated fights and unnecessary loot detours.
- Reassess the score: stop when the intended reward or leaderboard improvement is achieved unless further progress is reasonably safe.
- Extract successfully: secure the result rather than risking it during an unrelated encounter.
- Compare the saved personal best: check the Trials menu and decide whether another attempt is worth the cost.
Trials Map Conditions After the Removal of Double Points
Major Map Conditions previously offered additional Trials scoring opportunities, leading to strategies built around waiting for Night Raid or other special conditions. Embark removed the automatic double-progress benefit in Season 4. The studio also stopped tying weekly Trials to specific Map Conditions as a requirement, allowing players to pursue challenges without waiting for a restricted environmental rotation.
That change remains important for current planning. A Major Map Condition can still be useful when it improves access to the targets required by a Trial, but it should not be selected under the assumption that every action automatically grants twice its normal points. Choose the map condition because its available enemies, objects, or traversal opportunities support the objective, not because an outdated guide promises a universal scoring multiplier.
The official Frozen Trail update notes introduced new areas, enemies, weapons, and equipment that influence which Trials are available during Season 6. However, the principles of single-raid personal bests, extraction-dependent scoring, and objective-specific requirements remain the foundation of the system. Future rotations can introduce different tasks without requiring an entirely new scoring guide.
Weekly Trials Progression and Seasonal Rank Planning
A full Trials week is best approached in two stages. First, establish at least one qualifying extracted score for each of the five objectives and collect as many three-star rewards as possible. Then examine the leaderboard to identify which personal bests provide the greatest opportunity for rank improvement. This avoids spending an entire week optimizing one challenge while several others remain unscored.
The level requirement also matters for new players. Trials are inaccessible before Level 15, so leveling is a prerequisite rather than a way to earn Trials Rank directly. The Raider leveling progression applies to reaching that unlock, while the actual competitive scoring begins after Trials become available.
Embark's November 17 Live Update 2.6.0 corrected a display bug in which the stars-earned pop-up could fail to appear after exceeding a personal best. The correction affects score feedback rather than announcing new reward thresholds or an additional ranking mechanic. Players should use the retained Trials score and reward information to evaluate progress rather than judging it only by whether a pop-up appeared.
ARC Raiders Trials FAQ
The following answers cover additional scoring and reward details that commonly cause confusion when players move between weekly challenges and ranked competition.
Do Trials points stack across multiple raids? No. Only the highest successfully extracted score for each challenge is retained during the week. Different challenges can have their personal bests recorded in different raids.
Do three stars guarantee promotion to a higher rank? No. Three stars unlock the maximum standard challenge rewards, but rank progression depends on leaderboard placement against other Raiders. Scores above 3,000 can still improve competitive standing.
Can solo Raiders reach Cantina Legend? Solo players can participate in Trials and compete for the highest ranks, but the required placement depends on global competition. There is no separate guaranteed solo promotion threshold, and some objectives may favor coordinated squads.
Are Trials rewards the same as Feats and Reward Pass rewards? No. Trials award challenge-tier items and seasonal rank cosmetics, while Feats contribute to the separate Reward Pass progression system introduced with Frozen Trail.
Conclusion
ARC Raiders Trials reward consistent extractions, efficient objective selection, and strong single-raid personal bests. Reach three stars across the weekly challenges for the available item rewards, then improve whichever scores offer the greatest opportunity for leaderboard advancement. Solo Raiders should prioritize manageable routes and repeatable interactions, while squads can use coordinated combat and target control for more demanding objectives. For seasonal ranking, the strongest strategy is not completing the most raids, but extracting with the best scores from the right ones.