Refining in Star Citizen converts raw mining ore and supported salvage materials into processed commodities that can be transported, sold or used for crafting. In Alpha 4.10.2 LIVE, the standard refinery loop involves creating a work order, selecting a processing method, waiting for completion, collecting the finished cargo and delivering it to a buyer or crafting destination. Profit depends on material yield, station bonuses, processing fees, cargo handling and the final selling route.
Short answer: Dinyx Solventation is a strong choice for high yield and low processing cost when time is not important, while Ferron Exchange offers another high-yield option. Gaskin, Cormack and XCR favor faster processing, but always compare the actual work-order quote, available cargo capacity and buyer demand before committing.
Star Citizen Alpha 4.10.2 LIVE was released on October 9, 2026. Station refinery work orders remain an established part of the industrial economy, while material quality and crafting create additional reasons to retain selected resources. For extraction mechanics, see the Star Citizen Mining Guide. For material selection, use the Star Citizen Best Ore Guide.
Star Citizen Refining at a Glance
Refining is worth considering when the extra value of processed material exceeds the refinery fee and additional transport costs. The best method depends on whether maximum material recovery or faster access to the finished cargo matters more.
| Decision | Recommended approach | Why |
|---|---|---|
| Maximum yield without urgency | Dinyx Solventation | High yield, low cost and very slow processing |
| Alternative high-yield processing | Ferron Exchange | High yield with moderate processing cost |
| Fast processing with moderate yield | Gaskin Process | Fast processing at a high fee |
| Fast processing with low yield | Cormack Method or XCR Reaction | Prioritizes turnaround over retained material |
| Immediate aUEC | Sell raw ore where accepted | Avoids processing fees and a second cargo trip |
| Crafting materials | Preserve suitable quality and quantity | Refining retains material quality but changes output quantity |
| Several completed orders | Consolidate collection | Reduces repeated hauling trips |
The refinery terminal provides the relevant cost, expected output and processing time for the selected job. Reference charts are useful for planning, but actual quotes take priority.
How Refining Works in Star Citizen
The standard industrial loop connects mining, refining, hauling and selling or crafting. A completed refinery timer does not automatically deliver payment or transfer materials to another location.
- Mine: extract supported raw ore using a mining ship or suitable equipment.
- Refine: submit an eligible material source and choose a refinery method.
- Collect: return after the work order is complete and assign the output to a compatible cargo ship.
- Haul: transport the processed commodity to an appropriate destination.
- Sell or use: complete the commodity sale or retain the material for a supported blueprint.
Finished materials must be collected and sold separately. This makes the availability of a suitable cargo ship an essential part of refinery planning.
Raw Ore vs. Refined Material
Raw ore can provide immediate income at an accepting ore-sales terminal. Refining may increase usable commodity value, but introduces additional time, fees and cargo exposure.
| Factor | Raw ore | Refined material |
|---|---|---|
| Payment | Immediate at a compatible buyer | After processing, collection and sale |
| Potential return | Raw commodity sale value | Refined quantity multiplied by buyer price |
| Refinery fee | None | Required |
| Processing time | None | Varies by job |
| Cargo handling | Usually no additional collection | Requires finished-cargo collection |
| Transport risk | Raw-sale journey | Additional finished-cargo journey |
| Crafting quality | Quality remains relevant | Input quality is retained through current refining |
Refining is not automatically more profitable. A higher sale price can be outweighed by losses in processing yield, hauling expenses or cargo risk.
How to Refine Ore in Star Citizen
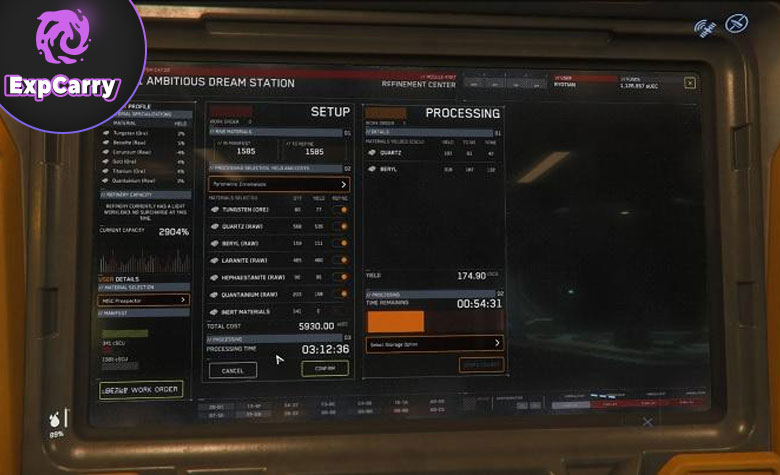
Refinery work orders are created at dedicated processing terminals. The terminal must recognize the mining ship, compatible mining container or supported station inventory holding the raw material.
- Travel to a station with an operational Refinery Deck.
- Store the mining ship or make compatible mining bags accessible in station inventory.
- Open the refinery processing terminal.
- Select the recognized material source.
- Review the available minerals and select the intended processing contents.
- Compare refinery methods by yield, speed and price.
- Check mineral-specific station modifiers.
- Review the estimated finished quantity, fee and processing duration.
- Submit the work order and pay the displayed cost.
- Allow the job to finish, including while offline.
- Return to the same refinery.
- Assign finished materials to a compatible cargo ship and verify the collected cargo.
Alpha 4.2 introduced the ability to refine supported material inside mining bags stored in station inventories. This does not make every loose commodity box an eligible refinery source. Before confirming an order, inspect the materials included: depending on the source and interface, excluded unwanted contents may not be recoverable after submission.
What to Check Before Submitting a Refinery Order
A work order should be evaluated before its fee is paid, especially when the load contains valuable or high-quality resources.
- Exact mineral and raw quantity.
- Material quality when crafting is intended.
- Expected refined output and processing yield.
- Refinery fee in aUEC and estimated completion time.
- Positive or negative station modifiers.
- Refinery workload and available methods.
- Immediate raw-sale value.
- Receiving ship capacity and cargo-container compatibility.
- Intended commodity buyer and transport risk.
For valuable batches, compare multiple processing methods. A faster option makes sense when its shorter waiting time produces a meaningful operational advantage.
Explore services related to this guide, selected from our Star Citizen catalog.
View All Star Citizen Services


Best Refining Methods in Star Citizen
Star Citizen has nine established station refining methods. They differ in processing speed, cost and yield. The categories below follow commonly used refinery reference data; exact in-game quotes are more reliable than old method descriptions or tooltips.
| Method | Speed | Cost | Yield | Practical use |
|---|---|---|---|---|
| Dinyx Solventation | Very slow | Low | High | Valuable ore without time pressure |
| Thermonatic Deposition | Slow | Low to moderate | Moderate | Lower-cost processing with average recovery |
| Kazen Winnowing | Moderate | Low to moderate | Low | Moderate turnaround when recovery is secondary |
| Ferron Exchange | Slow | Moderate | High | Alternative high-yield processing |
| Electrostarolysis | Moderate | Moderate | Moderate | Balanced processing |
| Cormack Method | Fast | Moderate | Low | Fast turnaround |
| Pyrometric Chromalysis | Slow | High | High | Expensive high-recovery processing |
| Gaskin Process | Fast | High | Moderate | Fast processing with reasonable recovery |
| XCR Reaction | Fast | High | Low | Speed-first processing |
The Star Citizen Wiki and UEX refining directory agree on the general method profiles but differ on some relative cost classifications, especially Kazen Winnowing and Thermonatic Deposition. Treat these labels as approximations and check the real work-order fee.
Best Refinery Method for Maximum Profit
Dinyx Solventation is usually the first method worth comparing for valuable ore when high yield and low cost matter more than speed. Its very slow processing is less troublesome when work orders can run overnight or while the player is offline.
Dinyx is particularly useful for high-value loads, non-urgent commodity sales and crafting batches where retaining more of the desired material is important. However, maximum yield does not guarantee maximum net profit if another method offers a better overall result.
Best General High-Yield Method
Ferron Exchange is another high-yield option with a moderate-cost profile. Compare it directly with Dinyx using the terminal's fee, output and completion estimate rather than assuming it always takes a fixed number of hours.
Best Fast Method
Gaskin Process combines fast processing with moderate yield, although its fees are high. Cormack Method provides fast processing at moderate cost but low yield, while XCR Reaction sacrifices yield and cost efficiency for speed.
Fast methods become most useful when completing a job earlier enables another profitable activity or an urgently needed material transfer.
Is Pyrometric Chromalysis the Fastest High-Yield Method?
No. Pyrometric Chromalysis is generally classified as slow, expensive and high-yield. It can be useful when the actual fee is acceptable, but it should not be chosen on the assumption that it provides the fastest high-yield processing.
Refinery Bonuses Explained
Refinery locations have material-specific yield modifiers. One station can offer a bonus for a particular mineral while another provides a smaller bonus or a penalty. These modifiers can change the finished quantity, but the terminal's quoted output should be used rather than manually applying a bonus twice.
Current Refinery Bonus Examples
The following selected values are reported in third-party Alpha 4.10.2 refinery data. They are useful route-planning references, not guaranteed independent additions to every completed order.
| Material | Refinery | Reported yield modifier |
|---|---|---|
| Titanium | MIC-L5 Modern Icarus | +13% |
| Bexalite | MIC-L5 Modern Icarus | +12% |
| Borase | MIC-L5 Modern Icarus | +9% |
| Iron | MIC-L5 Modern Icarus | +8% |
| Gold | ARC-L2 Lively Pathway | +7% |
| Taranite | Levski | +8% |
| Quantainium | Levski | +5% |
The SCMINER refinery directory provides station comparisons. Confirm the displayed multiplier and expected quantity inside the game before paying for a job.
How to Choose the Best Refinery
The highest mineral bonus does not automatically produce the best overall route. Consider distance from the mining location, refinery fees, workload, fuel costs, local security, finished-cargo buyer locations and the availability of a suitable hauling ship.
A nearby refinery with a smaller bonus can be more efficient than a distant station if additional travel and risk consume the value of the improved yield.
Star Citizen Refinery Locations
Refinery facilities are available in Stanton, Pyro and Nyx, but not every station or landing zone supports standard refinery work orders. Facility lists can also differ between community databases, so confirm that a location currently has an accessible processing terminal.
Stanton Refinery Locations
Stanton provides an established network for recurring mining and cargo operations.
| Region | Refinery location |
|---|---|
| ArcCorp | ARC-L1 Wide Forest Station |
| ArcCorp | ARC-L2 Lively Pathway Station |
| ArcCorp | ARC-L4 Faint Glen Station |
| Crusader | CRU-L1 Ambitious Dream Station |
| Hurston | HUR-L1 Green Glade Station |
| Hurston | HUR-L2 Faithful Dream Station |
| microTech | MIC-L1 Shallow Frontier Station |
| microTech | MIC-L2 Long Forest Station (listed by some refinery databases) |
| microTech | MIC-L5 Modern Icarus Station |
| Gateway | Pyro Gateway |
| Gateway | Magnus Gateway |
| Gateway | Terra Gateway |
| Gateway | Nyx Gateway (listed by some Alpha 4.10.2 databases) |
MIC-L1 and MIC-L5 are useful hubs for microTech miners, while the ARC-L stations support ArcCorp routes. MIC-L5 has favorable recorded modifiers for Bexalite and Titanium. Some current directories also list MIC-L2 and the Stanton-side Nyx Gateway; verify their available refinery services before relying on them.
Pyro Refinery Locations
Pyro allows industrial players to process supported materials without automatically returning to Stanton. Reported facilities include Orbituary, Checkmate Station, Ruin Station, Stanton Gateway and Nyx Gateway.
Security, cargo exposure and access to suitable buyers are particularly important. A nearby refinery may offer a better result than an intersystem trip for a marginal yield improvement.
Nyx Refinery Locations
Nyx includes industrial processing at Levski, along with reported refinery facilities at Pyro Gateway and Castra Gateway. Levski offers positive recorded modifiers for several resources, including Taranite, Iron and Quantainium.
Check the actual work-order quote and your intended cargo route before deciding whether to process or sell material locally.
Does Area18 Have a Refinery?
Area18 is primarily a commodity trading destination rather than a standard refinery work-order location. ArcCorp miners can refine at compatible ARC-L stations and deliver accepted commodities to the Area18 Trade and Development Division.
Does Lorville Have a Refinery?
Lorville is useful for commodity sales through its Central Business District. Standard mining work orders in the Hurston region are normally processed at refinery-capable stations such as HUR-L1 and HUR-L2.
Does New Babbage Have a Refinery?
New Babbage is a major trading destination, not the usual refinery work-order location. MIC-L1 and MIC-L5 are established processing alternatives in the microTech region.
Does Orison Have a Refinery?
Orison has commodity trading facilities, but standard Crusader refining is normally performed at a suitable station such as CRU-L1. Confirm that the intended Orison buyer accepts the finished material.
Refinery Workload and Why It Matters
Refinery workload can influence work-order planning alongside processing method, station modifiers and transport requirements. Use the actual estimated completion time rather than a fixed multiplier taken from an old spreadsheet.
Compare the processing fee, finished quantity, waiting time and total travel route. A slightly less favorable station may still be more efficient if it is substantially closer to your mining area or buyer.
Refining Time and Offline Work Orders
Refinery orders process in real time while the player is logged out. This allows long-duration processing to run between mining sessions instead of requiring continuous active gameplay.
Best Overnight Strategy
Submit high-yield, slow-processing jobs near the end of a session. Dinyx Solventation is useful when the final material is valuable and immediate collection is unnecessary.
Best Same-Session Strategy
Compare Gaskin, Cormack and XCR when the material is needed within the same session. Check whether the quicker completion outweighs higher fees or reduced material recovery.
Do Refinery Jobs Survive Patches?
Do not assume refinery work orders survive a patch. Alpha 4.10.2 officially preserved Long Term Persistence, but that does not guarantee unfinished industrial jobs will carry over. Community persistence tracking specifically reports that refinery jobs were lost during the 4.10.2 transition.
Before a scheduled deployment, finish and collect valuable orders where possible. Avoid starting expensive long-duration jobs immediately before an update, even if no full account wipe is announced.
Material Quality and Refining
Material quality matters for crafting. Current refining retains the quality of eligible raw resources while processing yield determines the amount of finished material. Refining should not be treated as a way to upgrade low-quality ore into high-quality material.
Blueprints can differ in required resource types, quantities and how input quality affects the crafted result. Do not assume every blueprint enforces a fixed minimum-quality threshold.
For example, high-quality Iron can be more useful for a quality-sensitive crafting project than low-quality Iron, even when both are accepted as material inputs. Separate batches of differing quality may also require additional storage and cargo handling.
Before submitting a crafting batch, confirm the exact resource, target quality, required amount, expected refinery yield and blueprint behavior. The Star Citizen Mining Resources catalog provides further material context, but the actual in-game blueprint remains authoritative.
Can You Refine Construction Materials?
Yes. Alpha 4.3.2 introduced refining for supported raw Construction Materials recovered through salvage. These raw structural salvage inputs must be distinguished from already processed Construction Materials and from Recycled Material Composite (RMC).
The standard process is to obtain supported raw salvage material, place it in an eligible source, select that source at a refinery terminal, choose a processing method, review the output and fee, submit the work order and collect the finished Construction Materials for sale or supported use.
Different raw salvage forms can have different recovery behavior. Do not assume every commodity box labeled Construction Materials needs refining, or that every salvage product is an accepted refinery input. See the relevant Star Citizen industrial guides for the wider salvage economy.
Raw vs. Refined Ore Profitability
Compare net economic value rather than the largest displayed commodity price. Mining expenses are part of both choices, while refining adds fees, delays and another cargo journey.
Raw-Sale Calculation
Raw net value = raw sale revenue − mining operating costs. This option avoids processing fees and the collection stage, making it useful when immediate aUEC or a quick turnaround is the main priority.
Refined-Sale Calculation
Refined net value = refined commodity revenue − refinery fee − mining operating costs − additional hauling costs − expected transport losses.
Additional refining margin = refined revenue − raw sale revenue − refinery fee − additional hauling costs.
Include the possibility of cargo loss and buyer demand restrictions when planning a valuable shipment. A longer route to a slightly better buyer is not always the most profitable choice.
Star Citizen Refinery Calculator Logic
A useful refinery calculator combines the work-order quote with current commodity prices and the real logistics of transporting the finished output.
| Input | Why it matters |
|---|---|
| Raw sale value | Immediate alternative to refining |
| Expected refined quantity | Finished material available |
| Buyer price | Estimated commodity revenue |
| Refinery fee | Direct processing expense |
| Transport costs | Additional fuel and logistics |
| Processing duration | Collection timing |
| Cargo capacity | Number of trips and physical compatibility |
| Buyer demand | Potential sales restrictions |
| Route risk | Possible losses or delays |
Estimated refined return = (refined SCU × buyer price per SCU) − refinery fee − additional hauling costs.
Compare this with the immediate raw-sale option. Do not apply a station bonus again if the refinery terminal already includes it in the predicted output. The VerseToolkit Refinery Tool can help organize comparisons, but verify the age of its market data.
Collecting Refined Ore
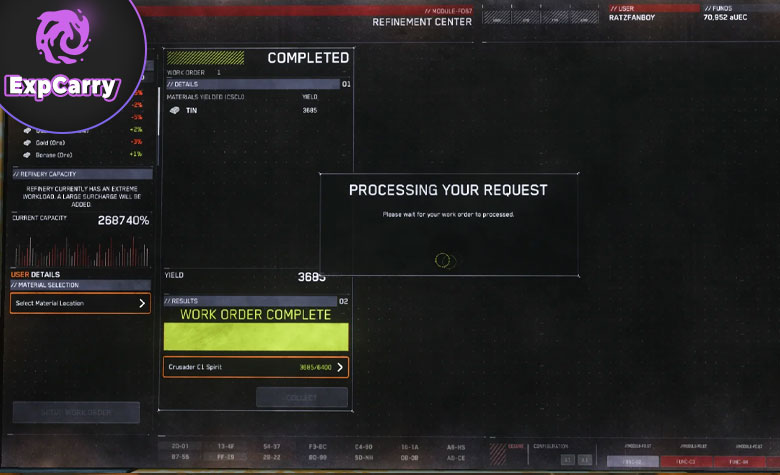
After an order finishes, return to its original refinery and transfer the processed materials to a compatible cargo ship.
- Return to the refinery containing the completed order.
- Bring a cargo ship with sufficient capacity.
- Store the ship correctly through the available ASOP interface.
- Open the refinery work-order terminal.
- Select the completed order and intended receiving ship.
- Check the ship's available cargo capacity and container compatibility.
- Confirm the transfer.
- Retrieve the ship and inspect the physical cargo.
- Verify that the expected material is present before departing.
Check the ship's exact identity and storage state before collection. A completed load that exceeds one ship's capacity requires an appropriate larger ship or a supported multi-ship collection arrangement.
How Refinery Cargo Interacts With Freight Elevators
The normal refinery collection interface assigns finished output to a cargo ship. A freight elevator separately connects physical containers with station warehouse inventory. It should not be assumed that every refinery order can be sent directly to a freight elevator.
To move cargo from a ship into station storage, position the ship in a suitable hangar, move the physical containers onto the freight elevator using supported tractor equipment, snap them to the platform grid, then use Freight Manager to lower and store them. To retrieve stored containers, select them in Freight Manager, raise the platform and load them into the ship.
This separation matters when consolidating multiple orders or changing cargo vessels. For detailed cargo handling, see the Star Citizen Freight Elevator Guide.
Freight Elevator and Cargo Collection Problems
Refinery cargo can be affected by incorrect ship storage states, missing physical containers or freight-elevator synchronization problems. Alpha 4.10.2 fixed several cargo and elevator issues, but those fixes do not guarantee that every possible problem has disappeared.
If finished cargo is missing, confirm the receiving ship, ASOP state, cargo grid and selected work order. Avoid repeating an expensive transfer without understanding the issue. Community reports suggest that properly storing the receiving ship before collection can help, but this is not a guaranteed repair procedure.
Use the official Alpha 4.10.2 Known Issues page and current Issue Council reports for unresolved problems.
How Much Cargo Space Do You Need?
Required cargo capacity depends on the completed refined quantity, the number of work orders and the physical size of the resulting containers. Nominal ship SCU alone does not guarantee that every container will fit through its loading path.
| Operation | Practical cargo approach |
|---|---|
| One small mining batch | Small compatible cargo ship |
| Regular Prospector mining | Suitable small or medium hauler |
| Several Prospector orders | Medium or larger vessel matched to total output |
| MOLE crew production | Dedicated cargo ship sized for collected batches |
| Organization-scale industry | Separate mining, processing and cargo roles |
Common hauling choices include the Nomad, Cutlass Black, C1 Spirit, Freelancer, Zeus CL, Constellation Taurus, Caterpillar and Hercules variants. Select the ship according to actual cargo-grid access, container dimensions and the number of required trips.
Where to Sell Refined Ore
Refined ore is sold at commodity trading terminals that accept the specific processed material. Common destinations include Area18, Lorville, New Babbage and Orison, but their accepted commodities, prices and demand can differ.
Major Refined Ore Buyers in Stanton
Common trading locations include Area18's Trade and Development Division, Lorville's Central Business District, New Babbage's TDD in the Commons and Orison's TDD at Cloudview Center.
Check the exact commodity before traveling. A raw ore-sales terminal is not automatically a buyer for the finished refinery output.
Before Leaving the Refinery
Confirm buyer acceptance, reported selling price, data freshness, available demand, route safety, fuel and available cargo space. When possible, compare several buyers instead of choosing solely by the largest reported price.
Community trade listings are reference data, not guaranteed transaction quotes for every server or time.
Profitable Refinery Route: Bexalite From MIC-L5 to New Babbage
Processing Bexalite at MIC-L5 Modern Icarus and selling at New Babbage provides an example of a refinery route that stays within Stanton. MIC-L5 has a reported +12% Bexalite yield modifier, while community reports from October 10, 2026, show a New Babbage TDD selling price of approximately 29,000 aUEC per SCU.
These figures are not fixed rewards. Actual recovery, fees, selling price and available demand must be checked in the game.
Step-by-Step Bexalite Refinery Route
A Prospector pilot can use this route when suitable Bexalite deposits are accessible within a reasonable distance of the microTech processing network.
- Prepare the Prospector with suitable mining equipment.
- Locate workable Bexalite deposits and evaluate concentration and mining difficulty.
- Extract valuable material without unnecessarily filling storage.
- Travel to MIC-L5 if its current modifier and route remain favorable.
- Select Bexalite at the refinery terminal.
- Compare Dinyx Solventation and Ferron Exchange.
- Review the fee, output and completion time before submitting.
- Return with a suitable hauler after processing.
- Check New Babbage TDD demand and pricing.
- Deliver and sell the finished commodity.
Another refinery may be better if the mining site is far from MIC-L5 or if the intended buyer has unfavorable conditions.
Example Bexalite Profit Calculation
Consider an illustrative completed load of 20 SCU of refined Bexalite sold at the reported reference price of 29,000 aUEC per SCU.
20 × 29,000 = 580,000 aUEC gross sale value.
This is not a guaranteed output for one Prospector run. Actual net profit must subtract refinery fees, mining expenses, hauling costs and potential losses. Compare the result with the real raw-sale offer before treating the route as profitable.
When to Choose a Different Route
Gold mined closer to ArcCorp may favor an ArcCorp refinery. Taranite acquired in Nyx may be better processed at Levski. Low-value ore may be more efficient to sell raw, while high-quality crafting resources may be worth retaining.
The best route is the one that matches the material actually collected and offers a favorable net return without unnecessary transport risk.
Best Refinery Strategy for Prospector Mining
Solo Prospector pilots benefit from a repeatable mining region, a nearby refinery hub and organized collection of finished orders.
- Choose a familiar mining region.
- Identify a primary refinery and an alternative.
- Prioritize useful minerals and crafting quality.
- Check the station modifier and actual terminal quote.
- Compare Dinyx, Ferron and faster alternatives.
- Submit slow jobs before ending a session.
- Record each order's station and completion time.
- Collect multiple completed jobs when practical.
- Use a compatible cargo ship.
- Confirm the selling destination before departure.
Pay attention to mining-bag capacity and the storage system. Standard Prospector storage should not be confused with capacities possible through compatible replacement containers.
Best Refinery Strategy for MOLE Crews
A MOLE crew can produce larger batches, making refinery coordination, cargo collection and profit distribution more important.
Record the station, material, quality, raw amount, chosen method, processing fee, expected refined quantity, completion time, receiving ship, intended buyer and crew profit arrangement.
When enough operators are available, separate mining from hauling. This reduces interruptions and allows completed orders to be collected while the mining crew continues working. Always match finished output to actual cargo capacity.
Future Refinery Ships
Station refining remains the established processing option for current mining operations. The MISC Expanse, RSI Galaxy with its Refinery Module and RSI Orion are associated with planned onboard refining capabilities.
Do not plan a LIVE industrial route around an unreleased ship or an onboard refinery feature that is not currently operational. Future refining mechanics, including more complex material recipes, should remain separate from the confirmed station workflow.
Common Refinery Mistakes
Most costly refinery errors result from choosing the wrong processing method, ignoring collection logistics or relying on outdated patch information.
Using the Same Method for Every Load
Compare the actual yield and fee for each batch. A method suited to valuable Quantainium may be inefficient for low-value ore.
Using an Outdated Refining-Method Chart
Community references and some in-game descriptions can disagree. Use the current work-order quote for practical decisions.
Ignoring Refinery Bonuses
Material-specific station modifiers can meaningfully change the expected finished quantity.
Flying Across the System for a Tiny Bonus
Extra fuel, travel time and cargo exposure may outweigh a small improvement in yield.
Refining Low-Value Material Automatically
Check whether the additional finished value exceeds refinery fees and transport expenses.
Starting Long Jobs Before a Major Patch
Unfinished refinery orders may be lost during deployment even when Long Term Persistence is preserved.
Submitting Jobs at Too Many Refineries
Scattered orders increase collection time and make it easier to forget completed materials.
Collecting Without Enough Cargo Space
Verify finished SCU and physical container dimensions before assigning the receiving ship.
Confusing Refinery Collection With Freight Elevator Storage
Standard work-order collection assigns output to a ship. Warehouse and freight-elevator transfers are separate cargo operations.
Ignoring Ship Storage State
Confirm the correct receiving ship is stored and recognized before transferring valuable output.
Choosing the Buyer After Loading
Check accepted commodities, prices and demand before exposing the finished cargo to another journey.
Applying a Refinery Bonus Twice
Do not add a station modifier again when it is already included in the terminal's finished-output estimate.
Ignoring Material Quality
High-quality material may have crafting value beyond its ordinary commodity selling price.
Star Citizen Refinery FAQ
The following answers summarize common practical questions about refinery processing and finished cargo.
What is the best refining method in Star Citizen? Dinyx Solventation is a strong high-yield, low-cost choice when waiting is acceptable. Ferron Exchange offers another high-yield option.
Does refining continue while offline? Yes. Work-order timers progress in real time while the player is logged out.
Can refined ore go directly to a freight elevator? Do not assume so. Standard refinery collection uses a compatible cargo ship, while freight elevators manage separate physical cargo transfers.
Where should I sell refined ore? At a commodity terminal that buys the exact refined material. Check current price and demand before transporting it.
Final Refinery Checklist
Check these points before submitting a work order or starting a valuable cargo delivery.
- Identify the exact raw material.
- Check quality when crafting is relevant.
- Compare station-specific mineral modifiers.
- Compare Dinyx, Ferron and faster refining methods.
- Verify the actual processing fee, time and output.
- Compare refining against immediate raw selling.
- Record the station and completion time.
- Prepare enough compatible cargo space.
- Verify the buyer, price and demand.
- Protect the finished cargo during delivery.
The most effective refinery strategy maximizes net value, not simply the highest displayed processing yield. A high-yield method is useful only when its cost, processing time, station bonus and hauling route produce a favorable final result.
For the stages before refining, consult the Star Citizen Mining Guide and Best Ore Guide. The Star Citizen Mining Resources catalog provides additional context for individual materials and crafting-related resource choices.