WARDOGS Sabatulo is the first proper city battlefield in the game, and it changes how infantry should approach a fight. Instead of running across open terrain, you have narrow streets, apartment blocks, courtyards, upper floors, and destructible buildings between your squad and the objective. The central hospital, power station, swimming pool, and river embankment are the main landmarks to learn. Sabatulo launched with Season 3 and Update 0.3.0 on November 12, 2026, and is now playable on live servers. The big mistake is treating the shortest road to an objective as the safest route. A straight push may expose your squad to several floors of enemy fire, while a longer approach through usable buildings can offer better cover. This guide explains how to approach the hospital, work around the power station, move along the river, and choose between streets and buildings without inventing unverified shortcuts or fixed enemy positions.
Short answer: On Sabatulo, use buildings and courtyards to approach contested objectives, clear elevated positions before crossing exposed streets, and keep a fallback route behind your squad. The hospital rewards coordinated room clearing, the power station requires careful checks of its surrounding approaches, and the river embankment is risky when enemies control higher ground.
WARDOGS Sabatulo Map Overview and Important Locations
Sabatulo is a dense urban battlefield built around vertical combat and destructible cover. BULKHEAD confirmed the map in its official Season 3 patch notes, describing narrow streets, high-rise buildings, the central hospital, swimming pool, power station, and river embankment. The city offers a different kind of fight from the more open terrain on earlier maps, with infantry able to use interiors and upper floors instead of relying entirely on vehicles or distant firing positions.
The important thing is not memorizing one route from headquarters. WARDOGS uses a Control Zone that can appear in four different positions on Sabatulo between matches, so the relevant approach depends on where the current objective sits. Sabatulo also has plenty of destructible structures, meaning a street or building that provided cover earlier may become exposed after sustained fighting. Check your in-game map when you spawn, identify the nearest useful buildings, and plan the final approach around the current situation.
| Location | Confirmed terrain | Main threat | Approach priority |
|---|---|---|---|
| Central Hospital | Multi-level hospital with corridors, wards, and an Emergency entrance | Fire from upper floors and multiple indoor angles | Secure the surrounding approach before clearing the building |
| Power Station | Named industrial landmark on Sabatulo | Potential exposure when approaching a defended position | Check nearby cover and enemy sightlines before advancing |
| River Embankment | Riverfront terrain bordering the urban battlefield | Fire from elevated positions overlooking exposed movement | Use available riverfront cover and avoid prolonged exposure |
| Swimming Pool | Indoor pool complex with a damaged roof and surrounding open areas | Exposed movement around the complex | Check the building and nearby observation points before crossing |
| Residential Blocks | Apartment buildings, courtyards, and narrow passages | Windows, balconies, and short-range ambushes | Advance between confirmed accessible buildings |
The landmarks are confirmed, but that does not make every nearby street a verified safe route. Public community maps provide useful orientation, including the Sabatulo interactive map, although its plotted objectives and route details should be checked against the current match. Do not assume that a building shown on an overhead map has an accessible interior or that two courtyards connect simply because their roofs appear close together.
How the Control Zone Changes Your Route
WARDOGS revolves around three teams competing for a Control Zone, not capturing one permanently fixed building on every map. The official WARDOGS Steam overview explains the randomized Control Zone system and how holding the relevant area contributes toward winning the match. That means the hospital might be central to one engagement but less important when the current fight is elsewhere.
Before deploying, look at the active Control Zone and your available spawn locations. Decide whether you need to reach the objective itself, secure a supporting building, or stop an enemy squad moving into the area. A useful route gets your team into a position that matters for the objective, not simply to the most recognizable landmark.
How to Read Sabatulo Before Moving Out
Check three things before leaving cover. First, identify the objective and the likely direction of enemy movement. Second, look for usable buildings or courtyards that reduce the distance you must travel in the open. Third, choose a fallback position in case the next street is covered by an enemy squad. With three factions on the battlefield, winning a fight against one team does not mean your rear is clear of the other.
Do not follow a supposed universal hospital-to-power-station shortcut without checking the actual map. The available public material does not establish a complete street-by-street route between all landmarks. The approach plans below are tactical decisions to apply to confirmed terrain, not invented navigation coordinates.
Sabatulo Infantry Approach Routes and Streets to Avoid
The safest approach is usually the one that reduces the number of directions from which enemies can shoot you. On Sabatulo, that often means using the edge of a residential block, checking the next courtyard, and crossing only the exposed section needed to reach your objective. A wide road may look convenient on the map, but it becomes a bad route when several apartment windows overlook it.
Buildings are not automatically safe either. An uncleared stairwell can turn a good flank into a trap, and a destroyed wall can expose a previously protected room. Use the table below as a practical route decision scheme for the current match rather than a fixed drawing of streets that have not been independently mapped.
| Destination | Preferred approach when available | Exposed approach to avoid | Final check |
|---|---|---|---|
| Hospital | Accessible residential cover followed by a coordinated building entry | Direct movement across an open hospital frontage under occupied windows | Emergency entrance, adjacent windows, and internal stairwells |
| Power Station | A covered approach using verified nearby structures or terrain | Running directly toward the landmark without checking its surroundings | Current enemy positions and available withdrawal route |
| River Embankment | Use the closest available cover before moving along the waterfront | Long movement across an exposed stretch beneath enemy-held high ground | Elevated sightlines and any confirmed crossing point |
| Residential District | Move between accessible interiors and covered courtyards | Repeatedly crossing the same open street while enemies watch upper floors | Windows, balconies, stairwells, and rear approaches |
| Swimming Pool | Approach from available building cover and secure the exterior first | Charging across an exposed car park without checking surrounding positions | Pool hall interior and overlooking structures |
A simple way to manage these routes is to move in stages. Reach the last reliable cover, stop and check the next exposed gap, cross while teammates watch the relevant angles, and regroup inside the next defensible position. If that position has been destroyed or occupied, reassess rather than forcing the same route. The goal is to avoid giving opponents an easy line of sight on your entire squad at once.
Which Streets Should You Avoid on Sabatulo
Be especially cautious with wide streets beneath occupied apartment blocks, uncovered approaches to the hospital, open ground around the swimming pool, and riverfront sections overlooked from higher positions. These are risk categories, not a verified list of named streets. A road is dangerous because of who controls its angles, not because the map contains a permanently unsafe location.
Watch how often teammates get shot while using a particular crossing. If several players are dropping in the same gap, do not immediately join the queue. Look for another accessible approach, identify the firing position, or wait until your squad can challenge that angle. A slightly longer route through cover is usually preferable to repeatedly losing expensive infantry kits on the same exposed approach.
When Should Infantry Move Through Buildings Instead of Streets
Use building routes when the interior is accessible, the next exit has been checked, and the route removes an exposed street crossing. The strongest reason to enter a building is not simply that it has walls. It is that the walls interrupt enemy sightlines while allowing the squad to reach a useful position.
Streets can still be the better option when an interior is heavily defended, destroyed, blocked, or forces the squad through an obvious chokepoint. A route through three uncleared stairwells may be slower and more dangerous than a short, protected street crossing. Check the actual geometry instead of assuming that indoor movement always wins.
Sabatulo Hospital Guide and Best Infantry Approach
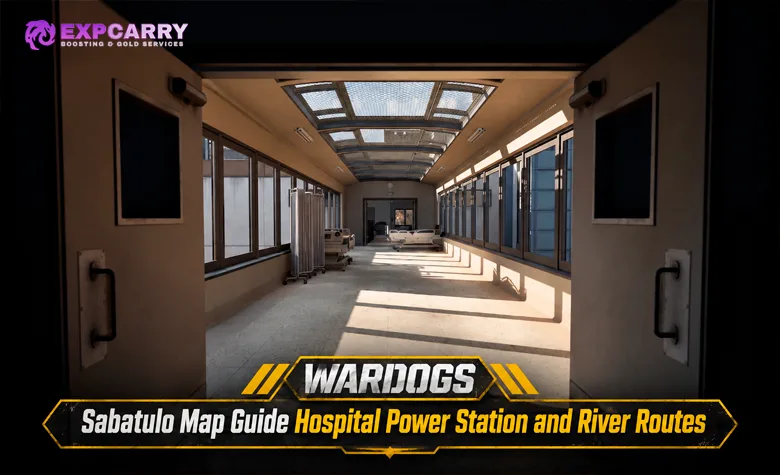
The central hospital is one of the most distinctive locations on Sabatulo. It has a recognizable Emergency entrance and a substantial interior with corridors, hospital wards, and multiple levels. Player footage from the first days of Season 3 confirms the building is more than an exterior landmark. It contains usable indoor spaces that create opportunities for close-range fights, vertical movement, and defenders watching approaches from above.
A documented live Sabatulo match from November 13 includes screenshots of the Emergency entrance, a hospital stairwell atrium, and a ward corridor. Those images establish the appearance of these areas in Update 0.3.0, but they do not by themselves provide a tested route through every entrance or a guaranteed safe path to the upper floors.
Approaching the Hospital Emergency Entrance
The Emergency entrance is easy to recognize, making it a useful callout for squads. It is also an obvious place for enemies to watch. If your team approaches along the front of the hospital, check the surrounding windows and nearby cover before committing to the entrance. Moving straight toward the doors without checking the upper levels gives defenders time to spot your squad and prepare for the push.
Use the available surroundings to stage the assault rather than bunching everyone at the doorway. Have one player watch the exterior while the entry group checks the immediate interior. Once the squad crosses into the building, the player covering the street should be ready to move or reposition instead of staying exposed outside indefinitely.
Clearing Hospital Corridors and Wards
The hospital interior shown in the live match contains long corridors, rooms with beds, and areas connected to a stairwell atrium. These features create several angles that need checking before a squad can treat a floor as secure. Long corridors are especially awkward because they invite both sides to hold a straight firing lane, while rooms along the sides can hide threats that are not visible from the entrance.
Keep the squad close enough to support one another without stacking everyone in the same doorway. Clear the next immediate threat before entering deeper into the floor, and avoid having every player aim toward the same end of the corridor. One teammate should remain aware of side rooms and any route leading back into the area you just cleared. Moving room to room is slower than sprinting down a hallway, but it reduces the chance of being caught by an enemy you ran past.
Upper Floors and the Hospital Atrium
Upper floors can give defenders useful views of the hospital frontage and surrounding city. The live match screenshots also confirm an atrium with an elevated interior section, so threats are not limited to the floor directly ahead of you. Watch both the upper angles and the lower approaches when moving through these spaces.
Do not rush up a stairwell simply because the bottom appears empty. An opponent holding the upper landing may already be aiming at the first visible part of the staircase. Coordinate the move, keep track of where your teammates are positioned, and avoid exposing the entire squad on one narrow route. If the upper floor is heavily defended, controlling a lower floor and cutting off movement may be more useful than repeatedly forcing the same stairs.
Defending the Hospital Without Getting Surrounded
Holding a room with good visibility is useful only while the squad can protect its entrances and move to the current objective. A defender watching the road can easily miss opponents entering from another direction, particularly when the fight spreads through multiple floors. Assign responsibility for the exterior approach, interior movement, and nearby stairwells instead of having everyone camp the same window.
Destruction makes permanent defensive setups less reliable. If a wall or section of cover is damaged, reassess the position rather than continuing to use it as though nothing changed. The best hospital defense preserves a route for reinforcements and a fallback when another faction starts pushing the building.
Explore services related to this guide, selected from our Wardogs catalog.
View All Wardogs Services


Sabatulo Power Station Guide and Approach Planning
The power station is one of the landmarks confirmed in BULKHEAD's Season 3 announcement. It gives squads a recognizable destination when organizing movement across the city, but its detailed interior layout and precise approach streets have not been established by the available official material. That makes the current in-game map and direct observation more important than memorizing an unverified entrance route.
When moving toward the station, identify the last piece of reliable cover before the objective and check whether enemies have a clear view of the approach. If the nearby terrain offers accessible structures, use them to break up the movement. If it does not, coordinate the crossing rather than sending individual players forward without support.
How to Approach the Power Station with Infantry
Begin by checking where the Control Zone and active fight sit relative to the power station. If the station is inside the contested area, your squad may need to clear its surroundings before moving closer. If it is outside the zone, occupying nearby cover might be sufficient to observe an enemy approach or support movement toward the actual objective.
Do not assume the closest road is the best entry. Look for an approach that minimizes exposure to the areas enemies are currently holding. Where usable buildings or terrain cover exist, move between them and stop before the final exposed section. The exact entrances and connected passages still need a verified live map capture before they can be recommended as fixed routes.
Defending the Power Station Area
A defensive squad should watch the approaches that enemies can actually use rather than spreading across every possible direction. Keep one player aware of movements outside the immediate position and preserve a route for friendly reinforcements. If the area becomes a main objective, prioritize controlling useful firing angles and keeping opponents from moving into the Control Zone uncontested.
A static position loses value when enemies can simply move around it. Be prepared to reposition as the fight changes, especially when another faction starts pressuring the same area. Without confirmed interior diagrams, it would be misleading to prescribe a particular power station roof, doorway, or room as the strongest defensive position.
Sabatulo River Embankment Routes and Exposed Crossings
The river embankment gives Sabatulo another type of terrain beyond narrow streets and building interiors. Instead of concentrating only on corners and doorways, infantry must also watch elevated sightlines overlooking the waterfront. Movement can become risky when a squad is exposed along the river while opponents occupy higher ground or nearby buildings.
For players attempting to reach the city from a riverfront position, the objective is to minimize the time spent in open terrain before entering reliable cover. For players moving along the embankment, the same principle applies in reverse. Follow the terrain that actually protects you from the current enemy positions rather than assuming that the river creates a safe flank.
Moving Along the Riverfront
Before advancing, check the nearby slopes, buildings, and visible positions overlooking the embankment. If enemies can shoot down onto the route, moving along the river may be worse than taking an interior approach through the city. Do not commit to a long waterfront run without knowing where your squad can leave the exposed section.
Move between confirmed cover points and check the next section before leaving the previous one. If the waterfront is under fire, pull back to useful protection rather than trying to outrun opponents who already have the angle. Avoid standing together in one exposed location while everyone checks the map.
How to Choose a River Crossing
Do not assume every section of the Sabatulo river is crossable or that a visible bank provides an accessible route to the other side. The official screenshots and available published match reports do not establish a verified list of crossing points. Use the current in-game map and direct observation to confirm a crossing before treating it as part of a squad route.
When a crossing is confirmed, assess where the squad will emerge and which enemy positions can see that exit. A crossing becomes a bad idea when opponents can hold the destination while your team is exposed during movement. Choose a route with usable cover on the far side and a clear reason to cross rather than moving across the river simply to create an unexpected flank.
When to Leave the River and Move Through Buildings
Leave the waterfront when the surrounding buildings offer a confirmed, usable route toward the objective and the embankment has become too exposed. The transition matters because entering the city replaces long sightlines with short angles, doorways, and potential enemies above you. A squad that survives the waterfront can still get wiped by charging into the first uncleared building.
Regroup before the transition, check the building entrance, and confirm where your teammates will move next. Once inside, use the same room-clearing discipline as at the hospital. The river is a terrain feature to consider when planning movement, not a guaranteed hidden route into every district.
Residential Blocks and Courtyards as Infantry Flank Routes
The residential districts are among Sabatulo's most useful terrain features for infantry. BULKHEAD's official screenshots show apartment blocks, narrow passages, courtyards, and surrounding urban spaces. These give players more options than the main road, although each building must be checked for accessibility before relying on it for movement.
A courtyard can let a squad regroup out of an exposed street, but it can also become a trap if several surrounding windows overlook it. The advantage comes from how you enter, what you clear, and where you can leave. Do not treat an enclosed courtyard as safe simply because it has walls around it.
Using Narrow Alleys Between Buildings
Alleys can shorten the amount of time infantry spends under direct fire from a main street. They are useful when the next exit is visible and your squad knows what is waiting at the other end. Their weakness is that an enemy can hold a narrow passage with little room for you to move sideways.
Check the exit before the whole squad commits, and keep someone watching the direction you came from. If enemies have already taken the next corner, do not repeatedly rush the passage one player at a time. Reposition or attack from another accessible angle rather than feeding the same defender easy kills.
High Windows and Rooftops
Elevated positions offer observation across roads and courtyards, which is valuable for Recon players and anyone covering a squad advance. Their weakness is visibility. A player who repeatedly fires from the same window gives opponents a predictable position to watch, while a rooftop may expose the player against the skyline.
Use elevation to identify movement and provide support, then reconsider the position after firing. Avoid claiming a rooftop is accessible just because it appears in a screenshot. Some buildings may have limited interiors, and destruction can change which parts remain usable as cover.
Swimming Pool and Surrounding Open Ground
Blue Ridge Swimming Pool is another recognizable Sabatulo landmark. The official preview images show an indoor pool complex with a damaged roof and surrounding exterior areas, including a car park. These features create a useful navigation reference but do not guarantee a protected route through the complex.
If your squad needs to pass the pool, check the surrounding structures before crossing open ground. The pool hall may provide useful cover when accessible, but approaching it blindly can expose you to defenders watching the entrances or nearby open areas. Choose the route based on the active objective rather than making the pool a mandatory stop in every match.
How to Push the Control Zone on Sabatulo
Capturing useful ground and winning the match are not always the same as clearing every building. WARDOGS rewards teams that control the relevant objective, so your squad needs to know whether an attack is creating pressure on the Control Zone or simply pulling players into a side fight. The city makes it easy to become distracted by enemies in windows while the actual objective remains elsewhere.
BULKHEAD's official Season 3 launch announcement confirms that Update 0.3.0 is live. The new map changes the terrain, but the basic three-team objective competition remains part of WARDOGS. Use the current map and objective display rather than treating any building as permanently decisive.
Planning Your First Push
Before a coordinated push, identify the last covered position outside the objective and the route your squad will use if the initial attack fails. A useful division of responsibilities is to have players watching elevated threats while others move toward the objective. Once the entry group reaches the next covered position, the supporting players can reposition without leaving everyone exposed simultaneously.
A Medic should stay close enough to help teammates without being the first player through every contested entrance. Recon players can contribute by identifying occupied windows and watching approaches, while Assault players focus on the immediate fight. The right combination depends on how many teammates are available and what the objective actually requires.
Defending the Objective Against Two Enemy Factions
WARDOGS has three competing factions, which makes tunnel vision especially punishing. A squad can win a fight against one team and immediately get attacked from another direction. On Sabatulo, the combination of streets and building interiors makes it important to monitor both the obvious front and the routes leading into the rear of the position.
Assign responsibilities for nearby approaches rather than having every player watch one street. If the building is no longer useful for controlling the objective, move to a better position instead of defending an empty room. The objective should determine where your squad fights, not the other way around.
How Destruction Changes Safe Routes
Destructible buildings are a major part of the Sabatulo experience. A wall that protects a street crossing at the beginning of the match may no longer provide the same cover later. Conversely, damaged structures can change available visibility and force both teams to reconsider their positions.
Never rely on a route solely because it worked earlier. Check whether the building still blocks enemy sightlines and whether the next interior remains accessible. This also affects defensive setups and logistics. The existing WARDOGS FOB Building Guide explains how to plan protected positions and maintain supply access as battlefield conditions change.
Best Infantry Loadouts for Sabatulo Urban Combat
A map with short streets and accessible buildings gives compact weapons an obvious role, but Sabatulo is not exclusively a close-range battlefield. The hospital, courtyards, elevated positions, and riverfront create different engagement distances. A squad benefits from mixing reliable general-purpose rifles with equipment suited to close fighting and observation.
Season 3 also changed weapon balance, including increased assault rifle and LMG torso damage and improved DMR performance. These are confirmed in the official patch notes, but they do not establish one universally strongest Sabatulo gun. Choose equipment according to the fights your squad is actually taking.
| Role or task | Weapon approach | Best terrain to support | Main priority |
|---|---|---|---|
| Assault | Controllable assault rifle such as AK74 or T-21 | Street crossings and mixed building fights | Reliable hits and manageable replacement cost |
| Medic | Affordable rifle or SMG | Hospital interiors and close squad support | Survivability and access to teammates |
| Recon | Rifle or DMR suited to the engagement | Observed streets and elevated positions | Spotting threats without exposing the whole squad |
| Support | Practical personal-defense weapon | Covered logistics and defensive positions | Supplies, construction, and maintaining useful access |
| Driver | Affordable personal-defense loadout | Transport routes outside the heaviest infantry fighting | Delivering teammates and supplies to useful positions |
Do not overspend on a rifle when most of your contribution comes from spotting, reviving, or logistics. Equipment is purchased with Cash, and repeated deaths on a contested hospital approach can become expensive. For players rebuilding their balance through normal matches, WARDOGS Cash progression assistance concerns the broader in-game economy rather than a guaranteed income route on Sabatulo.
Hospital and Building Combat Loadouts
Use a weapon you can control in hallways and rooms without giving up all ability to fight across the street. An affordable assault rifle is a flexible choice, while an SMG can suit players who spend most of the match clearing interiors. Carry medical supplies appropriate to your role and avoid replacing basic utility with attachments that offer little value in the current fight.
Players who are learning close-range engagements should focus on positioning and supporting teammates before chasing expensive equipment. Practical WARDOGS positioning and squad coaching can address those gameplay fundamentals, including how to approach objectives without repeatedly losing equipment on exposed routes.
Riverfront and Elevated Position Loadouts
A general-purpose rifle is useful when engagements may shift from a building interior to a longer sightline. DMRs can support deliberate shots from suitable positions, but they become awkward if a squad suddenly needs to clear a cramped interior. Choose the weapon around the part of the map you intend to influence rather than the longest sightline visible from one position.
If your current role is developing XP through support or reconnaissance, remember that the weapon is only part of the loadout. The WARDOGS role progression options cover separate XP paths, and the appropriate equipment depends on whether you are primarily spotting, fighting, building, or helping teammates.
Squad Coordination and Transport on Sabatulo
Infantry movement is easier when the squad knows who is watching the approach and who is crossing it. A group that runs down the same street together may be wiped by one well-positioned opponent, while a group that advances between covered positions can maintain pressure without exposing everyone at once.
Transport still matters because reaching the city and moving supplies are separate tasks from clearing the final objective. Sabatulo has denser urban terrain, so a useful transport plan should end at an area where infantry can dismount and approach under cover rather than attempting to drive every player directly into the contested building.
Choosing a Transport Dropoff
Do not choose the nearest street to the objective automatically. A useful dropoff gives passengers space to dismount, reach cover, and move without blocking the vehicle. If enemies are already holding nearby windows or an intersection, unloading directly beneath them may be more dangerous than leaving the vehicle farther away.
Ask the squad to agree on the next covered position before the vehicle stops. That prevents everyone from standing in the road deciding where to go. For players who prefer moving with an experienced teammate, WARDOGS coordinated match assistance covers team-based gameplay rather than a guaranteed shortcut through any particular Sabatulo route.
Where a FOB Helps an Urban Push
A useful FOB supports access to the current objective and allows supplies to reach the position. On Sabatulo, a location can appear protected by buildings while still being difficult for transport vehicles to enter and leave. Check both the infantry approach and the logistics route before investing in construction.
Keep the supply lane usable and avoid creating a straight firing route from an exposed entrance to important structures. The best position is one your team can maintain and use, not simply the closest available space to the hospital or power station. If the Control Zone is elsewhere, a FOB placed only for a famous landmark may become a poor investment.
Common Mistakes on Sabatulo
The biggest mistakes are committing to exposed streets without checking upper floors, treating every building as accessible cover, and following one route regardless of the current Control Zone. Sabatulo rewards map awareness, but it punishes players who assume that a familiar landmark guarantees a safe approach.
Rushing the Hospital Front Entrance Every Time
The Emergency entrance is recognizable, which also makes it easy for defenders to anticipate. Check the frontage and elevated angles first, and avoid sending the entire squad into one obvious entrance without a plan. A coordinated approach with a protected fallback is more useful than repeatedly charging the same doorway.
Watching Street Corners but Ignoring Upper Floors
A street can look empty while opponents watch it from above. Before crossing, check the windows and elevated positions that can see the movement. Continue checking those angles as you advance because an enemy can reposition while the squad is occupied elsewhere.
Treating Every Building as a Shortcut
Not every building has the same interior access, and destruction can alter movement and visibility. Confirm that the intended path is usable before the full squad enters. A route through an uncleared chokepoint may be worse than a shorter street crossing.
Following an Unverified Power Station Route
The power station is a confirmed landmark, but that does not establish a universal safest entrance or a named sequence of alleys leading to it. Use the live map and observed enemy positions before committing. Do not assume a path is safe because it appeared in a promotional screenshot or an older version of a community map.
Moving Along the River Without an Exit Plan
The embankment can become dangerous when enemies control higher positions. Check where you will leave the riverfront and whether the destination provides cover. If the route has no confirmed exit or crossing, do not risk the entire squad just to attempt a flank.
Forgetting About the Third Faction
Winning a firefight against one squad does not mean the area is secure. Another faction may arrive from a different approach while your team is reloading or reviving. Keep someone watching the rear and avoid leaving all nearby entrances uncovered when holding a building.
WARDOGS Sabatulo Map FAQ
These answers cover common questions about the new city map and how to approach its important locations.
When was Sabatulo released in WARDOGS?
Sabatulo launched on November 12, 2026, with Season 3 and Update 0.3.0. BULKHEAD confirmed the release in its official Season 3 announcement.
Is the hospital in the center of Sabatulo?
BULKHEAD describes a central hospital as one of the map's main landmarks. However, the active Control Zone changes between matches, so controlling the hospital is not automatically the objective in every game.
Are there safe shortcuts through Sabatulo buildings?
Accessible interiors, courtyards, and narrow passages can offer covered approaches. Their safety depends on the current enemy positions, destruction, and whether the exits are usable. No universal route is safe in every match.
Can infantry use the river to flank enemies?
The river embankment is a confirmed part of Sabatulo, but specific crossing points and reliable flank routes require checking in the current match. Avoid exposed waterfront movement when enemies control higher ground.
Conclusion
Sabatulo rewards infantry squads that use cover intelligently rather than blindly sprinting toward the objective. Approach the hospital with attention to its entrances, corridors, and upper floors, check available cover before moving around the power station, and avoid exposed riverfront routes without a confirmed exit. Use accessible residential buildings to reduce dangerous street crossings, but keep checking the current Control Zone and the effects of destruction. The strongest route is the one that gets your squad into useful cover with enough players alive to fight for the objective.