Strong defences in Path of Exile 2 do not come from stacking one impressive number. A reliable character combines a large enough Life and Energy Shield pool with damage mitigation, hit avoidance, resistances, recovery, and the ability to move out of attacks that are not meant to be tanked. Armour, Evasion, and Energy Shield solve different problems, while resistances remain essential regardless of which equipment bases a build uses.
This guide explains how those layers interact, how to identify the layer a character is missing, and how to test defensive readiness during the campaign and in the endgame. It is designed as an evergreen framework rather than a list of patch-specific target values. For broader progression help, the Path of Exile 2 guides hub covers campaign systems, skills, the passive tree, and endgame activities.
How PoE 2 Defences Work Together
Every defensive layer has a specific job. Avoidance tries to stop a hit from applying, mitigation reduces damage that gets through, an effective health pool absorbs the remainder, and recovery prepares the character for the next threat. Resistances reduce damage of their matching type and therefore support both Life and Energy Shield builds.
| Defensive job | Common tools | Main question |
|---|---|---|
| Avoidance | Evasion, Block, movement, and Dodge Roll | Can the incoming hit be prevented completely? |
| Mitigation | Armour, resistances, Deflection, and damage reduction | How much damage remains when protection applies? |
| Effective health | Life, Energy Shield, and other build-specific resources | Can the character survive the damage that remains? |
| Recovery | Flasks, regeneration, leech, recoup, and recharge | Can the lost resource return before the next hit? |
| Control protection | Stun threshold, ailment answers, Charms, and positioning | Can the character continue moving and using skills under pressure? |
A defence fails when one of these jobs is missing. A large pool without recovery slowly empties. High Evasion without enough pool or mitigation can die to the hit that gets through. High Armour with weak elemental resistances can still collapse to elemental damage. Capped resistances do not solve heavy physical hits, damaging ground, stuns, or poor positioning.
Hits and damage over time require different answers
A hit applies damage at one moment. Enemy attacks, spells, projectiles, and slams can all hit. A damaging ailment or ground effect can deal damage over time instead. The distinction matters because Evasion checks hits, Armour normally mitigates Physical Damage from Hits, and several Block or Deflection effects also refer specifically to hits.
Damage over time does not become harmless because the character has high Evasion. It needs the relevant resistance, recovery, ailment removal or prevention, and movement out of the source. When reading a modifier, treat words such as Hit, Physical, Elemental, Attack, and Damage over Time as limits on what the modifier can protect against.
Armour: Physical Hit Mitigation
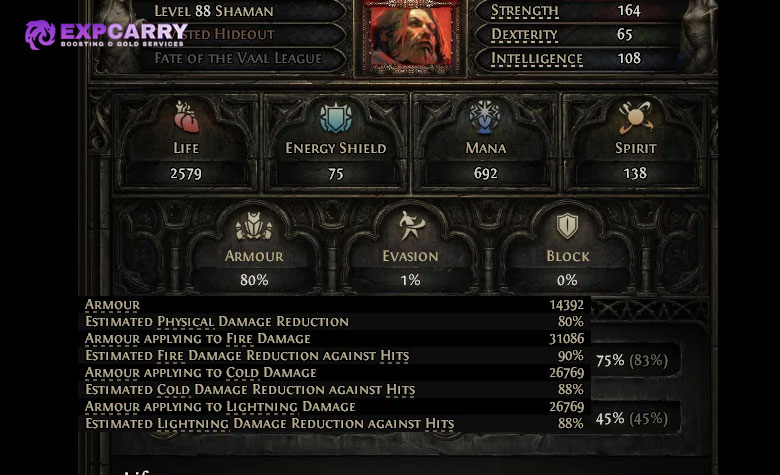
Armour normally reduces Physical Damage taken from Hits. It is consistent because it does not rely on a successful avoidance roll, but the amount of reduction depends on the physical size of the hit relative to the character's Armour. The same Armour is more efficient against smaller hits and less efficient against a large physical slam.
This makes Armour excellent at smoothing repeated physical pressure from packs. It does not mean a heavily armoured character should stand inside every boss wind-up. Large telegraphed attacks still demand movement, and an Armour build still needs enough Life or Energy Shield to survive the damage that remains.
What Armour does not cover by default
Armour does not normally reduce Fire, Cold, Lightning, or Chaos Damage, and it does not normally reduce physical damage over time. Specific passives, items, skills, or other modifiers can make Armour apply to additional damage, but those are explicit build choices rather than properties of base Armour.
The Physical Damage Reduction estimate in the character panel is a useful reference, not a promise that every physical hit will be reduced by that percentage. The estimate needs an assumed hit size, while real enemies deal hits of different sizes. Judge Armour by whether ordinary physical packs feel controlled and whether the character can survive a meaningful physical hit, not by the displayed percentage alone.
How to build and test Armour
Use current Strength-aligned Armour bases, improve their quality when the item is worth keeping, and favor strong local Armour modifiers on the slots that provide most of the base value. Passive increases multiply a better equipment foundation; they cannot turn obsolete low-level bases into strong endgame protection.
Test Armour in content the build can already complete. If many modest physical hits rapidly empty the health pool, inspect equipment bases, Armour scaling, and recovery. If routine hits are controlled but one large slam kills the character, the missing answer is more likely effective health, additional mitigation, or movement than another small Armour increase.
Evasion: Avoiding Enemy Hits
Evasion Rating provides a chance to evade enemy Hits, with the actual result depending on the attacker's Accuracy. A successful evade prevents that hit, so it also prevents consequences that require the hit to connect. A failed evade does not partially reduce the hit. This binary behavior is why Evasion needs a second layer behind it.
Current PoE 2 rules allow player Evasion to work against all hits except boss skills marked by a red flash. That is broader than descriptions found in older guides. The change and the removal of the former Acrobatics Keystone are recorded in the official Content Update 0.3.0 notes. Evasion still does not avoid damage over time.
Make the failed evade survivable
An Evasion character must be able to survive a hit when avoidance fails. Life or Energy Shield supplies the buffer, resistances reduce elemental and chaos damage, and another layer such as Deflection, Block, or suitable damage reduction can make connected hits less severe. Recovery then takes advantage of the gaps created when later hits are evaded.
Do not evaluate Evasion only by how safe a short easy area feels. Test whether the character remains stable when a rare monster survives long enough to attack, when several projectiles overlap, and when a boss forces sustained movement. If a single ordinary hit removes most of the pool, the build needs a stronger backup layer even when the estimated chance to evade looks high.
Red-flash boss skills are a movement check
A red flash identifies a boss skill that bypasses normal Evasion and is specifically unblockable. Treat it as an instruction to reposition, use the available movement window, or Dodge Roll out of the damaging area. Trying to solve that mechanic by adding more Evasion is a category error.
Movement is not a substitute for character defence against ordinary combat, but it is a required layer against telegraphed mechanics. Preserve enough movement speed and avoid skill rotations that lock the character in place for longer than the encounter permits.
Explore services related to this guide, selected from our Path of Exile 2 catalog.
View All Path of Exile 2 Services


Energy Shield: A Buffer with Recharge
Energy Shield protects Life by taking damage first in most situations. It is an effective health resource, not damage reduction: a larger Energy Shield pool allows the character to absorb more damage, but the incoming damage still needs to be reduced by resistances and other mitigation before it reaches that pool.
Lost Energy Shield begins to recharge after the character has gone for a short time without losing Energy Shield. Further loss interrupts recharge and restarts the delay. This creates a natural partnership with Evasion, Block, control, and movement because a gap in incoming damage gives recharge time to begin.
Recharge rate and recharge start solve different problems
Faster start of Energy Shield Recharge shortens the wait before recharge begins. Increased Energy Shield Recharge Rate restores the pool faster after recharge has started. A build under constant pressure may value an earlier start, but neither statistic helps if damage repeatedly interrupts recharge before it can do useful work.
Test recharge during realistic combat rather than in town. After taking damage, can the character create a safe gap and refill before the next dangerous sequence? If not, add avoidance, control, movement, a way to start or protect recharge, or another source of Energy Shield recovery supported by the build.
Energy Shield has specific damage concerns
Chaos Damage removes more Energy Shield than an equal amount of another damage type, so Chaos Resistance remains important. Damage from Bleeding and Poison bypasses Energy Shield and removes Life directly. A character with a large Energy Shield pool but very little Life must therefore understand how the build prevents, removes, or survives those ailments.
Pure Energy Shield, Life and Energy Shield hybrid, and other resource-conversion setups have different gearing and recovery needs. Do not copy a pool target from one archetype into another. Instead, verify the complete chain: relevant damage is resisted, the pool survives a hit, bypass threats have an answer, and the pool can recover during the encounter.
Resistances: Fire, Cold, Lightning, and Chaos
Fire, Cold, Lightning, and Chaos Resistances reduce damage of the matching type. The default maximum for each is 75 percent, although specialized modifiers can raise maximum resistance. A value above the current maximum can still be useful as overcap, but it does not grant additional reduction until an effect lowers resistance or the maximum itself is raised.
Fire, Cold, and Lightning Resistances should be treated as core gearing requirements, not optional bonuses. Chaos Resistance is tracked separately and should be improved as chaos threats become more common. A character panel showing strong Armour, Evasion, or Energy Shield does not compensate for a large hole in one resistance.
Why resistance gaps cause sudden deaths
Resistance changes the remaining fraction of matching damage. At 75 percent resistance, a character takes one quarter of the pre-resistance damage before considering other applicable layers. At 50 percent, the character takes one half. That means the 50 percent character takes twice as much matching damage as the 75 percent character, even though the panel differs by only 25 percentage points.
Campaign progression, debuffs, area modifiers, and equipment swaps can change effective resistance. Recheck the character panel after major progression milestones and after replacing multiple items. For endgame, read every Waystone before opening it and evaluate resistance penalties or penetration together with the other dangerous modifiers.
How to fix resistances without breaking the build
Start with rare equipment slots that are not carrying a mandatory build-enabling property. Rings, amulets, belts, boots, gloves, helmets, and body armour can share the burden. Runes, crafting options, and passive choices can cover a temporary shortfall, but equipment usually provides the long-term foundation.
Do not solve one resistance by replacing a good item and accidentally losing a large amount of Life, Energy Shield, Armour, Evasion, attributes, or another resistance. Compare the whole character before and after the swap. An item is a defensive upgrade only if the complete defensive profile becomes stronger.
| Panel result | Likely risk | Practical response |
|---|---|---|
| One elemental resistance trails the others | Matching enemies and bosses feel disproportionately lethal | Move suffix pressure across several gear slots and use a temporary rune if needed |
| All elemental resistances drop after an upgrade | A damage upgrade has weakened the entire defensive baseline | Keep the old item until the missing resistances are replaced elsewhere |
| Elemental resistances are capped but Chaos Resistance is deeply negative | Poison and chaos encounters can bypass the build's usual comfort | Add Chaos Resistance progressively and maintain a clear Poison answer |
| Resistance equals the cap with no margin | Debuffs or area penalties can push effective resistance below the cap | Build overcap where the content and available gear justify it |
Recovery: Surviving the Next Damage Sequence
Effective health answers whether the character survives one event. Recovery answers whether the character survives the next one. A build can have excellent mitigation and still fail if every moderate hit leaves permanent damage. Recovery must work during the conditions the build actually faces, not only between encounters.
| Recovery method | Strength | Failure condition to test |
|---|---|---|
| Life Flask | Direct, player-controlled Life recovery | Charges, reaction time, and effects that reduce recovery |
| Regeneration | Steady recovery without needing a target | Heavy burst or reduced recovery can exceed the rate |
| Leech | Recovery while dealing supported damage | No target, low damage uptime, or a mechanic that restricts leech |
| Recoup | Returns a portion of eligible Hit damage gradually | It is delayed and does not prevent the initial hit from killing the character |
| Energy Shield Recharge | Strong refill after a damage-free window | Repeated Energy Shield loss keeps resetting the delay |
Use at least one dependable recovery method for the main pool and understand its trigger. A hit-based leech setup needs targets and damage uptime. Recharge needs a safe window. A Life Flask needs charges and a timely press. Regeneration must be large enough to matter against the pressure being tested.
Recovery does not replace maximum hit protection
No recovery method helps after a single event has already reduced Life to zero. If a character dies from full resources to one connected hit, improve the relevant resistance, mitigation, avoidance rule, or effective health pool. If the character survives the first hit but dies while resources remain low, recovery and control are the more likely problems.
This distinction makes death analysis faster. Ask whether the resource globe disappeared at once, drained over time, or failed to refill between several hits. Each pattern points to a different layer and prevents random gear changes that do not address the cause.
Secondary Layers That Complete a Defence
Armour, Evasion, Energy Shield, and resistances form the core of this guide, but secondary layers often determine whether that core works under pressure. Their value depends on the build and current content, so choose layers that cover a known weakness instead of collecting disconnected defensive stats.
Block and Deflection
Block can prevent eligible hits, while active shield use and Parry add their own positioning and timing requirements. Regular hits are broadly blockable under current rules, but red-flash boss skills are specifically unblockable. Check whether a source of Block is passive, directional, or tied to an action before counting it as permanent protection.
Deflection Rating provides a chance to reduce damage from Hits rather than avoiding the hit completely. Because the chance depends on enemy Accuracy, its displayed estimate remains contextual. Deflection is particularly useful as a backup for Evasion because it can soften some of the hits that are not evaded, but it still needs an effective health pool.
Ailments, stun, and movement
Freeze, Shock, Ignite, Poison, Bleeding, and other harmful effects create different problems. Some increase damage taken, some deal damage over time, and some interfere with movement. Charms, item modifiers, passives, and build mechanics can provide prevention, reduced effect, removal, or stronger thresholds. Match the answer to the threat that is actually causing deaths.
Stun can turn a survivable sequence into a death by preventing movement or skill use. If the character repeatedly loses control before dying, inspect Stun Threshold and available anti-stun tools rather than adding only more recovery. Movement speed and responsive skill use also count as defensive uptime because they let the character leave ground effects and telegraphed attacks.
Campaign Defence Readiness Checks
Campaign readiness is not a fixed Armour, Evasion, Life, or Energy Shield number. Classes, builds, and item bases scale differently. A better test is whether every defensive job functions against the current act: relevant resistances are healthy, the primary pool survives ordinary hits, the main defence controls packs, recovery keeps pace, and boss mechanics can be avoided.
| Check | Ready signal | Warning signal |
|---|---|---|
| Ordinary pack test | Several normal hits are recoverable without panic | Routine enemies remove most of the pool immediately |
| Rare monster test | The build can move, deal damage, and recover during a longer fight | One modifier combination removes all defensive uptime |
| Resistance test | The resistance relevant to the next boss is not a major weakness | One element is far below the rest after an equipment change |
| Recovery test | The main pool refills before the next normal damage sequence | Every encounter begins with missing Life or Energy Shield |
| Boss mechanic test | Movement speed and skill timing allow clean repositioning | The character is locked in place during telegraphed attacks |
Run the check after every major gear change
During the campaign, a newer base with modest modifiers can outperform an old item with an attractive rare name. Review the level and base defence of the body armour, helmet, gloves, boots, and shield or focus. Then check Life, Energy Shield, all four resistances, movement speed, attributes, and recovery before selling the replaced items.
If progression is blocked, farm a comfortable area, upgrade weak bases, use available crafting resources deliberately, and retry. Players who would rather use assisted progression can review the available Path of Exile 2 services, but a defensive setup should still be understood before the character enters harder content.
Endgame Defence Readiness Checks
Endgame adds stronger enemies, dangerous combinations of area modifiers, and longer encounters. The defensive standard therefore changes from merely finishing the campaign to repeating content reliably. A ready build protects its baseline before spending heavily on damage or reward modifiers.
- Fire, Cold, and Lightning Resistances reach their current maximum in the content being entered, with useful overcap where penalties or debuffs justify it.
- Chaos Resistance is no longer ignored, especially if Poison or chaos hits are a recurring cause of death.
- The primary Armour, Evasion, Energy Shield, or hybrid setup has current equipment bases and meaningful scaling.
- The effective health pool survives an ordinary connected hit after avoidance fails.
- Recovery works against a boss, not only while clearing a dense pack of weak enemies.
- At least one answer exists for damaging ailments, control loss, and ground effects relevant to the activity.
- Every Waystone and encounter modifier is read before entry, and dangerous combinations are rerolled or deferred.
- Red-flash attacks and other telegraphed mechanics are handled through positioning instead of assumed tankiness.
Use a repeatability test, not one lucky clear
A single successful run can hide a weak Evasion streak, favorable monster modifiers, or unusually good flask uptime. Repeat content at the same difficulty and record what causes resource loss. If ordinary maps are stable but one modifier repeatedly creates deaths, the build may be ready for the tier but not for that modifier.
When upgrading difficulty, change one variable at a time. Moving to a harder tier while adding several dangerous modifiers makes it difficult to identify the failure. The official Path of Exile 2 patch notes are the final reference when a live update changes a defence, item, passive, skill, or area modifier.
Diagnosing Deaths by Their Pattern
The fastest way to improve defence is to classify the death before changing equipment. The resource globes, the enemy effect, and the timing of the death reveal whether the missing layer is avoidance, mitigation, effective health, resistance, recovery, or control.
| Death pattern | First layers to inspect | Common correction |
|---|---|---|
| One large physical hit kills from full | Hit size, Armour, additional physical mitigation, and total pool | Increase maximum-hit protection and avoid the telegraph |
| One elemental skill feels far worse than everything else | Matching resistance, debuffs, and area penetration | Repair the resistance gap and read content modifiers |
| Many small hits overwhelm the character | Armour or avoidance, recovery rate, stun, and positioning | Improve pack control and recovery under sustained pressure |
| Life drains while Energy Shield remains | Poison, Bleeding, and other bypass mechanics | Add the correct ailment prevention, removal, resistance, or Life buffer |
| The character survives a hit but never refills | Recovery trigger, recharge interruption, flask charges, and leech uptime | Choose recovery that works in the encounter's actual rhythm |
| The character cannot move before dying | Freeze, stun, slows, action time, and movement speed | Add control protection and shorten unsafe skill commitments |
Common Defence Mistakes
Most defensive failures come from treating one visible number as the entire system. Avoiding the following mistakes creates a stronger character without requiring a perfect item in every slot.
- Stacking Armour while leaving elemental resistances weak.
- Stacking Evasion without enough Life or Energy Shield for the hit that connects.
- Treating Energy Shield as mitigation and ignoring Chaos Resistance, Poison, or Bleeding.
- Assuming capped resistances protect against physical damage, ground effects, stun, or red-flash boss skills.
- Using a recovery method whose trigger disappears during boss fights.
- Equipping a damage upgrade without checking the total defensive losses across the character.
- Copying a numeric target from a different class, archetype, or version of the game.
- Entering a Waystone without reading how its modifiers combine.
Upgrade the weakest required layer first
A balanced character does not need every defence in equal amounts. It needs every required job covered. Identify the layer that fails first, make the smallest upgrade that repairs it, and retest. This preserves damage, attributes, and resource stability better than replacing several items at random.
Once the baseline works, additional investment can specialize the character. Armour builds can add maximum-hit protection, Evasion builds can strengthen the hit that gets through, and Energy Shield builds can improve recharge access or bypass protection. The correct specialization follows the build's demonstrated weakness.
Final Verdict
Reliable PoE 2 defence is a system, not a single stat. Armour mitigates Physical Damage from Hits, Evasion avoids eligible hits, Energy Shield adds a rechargeable buffer, and resistances reduce matching damage. Life or another effective pool must survive what remains, while recovery, ailment answers, control protection, and movement keep the character functional.
For the campaign, test ordinary packs, relevant resistances, recovery, and boss movement after every major equipment change. For the endgame, cap the elemental baseline, improve Chaos Resistance, verify maximum-hit survival, confirm recovery against bosses, and read every area modifier. Diagnose deaths by their pattern and repair the first failing layer; that method remains useful even when individual balance values change.