The best ore to mine in Star Citizen depends on more than the highest commodity price. In Alpha 4.10.2 LIVE, a profitable deposit must offer useful mineral concentration, manageable fracture difficulty, an efficient extraction route and a practical destination for refining or selling. Crafting adds another consideration: the exact material and its quality can be more important than ordinary commodity value.
Quantainium remains a premium mining target, but it is not the only resource worth collecting. Riccite and Stileron offer valuable opportunities in Pyro, while Savrilium and Lindinium give Nyx miners distinct regional targets. In Stanton, deposits of Gold, Bexalite, Borase, Taranite and other useful minerals can support repeatable mining routes without requiring every session to produce a rare-resource discovery.
Short answer: prioritize workable premium deposits, but use clean high-value ores for consistent income. Keep lower-value minerals when their quality satisfies a confirmed crafting blueprint, and choose locations according to resource availability, refinery access, cargo capacity and route risk.
The current public build is Star Citizen Alpha 4.10.2, released on October 9, 2026. The major changes connecting mining with material quality and crafting arrived in Alpha 4.7, which also reworked resource distribution. This guide focuses on ore selection and economic priorities; the separate Star Citizen Mining Guide
Best Ore to Mine in Star Citizen Alpha 4.10.2
Ore priorities should reflect commodity value, practical availability, fracture difficulty and intended use. Rare materials can be worth pursuing, but concentration, refining costs, travel time and cargo hazards determine whether collecting them is profitable.
The categories below are editorial mining priorities, not official CIG item tiers or a guaranteed ranking of current selling prices.
- Premium: rare or especially valuable material worth prioritizing when a suitable deposit is found.
- High: attractive resources for regular commodity mining when concentration and route are favorable.
- Medium: worthwhile secondary materials or resources that become attractive in clean deposits.
- Situational: primarily useful for a specific blueprint, quality requirement, contract or available buyer.
- Low: generally less attractive for commodity mining unless extraction is easy or there is a defined use.
| Ore or resource | Practical priority | Mining regions | Best use |
|---|---|---|---|
| Quantainium | Premium / volatile | Stanton, including Aaron Halo and selected moons | High-value processing with strict cargo-stability planning |
| Riccite | Premium | Pyro, including Akiro Cluster and selected planets and moons | Rare-resource mining, refining and supported crafting |
| Stileron | Premium | Pyro asteroid regions and selected planetary deposits | High-value processing and specialized material supply |
| Ouratite | Specialized / crafting | Stanton, including Hurston, Arial, Aberdeen and Yela Asteroid Belt | Specialized crafting and material requirements; verify available buyers |
| Savrilium | Specialized / volatile | Nyx, particularly Glaciem Ring and Keeger Belt | Rare material collection and supported crafting; plan safe transport |
| Gold | High | Selected deposits in Stanton, Pyro and Nyx | Regular commodity mining and refining |
| Bexalite | High | Selected asteroid and surface deposits across multiple systems | Valuable refining when concentration is favorable |
| Borase | High | Selected asteroid belts and planetary deposits | Repeatable commodity mining |
| Taranite | High | Stanton and Pyro mining regions | Commodity refining and supported crafting |
| Lindinium | High / specialized | Nyx, including Glaciem Ring and Keeger Belt | Regional mining and specialized crafting supply |
| Torite | Medium / situational | Selected deposits in Stanton, Pyro and Nyx | Industrial and crafting-related material collection |
| Agricium | Medium | Selected moons and asteroid fields | Secondary commodity and crafting material |
| Beryl | Low / situational | Selected locations, including Aaron Halo and Wala | Secondary extraction and specific material requirements |
| Laranite | Medium | Selected planetary and asteroid deposits | Commodity refining and crafting supply |
| Tungsten | Medium | Selected Stanton and Pyro deposits | Industrial refining and crafting inputs |
| Aslarite | Situational / crafting | Selected Stanton and other supported mining locations | Specific material requirements; verify sale options |
| Titanium | Medium / crafting | Stanton and Pyro surface and asteroid deposits | Bulk refining and blueprint ingredients |
| Hephaestanite | Low | Common surface and asteroid deposits | Bulk mining or specific material requirements |
| Copper | Crafting priority | Common ship-mining deposits across multiple regions | Blueprint ingredients and quality-specific supply |
| Iron | Crafting priority | Multiple mining regions across Stanton, Pyro and Nyx | Crafting, including minimum-quality blueprints |
| Aluminum | Low / situational | Common surface and asteroid deposits | Bulk material and specific crafting requirements |
| Corundum | Low / situational | Common mining regions | Beginner mining and industrial requirements |
| Quartz | Low / situational | Selected surface and asteroid deposits | Crafting or supplementary extraction |
These priorities support decisions in the field rather than replacing current terminal prices. For example, Iron is normally a low-priority sale commodity compared with rare materials, but high-quality Iron becomes important when a specific blueprint requires it.
Specialized materials such as Ouratite and Savrilium should not automatically be treated as guaranteed high-paying commodities. Their usefulness depends on verified crafting requirements, available markets and safe transportation. Current community datasets do not provide equally complete standard selling-price information for every resource.
Regional information is based on available Alpha 4.10-series game-data and community location records. An ore appearing in a region's resource pool does not guarantee a deposit on every scan, and database abundance figures are not guaranteed extraction yields.
The SCMINER Ore by Location database and SC DataHub Mining Tools can help narrow your search. Check the patch version attached to their data when targeting a specific mineral.
What Is the Most Profitable Ore?
The most profitable ore is the material that generates the highest net return from the complete mining operation, not necessarily the resource with the highest listed price per SCU.
To evaluate a deposit, consider the entire process:
- Find a rock containing the desired material.
- Check whether the useful concentration justifies extraction.
- Confirm that your equipment can fracture the deposit safely.
- Extract valuable fragments without filling the hold with unwanted material.
- Transport the raw ore to a compatible refinery or buyer.
- Choose a refining method when processing adds sufficient value.
- Collect refined output using a suitable cargo ship.
- Deliver the cargo to an accepting buyer.
- Subtract operating expenses, processing fees and other costs.
- Compare the net result with the total time invested.
A clean Bexalite or Gold deposit close to a refinery can outperform a rare Quantainium rock that requires extended scanning, difficult fracturing and a long return trip.
Alpha 4.7 reduced the overall quantity of resources found in ship-mineable rocks, with particularly significant reductions affecting high-value materials. Useful concentration and selective extraction are therefore more important than the yields shown in older mining guides.
Best Premium Targets
Premium resources are valuable opportunities, but they should not dictate every minute of a mining session. Different minerals also have different market and transportation requirements.
- Quantainium: a high-value, volatile material. Current mining databases flag an approximately 15-minute degradation window after extraction, so plan the refinery route before collecting it and follow the live stability display.
- Riccite: a rare Pyro mining resource worth prioritizing when concentration and fracture requirements are suitable.
- Stileron: a premium Pyro mineral found in asteroid fields and selected planetary deposits.
- Ouratite: a specialized Stanton resource associated with crafting. Confirm a useful recipe or buyer rather than assuming an ordinary premium sale price.
- Savrilium: a rare Nyx resource flagged as volatile by current mining databases. Check its stability behavior, destination and material requirements before planning extraction.
These materials are not interchangeable. A player searching for Savrilium in Nyx should not follow the same route as a pilot targeting Stileron in Pyro.
Volatile cargo needs particular care. Do not rely on a permanent timer copied from an older patch; use the current ship warning and stability information. If a premium deposit is too resistant or unstable for your equipment, reject it instead of risking a failed fracture or lost cargo.
Best Reliable Ores for Regular Profit
Gold, Bexalite, Borase and Taranite remain useful resources for repeatable commodity-focused mining. The advantage is flexibility: accepting several valuable materials provides more opportunities to fill a hold efficiently than rejecting every rock without one rare mineral.
For regular Prospector operations, target sufficiently clean deposits that can be extracted and refined without excessive travel, risk or specialized equipment.
Actual selling prices and available demand vary by location. A permanent aUEC ranking without a buyer, date and processing assumptions should not be treated as a reliable profit forecast.
Best Mining Locations by Activity
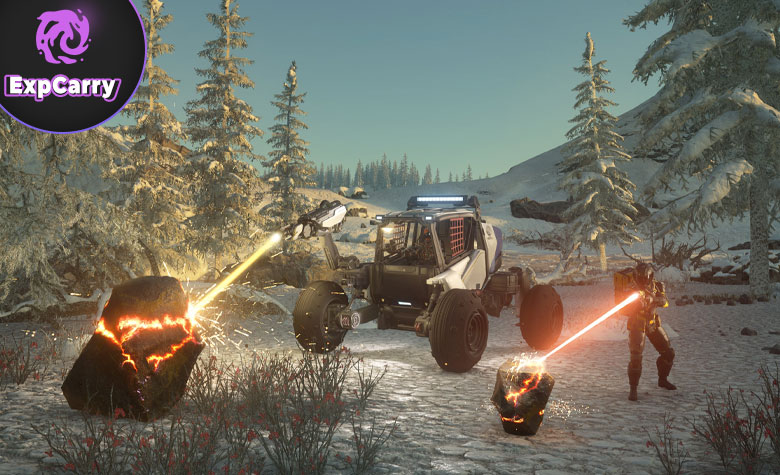
The best mining location depends on the required mineral, mining method and route to processing or selling. Stanton offers established refinery logistics, while Pyro and Nyx have different resource distributions and greater operational complexity.
| Location type | Best for | Advantages | Main risks |
|---|---|---|---|
| Planet and moon surfaces | Prospector, MOLE and ground mining | Known regional resource pools and visible terrain | Gravity, atmosphere, temperatures and exposed landing sites |
| Asteroid fields | Ship mining | Open space and selected mineral deposits | Search time, collisions and transport distances |
| Lagrange-point regions | Repeatable Stanton mining | Access to nearby services and refinery stations | Traffic, visible travel routes and piracy |
| Aaron Halo | Stanton asteroid mining | Large mining area without surface terrain | Navigation and distance from services |
| Pyro mining regions | Riccite, Stileron and regional materials | Distinct resources and increased probability of higher-quality materials | Security, travel time and hostile players |
| Nyx asteroid belts | Savrilium, Lindinium and regional mining | Rare regional resources and industrial opportunities | Logistics, volatile cargo and difficult deposits |
| Caves and specialist deposits | Hand mining and specialized collection | Small-scale resources and particular acquisition methods | Navigation, environmental hazards and limited storage |
Location databases identify possible resources, not guaranteed individual rocks. An advertised mineral may appear in only a small proportion of the deposits available in a region.
Stanton Mining
Stanton is a practical choice for beginners and miners seeking repeatable refinery operations. Its established station network reduces the logistical complexity of extraction, processing and selling.
Current mining records identify these useful examples:
- Aaron Halo: asteroid mining with Quantainium in the available resource pool, alongside more common materials.
- Aberdeen: ship-mining deposits including Agricium, Titanium and Ouratite, plus separate ROC and hand-mining resources.
- Arial: a confirmed Stanton location for Ouratite and other ship-mineable materials.
- Hurston: includes Ouratite and other mineral deposits in current location records.
- Selected Lagrange asteroid regions: useful for targeting Taranite, Borase, Bexalite and other materials according to the specific field.
- Lyria and other moons: provide multiple mining resources and different environmental and logistical conditions.
These are possible locations rather than guaranteed discoveries. Rare Quantainium deposits can require extensive searching even where the mineral appears in the location dataset.
For repeatable mining, choose a small group of compatible targets, identify a nearby refinery and learn the actual deposit composition before moving to another system.
Stanton also works well for collecting common high-quality crafting inputs when shorter routes compensate for their modest ordinary commodity values.
Pyro Mining
Pyro is important for regional resources and quality-focused mining. CIG's Alpha 4.7 distribution update specifically identified Pyro as having an increased chance of higher-quality materials, not a guarantee that every deposit contains premium-quality ore.
Current location records identify several notable resources:
- Riccite: recorded in Akiro Cluster, Pyro deep-space asteroid regions, Bloom, Ignis, Vatra, Adir and Terminus.
- Stileron: recorded in Akiro Cluster, deep-space asteroids and planetary locations including Bloom, Monox and Terminus.
- Gold and Bexalite: available in selected deposits as alternatives to rare resources.
- Common crafting materials: Iron, Copper and other minerals can be worth collecting for confirmed quality-dependent blueprints.
In Pyro, the material should justify additional logistical and security risks. A valuable rock may become an inefficient target when mining it requires dangerous travel, significant fuel use or a difficult return route.
Before extraction, verify your processing destination, fuel reserves, planned buyer and ability to transport the cargo safely. For crafting expeditions, establish the required quality and quantity before gathering material.
Nyx Mining
Nyx offers regional resources and longer industrial routes. Its attraction is access to minerals with distributions different from those in ordinary Stanton mining regions.
Two important asteroid-mining locations are:
- Glaciem Ring: deposits including Savrilium, Lindinium, Torite, Gold, Bexalite and Borase.
- Keeger Belt: another region supporting Savrilium, Lindinium and other useful minerals.
Savrilium is a rare Nyx target, but rarity alone does not establish a guaranteed sale price. Current mining records also classify it as volatile, making return-route planning especially important. Lindinium offers a different regional target for valuable or specialized material collection.
Some Nyx facilities have specialized deposits, including locations associated with Breaker Stations. These should not be confused with ordinary asteroid mining: access, equipment and mission requirements may differ.
Levski is an important industrial and mission hub, but that does not mean every resource can be processed or sold there under identical conditions. Check current facilities and supported commodities before planning a large shipment.
Mine in Nyx with a defined objective, such as collecting Savrilium, targeting Lindinium or obtaining a material required by an unlocked blueprint.
Explore services related to this guide, selected from our Star Citizen catalog.
View All Star Citizen Services


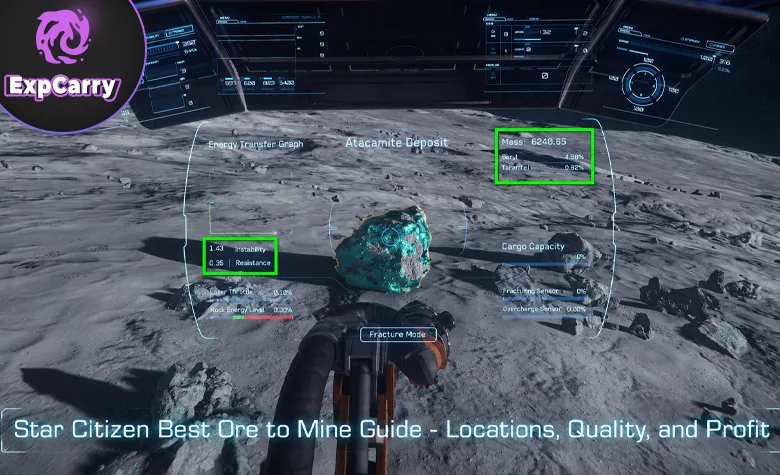
How to Judge Whether a Rock Is Worth Mining
A mineral name is only the beginning of the decision. Evaluate the useful quantity, fracture difficulty, material quality and expected processing return before committing to a deposit.
1. Composition
Composition identifies the materials in a deposit and their approximate proportions. A rock containing only a small amount of premium ore can be less attractive than one rich in a slightly cheaper mineral.
For commodity mining, clean composition reduces unwanted extraction. For crafting, a smaller quantity can still matter when it provides the correct resource and quality.
2. Mass
Rock mass is part of determining the mining power needed for a successful fracture. Large or difficult deposits may exceed the practical capabilities of a normal single-beam Prospector setup.
The MOLE can coordinate multiple mining lasers, making certain difficult deposits more accessible to an organized crew. Avoid attempting rocks beyond your equipment's safe operating range.
3. Resistance
Resistance affects how efficiently a mining laser transfers energy into a rock. High-resistance deposits may require a suitable mining head, resistance-reducing modules, a gadget or coordinated beams.
If the charge cannot enter a controllable range, continuing the attempt wastes time and increases risk.
4. Instability
Instability influences how difficult it is to maintain the fracture charge inside the optimal window. An unstable premium deposit may be less profitable in practice than an easier rock with a slightly lower-value composition.
Choose equipment that solves the actual fracture problem instead of assuming the strongest available laser is always the best choice.
5. Material Quality
Quality matters when a mined material is intended for a supported crafting blueprint. High-quality resources deserve priority when a confirmed recipe requires them, but quality alone does not guarantee an attractive selling price.
Compare the deposit's quality with the recipe requirement and its quantity with the amount needed for crafting.
Ore Quality and Crafting Value
Alpha 4.7 connected mining more directly with fabrication. Mineable resources received quality values displayed in mining, inventory and crafting interfaces.
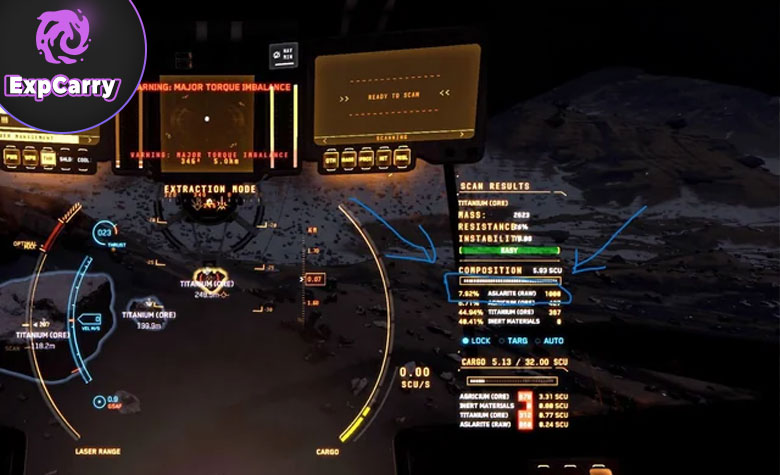
CIG confirmed that refining preserves material quality. Iron Ore converted into refined Iron, for example, retains its relevant quality rating. Processing does not automatically erase the quality needed for crafting.
Supported crafting blueprints use material quality to determine characteristics of fabricated items. Individual material slots can affect particular statistics, and certain recipes have minimum quality requirements or penalties for inadequate inputs.
This creates two different kinds of value:
- Commodity value: the amount an available buyer offers for the resource or processed material.
- Crafting value: usefulness for a specific blueprint, including material type, required quantity and quality.
Commodity value can be compared at current trading terminals. Crafting value requires checking an actual recipe and the intended result rather than assuming all high-quality minerals are equally desirable.
How Crafting Quality Changes Ore Priorities
The important question is not simply which ore sells for the most. It is also whether a material meets a blueprint's quality requirement.
The Alpha 4.10 crafting database includes the MISC Enhanced Ore Pod blueprint, associated with Recco Battaglia progression. The recorded recipe requires 0.75 SCU of Iron at minimum quality Q800, and the completed pod provides 15 SCU of capacity.
The database associates access with Recco Battaglia's Trusted Associate reputation level and the relevant blueprint reward. Verify that you have unlocked the recipe before collecting its materials.
This is a concrete reason to prioritize high-quality Iron despite its normally modest commodity value. The requirement concerns a specific crafting project, not a universal premium for every Iron deposit.
Recipe information comes from Alpha 4.10 game-data records and should be checked against the current crafting interface after future patches. See the MISC Enhanced Ore Pod blueprint reference.
The same principle can apply to Ouratite, Savrilium, Riccite, Stileron and other specialized minerals when a real blueprint requires them.
Keep High-Quality Material When
High-quality resources are most useful when you have a known destination or production objective.
- You own or plan to unlock a blueprint using the material.
- The material meets a meaningful quality requirement.
- Replacing the resource would require another difficult expedition.
- A crafting group or player has a confirmed need for it.
- You have enough storage and a workable delivery plan.
Do not stockpile unlimited resources merely because they have high quality values. Identify the exact amount and current crafting use before keeping them.
Sell or Refine Material When
Use the normal commodity loop when no confirmed crafting requirement justifies storing the resource.
- No relevant blueprint or quality-sensitive buyer needs it.
- The material is common and easy to replace.
- Storage limitations make keeping it inefficient.
- The available commodity price provides a worthwhile return.
- Refining increases useful output or net value.
- The recipe requires a processed rather than raw material.
The correct decision depends on the exact resource and form. Raw ore, refined commodities and physical crafting materials do not necessarily share identical storage, processing or delivery rules.
The Star Citizen Mining Resources catalog separates ores, gems and other crafting resources for players who need a specific material and quantity.
Best Ore for the Prospector
The MISC Prospector rewards selective mining. Its standard mineral capacity is 32 SCU, while its single mining arm limits which deposits can be fractured comfortably without special equipment or external assistance.
Recommended solo priorities are:
- Workable premium deposits: Quantainium, Riccite or Stileron when location, fracture requirements and cargo risks are manageable.
- Reliable high-value ores: Gold, Bexalite, Borase and Taranite in clean, workable deposits.
- Useful secondary minerals: Agricium, Laranite, Titanium and other materials when the rock's composition justifies collection.
- Quality-specific crafting inputs: Iron, Copper, Ouratite and other confirmed blueprint requirements.
- Low-value materials: collect mainly when extraction is particularly efficient or a specific use exists.
The Prospector's limitations include fracture power and control, not just capacity. Large, resistant deposits may remain impractical even when their composition looks attractive.
For dependable solo income, learn one mining region and its refinery route. A session accepting several workable valuable ores is usually more consistent than searching only for one rare material.
Best Ore for the MOLE
The Argo MOLE has three mining turrets and supports coordinated multi-crew operations. Several operators can apply their beams to difficult deposits, giving an organized crew access to rocks that may be impractical for an ordinary single-beam miner.
MOLE crews should prioritize:
- large deposits with substantial premium or high-value composition;
- rocks that genuinely benefit from simultaneous mining beams;
- clusters containing several useful deposits close together;
- rare regional materials worth a longer expedition;
- high-quality inputs for a planned crafting project;
- rocks producing enough useful material to justify combined crew time.
The MOLE is particularly useful in difficult mining regions, including parts of Nyx. However, a large rock full of low-value material may consume several players' time without producing an attractive return.
Coordinate fracture control, target selection and refinery logistics. Rejecting unsuitable deposits early can be more valuable than mining every rock faster.
ROC and Hand-Mining Resources
ROC and hand mining are separate activities and should not be ranked directly against ship-mining ores. They use different tools, deposit sizes, storage systems and processing routes.
The Alpha 4.1 changes separated traditional hand-mining gems from the ground-vehicle resource pool. Current location datasets include these examples:
- Hand mining: Aphorite, Dolivine and Hadanite, along with rarer crystals and specialized deposits.
- ROC mining: Beradom, Glacosite and Feynmaline, subject to current regional availability.
- Ship mining: larger deposits containing Quantainium, Bexalite, Taranite, Savrilium and other ores.
Hand-mined and ROC-collected materials generally follow a different sale process from conventional refinery work orders. Check the exact resource and buyer before transport.
These activities are useful for lower-cost mining, shorter sessions or obtaining specific physical crafting resources. For equipment, progression and extraction details, use the Star Citizen Mining Guide.
Raw Ore or Refining: Which Is Better?
Refining is a major economic decision in ship mining. It converts supported raw ore into processed material that can be transported, sold or used in supported crafting workflows.
A refinery work order has processing costs, completion time and expected yield. The best method depends on the material, facility, objective and whether the additional value justifies the logistics.
Refine Premium and High-Value Ore When
Refining is attractive when it increases the useful or saleable output of a valuable load enough to cover processing expenses and transport.
- Expected refined value exceeds the alternative raw-sale return after costs.
- The chosen refinery provides a useful material bonus.
- You can accommodate a slower, higher-yield process.
- A compatible cargo ship can collect the finished material.
- An available buyer accepts the processed commodity.
- The delivery route is reasonable for the cargo's value and risk.
- A known crafting blueprint requires the refined material.
The fastest processing method is not necessarily the most profitable. Longer methods may produce better yields, especially when you can perform other activities while waiting.
Refinery bonuses and penalties vary by facility and material, so the same ore can produce different results at different stations.
Sell Raw Ore When
Raw sale is useful when immediate payment or simpler logistics matter more than maximizing processed yield.
- You need aUEC without waiting for a refining job.
- The load is too small or low-value to justify processing.
- Fees eliminate most of the expected refining benefit.
- You lack a suitable cargo ship for finished output.
- An additional delivery stage introduces excessive security risk.
- A technical problem or maintenance window makes an unfinished work order unattractive.
Raw ore and refined cargo do not necessarily use the same buyers or terminals. Confirm the destination for the specific material before starting the trip.
For Dinyx Solventation, Ferron Exchange, Gaskin, Cormack and other processing methods, see the Star Citizen Refinery Guide.
Refining and Material Quality
Preserving quality matters when mining for crafting. CIG confirmed that the material's quality is retained when ore is refined into its corresponding processed resource.
However, processing yield determines how much usable material remains. A blueprint requiring a fixed quantity must still receive enough output after refining.
Calculate the required quantity before mining and allow for processing losses. Do not assume every unit of raw ore becomes an equal quantity of refined crafting material.
Mining Profit Rules
Profit should be evaluated across the complete industrial loop. A valuable deposit can be inefficient when searching, fracturing, refining and transport consume more time or resources than the return justifies.
Scan More Rocks Than You Mine
Reject low-concentration or overly difficult rocks early rather than trying to extract material from every signature.
Judge Concentration, Not Only the Resource Name
A small trace of Quantainium may be less useful than a clean Gold, Bexalite or other valuable deposit.
Do Not Let Low-Value Material Dominate the Hold
Mineral capacity is limited. Extract selectively whenever possible instead of filling storage with low-value or unwanted material.
Match the Rock to Your Equipment
Mass, resistance and instability can make an attractive deposit unsuitable for your laser, modules and current level of fracture control.
Include Refining and Cargo Time
Net income per hour must account for searching, extraction, fees, waiting, cargo collection, hauling and sale. For volatile materials, account for the return deadline and risk of cargo loss.
Plan the Material's Final Use
Decide whether the material is intended for raw sale, refining, crafting or a contract before filling the hold.
Evaluate Quality Against Real Blueprints
High quality matters when an available recipe or confirmed buyer needs it. Speculative stockpiling does not automatically improve mining profits.
Common Ore-Selection Mistakes
Most inefficient mining decisions result from focusing only on theoretical ore value or following outdated resource and crafting information.
Mining Only Quantainium
Extended search time, difficult fractures and volatile cargo can reduce profitability. Accept other valuable deposits when they suit your route.
Using an Outdated Fixed Price List
Market prices, demand and refinery economics can change. Check actual terminals and current data before committing valuable cargo.
Assuming Every Rare Ore Appears in Every System
Riccite and Stileron are associated with Pyro, while Savrilium and Lindinium have identified Nyx mining locations. Check the specific resource pool.
Ignoring Material Quality
A common mineral meeting a confirmed blueprint's minimum quality can be more useful than a rare material the recipe does not consume.
Keeping Low-Value Ore Without a Purpose
Storage filled with unnecessary material can reduce the efficiency of future mining and crafting operations.
Choosing a Location Without Refinery Planning
A distant premium resource may deliver lower net income than an established route with easier processing and selling.
Ignoring Regional Security
Pyro and remote Nyx routes can increase exposure to piracy, long travel and cargo loss.
Confusing Ore Quality With Commodity Price
Crafting quality affects supported fabrication results, but ordinary buyers do not necessarily pay an additional premium for each quality point.
Ignoring Blueprint Quantity Requirements
Correct material quality is not sufficient if refining or extraction leaves less than the recipe needs.
Using Old Resource Distribution Tables
Alpha 4.7 substantially changed mineral distribution. Older maps and yield estimates may no longer describe the available rocks accurately.
Forgetting Volatile Cargo Limits
Quantainium and other resources flagged as volatile require careful route planning. Review the current cargo-stability information rather than treating every ore as safe for unlimited transport time.
Star Citizen Best Ore FAQ
These answers cover the main practical questions about ore value, locations, material quality and cargo risk.
What is the best ore to mine for money? Quantainium and Stileron are notable high-value targets, but clean Gold, Borase, Bexalite or other workable deposits can deliver better practical income per hour. Specialized resources need a verified buyer or crafting purpose.
Is Quantainium still worth mining? Yes, when the deposit is workable and your return route accounts for its volatility. It is not always efficient to ignore other valuable minerals while searching for it.
Where can I find Savrilium? Current records identify Glaciem Ring and Keeger Belt in Nyx, along with specialized deposits associated with Breaker Stations. The latter may have different access conditions.
Does ore quality survive refining? Yes. CIG confirmed that material quality is preserved through refining, allowing high-quality ore to remain useful in supported crafting recipes.
Are rare resources always the most profitable? No. An unavailable buyer, difficult fracture, volatile cargo or long delivery route can make a rare resource less profitable than a common, clean deposit.
Final Mining Priority
Use this checklist to decide which deposits deserve mining time and cargo space.
- Prioritize premium materials when concentration, fracture difficulty and route are acceptable.
- Build repeatable runs around reliable high-value ores.
- Collect secondary minerals when composition or confirmed crafting demand justifies them.
- Keep lower-value material when it meets a specific blueprint or contract requirement.
- Reject rocks that exceed your equipment or introduce excessive fracture risk.
- Check volatility and return time before extracting unstable resources.
- Choose between raw sale, refining and crafting before filling the hold.
- Include processing access, cargo capacity, buyer availability and route security in the profit calculation.
The best ore in Star Citizen is the resource producing the strongest net result from the complete industrial loop. Premium materials only deliver value when you can find, fracture, extract, process, transport and successfully sell or use them. Prioritize workable deposits, protect cargo capacity, respect volatile-material warnings and favor repeatable returns over rare-resource hunting without a clear objective.