Paladins cover three distinct PvE jobs in TBC Classic Anniversary Edition. Holy is a focused tank healer with powerful emergency tools, Protection combines reliable area threat with block based mitigation, and Retribution supports physical and Holy damage while using a precise melee rotation. Each specialization needs its own talents, priorities, caps, and equipment plan, so one universal Paladin setup does not work for every raid assignment.
Paladin PvE Specializations at a Glance
Choose a specialization by the job your group needs, not by armor type alone. Holy converts mana and critical healing into long single target coverage. Protection builds threat primarily through Holy damage while preparing defensive sets for different bosses. Retribution uses a slow two handed weapon, maintains raid debuffs, and times seals around weapon swings. The table summarizes the central responsibility of each option.
| Specialization | PvE Role | Core Resource | Main Strength |
|---|---|---|---|
| Holy | Healer | Mana | Efficient single target healing |
| Protection | Tank | Mana and defensive charges | Area threat and block coverage |
| Retribution | Melee DPS | Mana and weapon swing timing | Raid support and seal twisting |
Holy Paladin PvE Guide
Holy Paladin is at its best when assigned to a tank or another player who receives frequent predictable damage. Its direct heals are efficient, its critical strikes return mana through Illumination, and its defensive utility can prevent deaths that raw healing alone would not stop. It has limited group healing, so successful play depends on assignment discipline and coordination with healers who cover raid wide damage.
Holy Talents and Raid Role
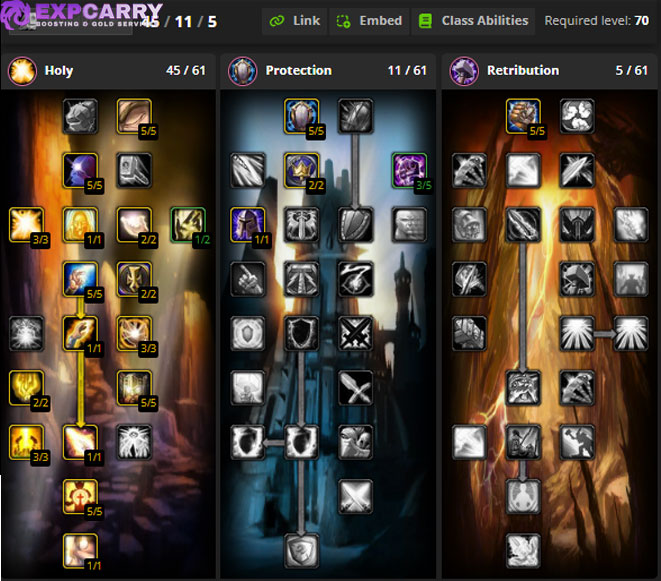
A common raid framework uses 45 points in Holy, 11 in Protection, and 5 in Retribution. The Holy core includes Divine Intellect, Spiritual Focus, Healing Light, Illumination, Divine Favor, Sanctified Light, Holy Power, Light's Grace, Holy Shock, Holy Guidance, and Divine Illumination. The Protection investment reaches Blessing of Kings, while the remaining Retribution points improve Blessing of Might for groups that need that assignment.
Small changes depend on the raid roster. A Paladin may move support points when another player already supplies a blessing or when an encounter rewards pushback resistance, range, or survivability. Do not remove Illumination, Light's Grace, or Divine Illumination from a general raid build. Those talents define Holy's mana efficiency and allow repeated Holy Light casts during dangerous damage windows.
Holy Healing Priority
Use Holy Light for large or sustained incoming damage and select a rank that matches the expected hit. A lower rank can preserve mana during steady damage, while the highest practical rank belongs in lethal windows. Keep Light's Grace active so later Holy Light casts finish faster. Flash of Light handles lighter damage efficiently, and Holy Shock provides an instant heal while moving or when another cast would arrive too late.
Divine Favor guarantees a critical heal, so combine it with an appropriately ranked Holy Light when the target needs immediate recovery. Divine Illumination reduces the mana cost of spells during an extended healing burst and is most valuable when the encounter forces repeated expensive casts. Use Avenging Wrath only when the increased healing justifies locking out other major protection effects for its duration.
Healing is only part of the assignment. Cleanse dangerous effects quickly, use Blessing of Protection to stop eligible physical attacks, and use Blessing of Freedom when movement restrictions threaten a mechanic. Lay on Hands is a last resort with a severe mana consequence. Coordinate these tools before the pull because an unplanned protection blessing can remove a tank's physical threat if used on the wrong target.
Holy Stats and Caps
Healing Power is the most direct throughput stat, while Intellect increases the mana pool and contributes spell critical strike chance. Spell critical strike works with Illumination, which returns 60 percent of a healing spell's base mana cost when that spell critically heals. Mana per five seconds supports long encounters, and Stamina protects the healer from unavoidable damage. Spirit is much less useful during continuous casting because Paladins do not rely on an in combat Spirit regeneration talent.
Holy has no hit or expertise requirement and no single healing cap. Build enough mana and regeneration to finish the encounter, then add the throughput needed to keep the assigned target safe. A shorter farm fight may favor more Healing Power and critical strike, while progression can reward a larger mana pool and more regeneration. Evaluate the complete raid environment instead of copying a fixed stat total.
Holy Gear and BiS
Holy gear should support the healing pattern the encounter demands. A Holy Light focused set values Intellect, Healing Power, critical strike, and sustainable mana, while a Flash of Light heavy assignment can place more emphasis on efficient throughput. Plate is not mandatory when a cloth, leather, or mail healing piece is clearly stronger, but armor and Stamina still matter when the healer is exposed to physical damage.
The Tier 6 healing set is Lightbringer Raiment. Its two piece bonus improves Holy Light critical strike chance, and its four piece bonus increases Flash of Light healing, so the correct number of pieces depends on the rest of the available gear. Major Phase 3 targets include Crystal Spire of Karabor, Felstone Bulwark, and Memento of Tyrande. These drops are contested, so players coordinating weekly progression can account for realistic acquisition time when comparing TBC raid options.
Protection Paladin PvE Guide
Protection Paladin creates threat through Holy damage and excels when several enemies must be controlled at once. Holy Shield provides block coverage, Consecration builds area threat, and Righteous Fury multiplies threat from Holy abilities. The specialization can tank raid bosses, but it must balance critical immunity, crushing blow protection, effective health, avoidance, and threat for each encounter.
Protection Talents and Raid Role
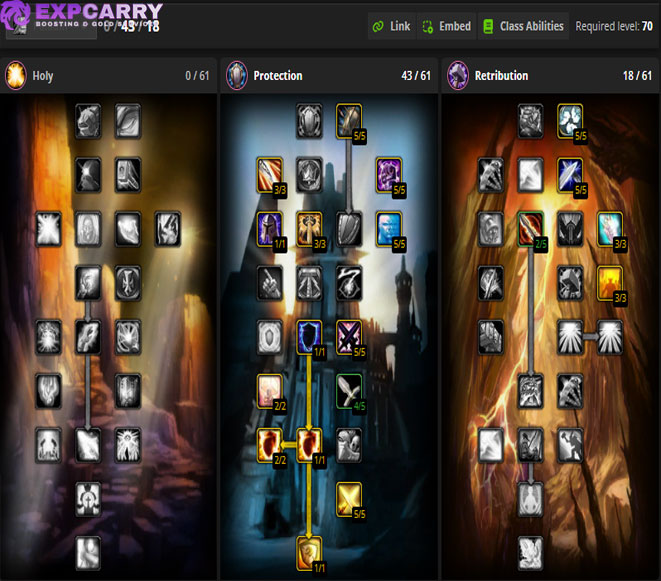
Core Protection talents include Anticipation, Toughness, Improved Righteous Fury, Blessing of Sanctuary, Sacred Duty, One-Handed Weapon Specialization, Holy Shield, Ardent Defender, Combat Expertise, and Avenger's Shield in deep Protection builds. Precision improves hit, while Improved Holy Shield extends the ability's coverage. The exact distribution changes according to whether the character is built for general progression, dungeon pulls, or maximum boss threat.
A deep Protection setup with Avenger's Shield provides a convenient ranged pull and strong control at the start of a pack. A Sanctity Aura variant gives up the capstone to improve Holy damage and single target threat. Both approaches must retain the defensive talents required for the assignment. The raid should also decide who supplies blessings and judgements before changing points for personal threat.
Protection Rotation and Active Mitigation
Keep Righteous Fury active and begin with Avenger's Shield when talented and safe to use. Establish Consecration under the targets, activate Holy Shield before dangerous swings, and use Judgement without allowing either defensive coverage or area threat to lapse. Reseal immediately after judging. Seal of Righteousness favors direct threat, while Seal of Wisdom can support mana when threat is already secure.
Against groups, position enemies inside Consecration and face them away from allies so blocks and parries remain available. Holy Shield is both mitigation and reactive threat, but its charges can disappear quickly when several enemies attack. Exorcism and Holy Wrath add damage against valid demon or undead targets. Mark a priority target because strong area threat does not excuse damage dealers from attacking before the pack is controlled.
Protection Paladins receive mana through Spiritual Attunement when healed, so trivial damage can create resource problems. Do not replace survival gear merely to take more damage. Adjust spell ranks, use Judgement and Seal of Wisdom when appropriate, and pace expensive abilities once threat is stable. Defensive planning remains more important than filling every global cooldown.
Protection Stats and Caps
Before reductions from defensive stats, an enemy three levels higher gains 5.6 percent melee critical chance against a level 70 target. With no Resilience equipped, 490 Defense skill negates that bonus. Defense and Resilience may be combined for the same outcome, although Resilience adds no dodge, parry, block, or chance to be missed. Confirm the total critical strike reduction of the equipped set instead of treating 490 as the only valid number on the character sheet.
To push ordinary crushing blows off the attack table while Holy Shield remains active, the total must reach 102.4 percent. This calculation adds the boss's chance to miss to the Paladin's dodge, parry, and block. Its protection lasts only while Holy Shield has charges. Large packs can consume them rapidly, and special encounter attacks may ignore the normal melee table. Critical immunity and reliable health therefore remain necessary after reaching the uncrushable threshold.
For threat, the practical spell hit ceiling against a raid boss is 16 percent because the final 1 percent spell miss chance cannot be removed. Three points in Precision reduce the amount needed from gear to 13 percent, or about 164 spell hit rating, but a tank should not chase that total at the expense of survival. The melee special attack target is 9 percent hit, and 26 expertise removes 6.5 percent dodge before racial bonuses. After the defensive requirements, balance Stamina, armor, avoidance, Spell Power, hit, and expertise around the encounter.
Protection Gear and BiS
Protection needs multiple equipment sets. Keep a high effective health set for dangerous physical bosses, an avoidance or block focused set when the attack table matters, and a threat set for controlled farm content. Resistance gear is mandatory only when a mechanic calls for it. A listed BiS item can be wrong for the current pull if equipping it breaks critical immunity or removes Holy Shield attack table coverage.
The Tier 6 tank set is Lightbringer Armor. Its two piece bonus increases mana gained through Spiritual Attunement, while its four piece bonus increases Consecration damage. Representative Phase 3 targets include Tempest of Chaos for spell threat, Bulwark of Azzinoth for defensive value, and Shadowmoon Insignia for mitigation. Because several of these items come from the same raid, a weekly Black Temple progression plan should account for boss access and the raid's loot priorities.
Explore services related to this guide, selected from our WoW TBC Anniversary catalog.
View All WoW TBC Anniversary Services


Retribution Paladin PvE Guide
Retribution combines melee damage with effects that improve the whole raid. It brings Improved Sanctity Aura, applies an improved Judgement of the Crusader, and refreshes active Paladin judgements with Crusader Strike. Personal performance depends on weapon quality, group support, mana management, and accurate seal timing rather than a simple ability cooldown list.
Retribution Talents and Raid Role
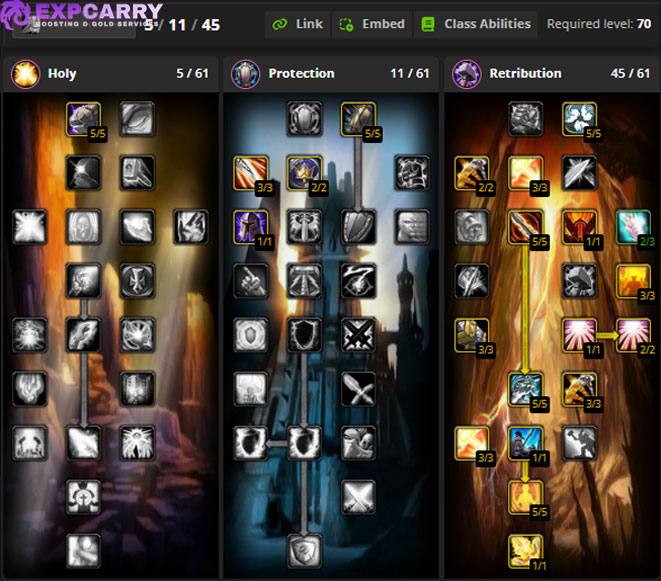
A common raid framework uses 5 points in Holy, 11 in Protection, and 45 in Retribution. The build takes Divine Strength, Precision, Blessing of Kings, Seal of Command, Conviction, Two-Handed Weapon Specialization, Sanctity Aura, Vengeance, Sanctified Judgement, Sanctified Crusader, Fanaticism, and Crusader Strike. Improved Sanctity Aura and Sanctified Crusader are major reasons to reserve a raid place for Retribution beyond its personal damage.
The Retribution Paladin normally applies Judgement of the Crusader and uses Crusader Strike to refresh every Paladin judgement already active on the target. Coordinate this duty with Holy and Protection Paladins so useful judgements are applied once and maintained. Blessing assignments, emergency cleansing, and situational protection spells remain part of the role even when they cost personal damage.
Retribution Rotation and Seal Twisting
Seal twisting allows one weapon swing to benefit from Seal of Command and Seal of Blood or its Alliance equivalent, Seal of the Martyr. Activate Rank 1 Seal of Command early enough in the weapon swing, then cast Seal of Blood or Seal of the Martyr during the final 0.4 seconds before the attack lands. The useful direction is from Seal of Command into the second seal. Reversing the order does not produce the same double effect.
Keep Judgement of the Crusader on the target and use Crusader Strike on cooldown when doing so will not destroy the next twist window. Judge while Seal of Blood or Seal of the Martyr is active, then restore the seals needed for the following swing. Consecration and Exorcism against valid targets are fillers when mana and swing timing permit. Hammer of Wrath becomes available during the execute phase but still has to fit around weapon swings and Crusader Strike.
Use a visible swing timer and practice at a stable weapon speed before adding temporary Haste. Bloodlust or Heroism and Haste procs shorten the available window, so the timing changes during the fight. Align Avenging Wrath with a period of uninterrupted target access, but remember that seal twisting is mana intensive. Skipping an optional filler is better than losing the resources required for Crusader Strike and the next seal sequence.
Retribution Stats and Caps
Against a level 73 raid boss, 9 percent melee hit prevents special attacks from missing. This equals about 142 hit rating before talents and raid effects. Three points in Precision provide 3 percent hit, leaving 6 percent, or about 95 rating, to obtain from other sources. Improved Faerie Fire, Heroic Presence, and other group effects can reduce the personal requirement further, so calculate the equipped target for the actual raid composition.
The boss can still dodge attacks delivered from behind. Eliminating the standard 6.5 percent rear dodge requires 26 expertise. At level 70, that normally means roughly 103 expertise rating before subtracting racial weapon bonuses. Human sword and mace specialization lowers the required rating with a matching weapon. After useful hit and expertise targets, Strength, critical strike, and Haste improve damage. Haste is valuable, but every speed change requires the player to adapt seal timing.
Retribution Gear and BiS
Weapon damage is the foundation of Retribution gearing. Prefer a slow two handed weapon with a strong damage range, then solve hit and expertise without giving up excessive Strength and critical strike. Keep alternative pieces because a new weapon, racial bonus, or group buff can change the required ratings. A theoretical full BiS list also depends on profession access and the raid's distribution of highly contested melee items.
The Tier 6 damage set is Lightbringer Battlegear. Its two piece bonus can return mana from melee attacks, while its four piece bonus improves Hammer of Wrath. Important Phase 3 targets include Torch of the Damned, Dragonspine Trophy, and Libram of Avengement. Use these direct item targets as a planning baseline, then preserve cap pieces and realistic alternatives instead of treating one raid drop list as mandatory.
Final Verdict
Holy is the focused healing option for players who enjoy efficient spell selection, tank assignments, and emergency support. Protection is a flexible tank that excels at controlling groups but must maintain critical immunity and encounter appropriate defensive coverage. Retribution rewards precise swing timing while supplying valuable raid buffs and judgement support. Build each specialization for its actual assignment, meet only the caps that solve that assignment, and maintain alternative gear sets for encounters that demand a different balance of survival, mana, or threat.