Warrior is one of the most specialized PvE classes in TBC Anniversary. Arms earns its raid slot through physical damage support, Fury turns strong weapons and steady rage into sustained damage, and Protection provides active mitigation, reliable threat, and a wide defensive toolkit. The expansion is now live on Anniversary realms, as confirmed by the official Burning Crusade Classic Anniversary announcement. This guide explains how all three Warrior specializations work at level 70, including talents, rotations, stat caps, gear priorities, and current BiS resources.
Warrior PvE Specializations at a Glance
Each Warrior specialization fills a distinct job. Arms is primarily a raid support damage dealer, Fury is a gear-driven pure damage option, and Protection is a tank that controls incoming physical damage with Shield Block and defensive cooldowns. A raid normally chooses Warrior slots according to the value of these jobs rather than treating every Warrior as interchangeable.
| Specialization | Primary Role | Typical Weapons | Main Raid Value |
|---|---|---|---|
| Arms | Support DPS | Slow two-handed weapon | Blood Frenzy and strong cleave |
| Fury | Melee DPS | Dual wielded one-handed weapons | Sustained damage and scaling |
| Protection | Tank | One-handed weapon and shield | Active mitigation and controlled threat |
Arms Warrior PvE Guide
Arms is the support DPS choice for a raid that needs Blood Frenzy and strong two-target cleave. Its performance depends on a slow two-handed weapon, accurate Slam timing, and a composition that can exploit the physical damage debuff. Players building an Arms Warrior for organized progression can compare the available TBC raid progression options before investing in several specialized gear sets.
Arms Talents and Raid Role
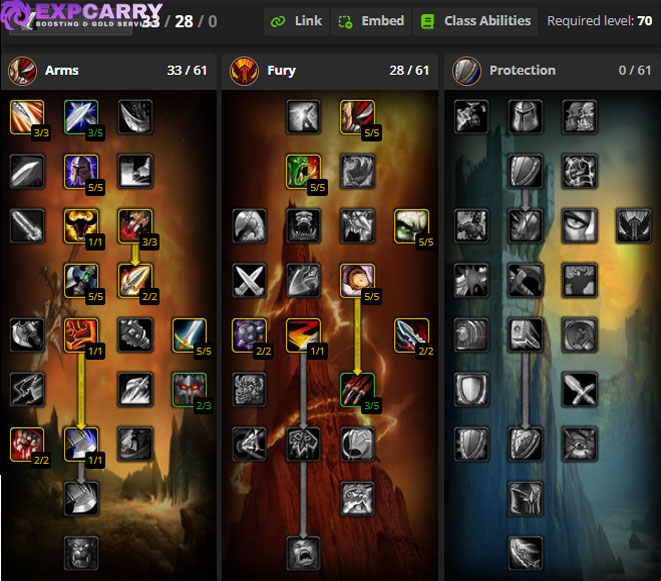
The standard raid framework is 33 points in Arms and 28 in Fury. Its defining talents are Mortal Strike, Blood Frenzy, Death Wish, Improved Slam, Sweeping Strikes, and Flurry. Blood Frenzy increases physical damage taken by a target affected by Rend or Deep Wounds, making Arms valuable even when its personal damage is below that of a similarly equipped Fury Warrior.
A common build spends enough points in Fury to reach Sweeping Strikes and Flurry while keeping the Arms talents required for Mortal Strike and Blood Frenzy. Some points can move between utility talents according to the raid assignment, but removing the core Slam, bleed, and raid support talents changes the purpose of the build. The current Warrior DPS talent guide on Wowhead provides a complete talent calculator for the standard two-handed setup and its alternatives.
Arms Rotation
Arms uses Slam immediately after a main-hand auto attack. Slam resets the weapon swing timer, so casting it before the swing lands delays the next attack and reduces rage generation. A practical loop alternates Mortal Strike and Whirlwind after post-swing Slams. The sequence is auto attack, Slam, Mortal Strike, then auto attack, Slam, Whirlwind, followed by another auto attack, Slam, and a filler if rage and time allow.
Keep the target affected by a bleed so Blood Frenzy remains active. Deep Wounds normally provides that bleed, so Rend is not part of the routine raid rotation. Use Hamstring as a rage dump only when it cannot delay Slam, Mortal Strike, or Whirlwind and when additional Deep Wounds or Windfury opportunities justify it. Use Heroic Strike cautiously because it replaces the next white swing and can reduce future rage. Below 20 percent health, use Execute as a filler after Mortal Strike and Whirlwind rather than abandoning the normal priority. Align Death Wish with Bloodlust or Heroism, trinkets, and a period of reliable target access.
For multiple targets, activate Sweeping Strikes before Whirlwind and use Cleave instead of Heroic Strike when rage is abundant. If the raid assigns Sunder Armor to Warriors, apply or refresh it without allowing the debuff to fall. Raid support takes priority over a minor personal damage gain.
Arms Stats and Caps
Reach the special attack hit cap first. Against a level 73 raid boss, a Warrior needs 9 percent melee hit, equal to 142 hit rating before racial abilities, talents, or raid debuffs. Draenei Heroic Presence and Improved Faerie Fire reduce the amount required from gear, so use the values shown for the actual raid group rather than copying a fixed equipment list.
The dodge soft cap is 6.5 percent expertise reduction, equal to 26 expertise or about 103 expertise rating before racial expertise bonuses and relevant talents. Expertise prevents dodged attacks and is especially valuable because a dodged Mortal Strike or Slam wastes both time and rage. After useful caps, critical strike, Strength, Armor Penetration, and Haste all contribute. Critical strike also supports Flurry and bleed uptime, while Strength gives 2 attack power per point.
Arms Gear and BiS
Weapon damage and speed are central to the two-handed Slam build. Prefer a slow, high-damage weapon that matches any racial weapon bonus available to the character. Then cap special hit, improve expertise, and balance critical strike with Strength and Armor Penetration. Do not keep weak items solely to exceed the hit cap, because hit beyond the special cap only helps white swings and loses value compared with stronger offensive stats.
Tier 6 damage pieces belong to Onslaught Battlegear. Its set bonuses improve Execute efficiency and the damage of Mortal Strike and Bloodthirst, but the correct number of set pieces depends on the quality of available off-set items. Use the current Arms Warrior Phase 3 BiS guide as a target list, then adjust it for racial weapon bonuses, raid buffs, and the items your group can realistically assign.
Fury Warrior PvE Guide
Fury is the Warrior's dedicated melee damage specialization. It converts strong weapons, raid buffs, and uninterrupted target access into sustained single-target and cleave damage, but it does not provide the unique physical damage support attached to Arms.
Fury Talents and Raid Role
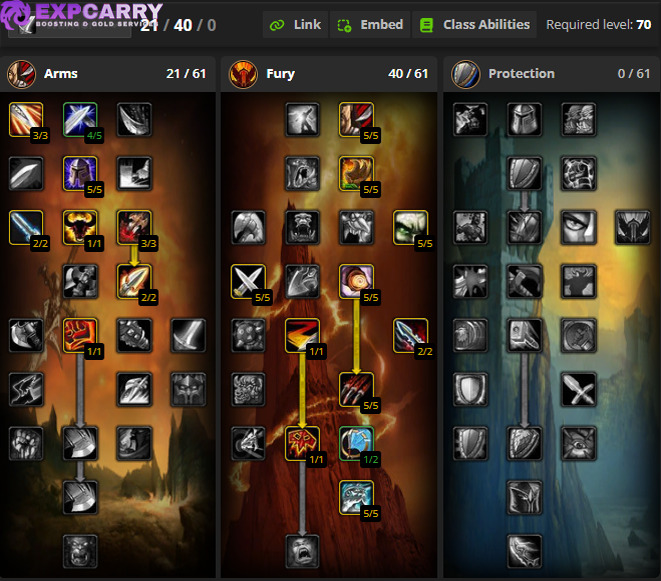
The standard Fury raid framework uses 21 points in Arms and 40 in Fury. The Arms points reach Death Wish while retaining Improved Heroic Strike, Deep Wounds, and Impale. The Fury tree supplies Flurry, Sweeping Strikes, Precision, Bloodthirst, Improved Whirlwind, and Improved Berserker Stance. Rampage is a playable alternative, but its flat attack power and maintenance cost make the 21/40/0 Death Wish build the stronger general raid choice.
Fury contributes Battle Shout or Commanding Shout, interrupts, and Sunder Armor when assigned, but it does not replace the Blood Frenzy support of an Arms Warrior. Its performance depends heavily on time in melee range, weapon quality, rage income, and group buffs. This makes Fury stronger as raid gear improves and weaker on encounters that repeatedly force the Warrior away from the target.
Fury Rotation
Use Bloodthirst as the first priority and Whirlwind as the second. Queue Heroic Strike only with excess rage. At low rage, allow normal weapon swings to land so they can generate the resources needed for the next Bloodthirst and Whirlwind.
Below 20 percent health, use Execute as a filler only while Bloodthirst and Whirlwind are unavailable, because Execute consumes the remaining rage. Align Death Wish and Recklessness with Bloodlust or Heroism, trinkets, and a period of uninterrupted target access. For multiple targets, use Sweeping Strikes, prioritize Whirlwind over Bloodthirst, and queue Cleave with spare rage. Cleave replaces Heroic Strike in the queue, so it must also be limited when rage is low.
The rotation is simple on paper but sensitive to rage. A missed white attack, forced movement, or an unnecessary Heroic Strike can delay the next core ability. The current Wowhead Warrior DPS rotation guide includes the ability priorities and cooldown notes for both Fury and Arms.
Fury Stats and Caps
Fury also needs 9 percent hit for special attacks against raid bosses. Dual wielding gives ordinary white attacks a much larger 28 percent miss chance, but reaching that full white hit cap is not a practical gearing objective. Hit above 9 percent still has value because Fury generates rage through successful weapon swings, yet it must compete with expertise, critical strike, Strength, Armor Penetration, and Haste.
Aim for 26 expertise before racial weapon bonuses and other reductions to boss dodge chance. After the special hit cap and useful expertise, critical strike supports Flurry and Deep Wounds uptime, Strength increases attack power, and Armor Penetration becomes stronger against targets with reduced armor. Evaluate main-hand and off-hand weapons separately because damage range, speed, racial bonuses, and availability can outweigh a small difference in listed item level.
Fury Gear and BiS
Fury gearing starts with two strong weapons and enough hit to make the core rotation dependable. The main hand has the larger effect on ability damage, while the off hand contributes white damage, rage, and stat bonuses. Match weapon types to racial bonuses when the quality difference is small. Keep multiple pieces for hit and expertise adjustments because new weapons or raid buffs can change how much rating the character needs.
Onslaught Battlegear is the Tier 6 damage set for Warriors. The rare Twin Blades of Azzinoth can define an endgame Fury setup, but a realistic gear plan must also cover obtainable alternatives and the raid's weapon allocation rules. The current Fury Warrior Phase 3 BiS guide lists full alternatives for Black Temple and Mount Hyjal. Groups preparing specifically for Illidan can also review the available Black Temple progression route while planning weekly raid access.
Explore services related to this guide, selected from our WoW TBC Anniversary catalog.
View All WoW TBC Anniversary Services


Protection Warrior PvE Guide
Protection is the Warrior tank specialization for precise single-target threat and active control over dangerous physical swings. It requires encounter-specific decisions about Shield Block, defensive cooldowns, threat stats, and mitigation gear rather than one fixed setup for every boss.
Protection Talents and Raid Role
Common raid tank builds use 12 points in Arms, 5 in Fury, and at least 43 in Protection, with the remaining point or points assigned to encounter utility or threat. High-value Protection talents include Anticipation, Toughness, Last Stand, Improved Shield Block, Defiance, Shield Slam, Focused Rage, Vitality, Shield Mastery, and Devastate. Late gear can justify moving points between rage efficiency and Shield Mastery. The Arms and Fury points improve threat efficiency, avoidance, Thunder Clap, rage management, or critical strike according to the chosen version. The current Protection Warrior talent guide shows the standard raid framework and common adjustments.
Protection Warriors are strongest when Shield Block can cover the dangerous boss swings and when precise threat on a priority target matters. They also bring Last Stand, Shield Wall, Intervene, Disarm where allowed, and short-cooldown interrupts. Their active style rewards knowledge of swing timers and encounter mechanics because Shield Block, stance changes, and cooldowns must be used before damage arrives.
Protection Rotation and Active Mitigation
Open with Shield Slam, then use Revenge whenever it becomes available and Devastate as the main filler. Queue Heroic Strike only when rage is high enough to fund the next Shield Slam and Revenge. Keep Shield Block active against raid bosses when blocking the next attacks is important. Apply Thunder Clap and Demoralizing Shout if the raid assigns those debuffs to the tank.
For multiple targets, establish initial threat with Thunder Clap and Demoralizing Shout, then cycle targets with Shield Slam, Revenge, and Devastate. Use Cleave only with spare rage. Protection has limited uncapped area threat, so mark a kill target and ask damage dealers to follow it. Taunt corrects a target switch but does not replace the need to build threat after the taunt lands.
Shield Block greatly increases block chance and adds an extra block charge with Improved Shield Block. Against a single raid boss, this normally pushes a properly geared Warrior beyond the 102.4 percent combined miss, dodge, parry, and block threshold while charges remain. Multiple attackers can consume the charges quickly, so this protection cannot be treated as permanent immunity to crushing blows in large packs.
Protection Stats and Caps
Survival comes first. A level 73 raid boss has a 5.6 percent chance to critically hit a level 70 player before defensive stats. Reaching 490 Defense skill provides the full 5.6 percent critical strike reduction when no Resilience is used. A combination of Defense and Resilience can also remove critical hits, but Resilience does not add avoidance or block. Confirm the final result with the character's actual gear rather than assuming every tank must display exactly 490 Defense.
After critical immunity, prioritize enough Stamina, armor, and avoidance for the encounter. Expertise and hit improve threat and reduce dangerous parries, with 26 expertise and 9 percent hit serving as offensive soft caps against raid bosses. They are not mandatory at the cost of survival. Block value improves Shield Slam threat and reduces blocked physical hits, while block rating is most useful when it helps maintain the attack table coverage required for a specific fight.
Protection Gear and BiS
A Protection Warrior needs more than one equipment set. Build a mitigation set for hard physical bosses, a threat set for farm encounters, and resistance sets when mechanics demand them. A fast one-handed weapon can support Heroic Strike and Devastate threat, while shield armor, Stamina, Defense, avoidance, expertise, and hit should be balanced around the encounter rather than ranked in one permanent order.
Tier 6 tank pieces form Onslaught Armor. Its bonuses improve Commanding Shout and Shield Slam, but the mitigation-heavy itemization means off-set pieces or selected damage set pieces can be stronger for a particular survival or threat target. The current Protection Warrior Phase 3 BiS guide separates recommended raid gear and alternatives. Treat it as a planning tool, then preserve older pieces that provide unusual amounts of hit, expertise, block value, avoidance, or resistance.
Final Verdict
Arms is the Warrior raid support specialist, built around Blood Frenzy and disciplined Slam weaving. Fury is the scaling damage specialization, driven by weapon quality, rage control, and uninterrupted melee uptime. Protection is an active tank that combines Shield Block, strong single-target threat, and defensive cooldowns. Choose the role your raid needs, meet only the caps that solve that role's immediate problems, and build several practical gear sets instead of chasing one universal list.