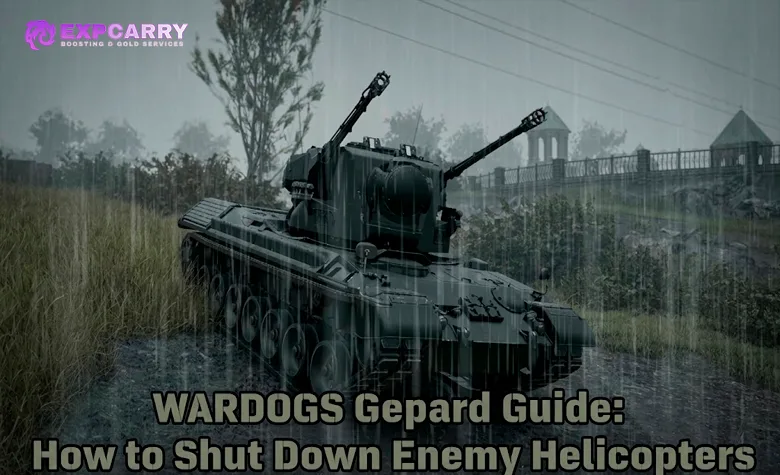
The Flakpanzer Gepard gives ground forces a mobile answer to enemy helicopters in WARDOGS Season 2. Its twin 35mm cannons can threaten aircraft without relying on missile lock-ons, but the vehicle is expensive, vulnerable to anti-tank weapons and easy to expose by firing from the same position for too long. The best Gepard crew does not simply park near a Forward Operating Base and wait for a helicopter. It chooses a firing lane, watches the enemy's approach routes, works with friendly infantry and moves before opposing players can organize a counterattack. This guide covers positioning, target tracking, crew roles, ammunition, defensive measures and the decisions that keep a $14,000 anti-air vehicle alive.
Short answer: Use the Gepard as a mobile anti-air ambush vehicle behind friendly ground forces, with a clear view of helicopter approach routes and a protected escape path. Track aircraft visually, fire controlled bursts with appropriate lead, coordinate with infantry and relocate whenever your position becomes predictable.
WARDOGS Gepard Unlock, Price and Weapon Stats
The Gepard arrived with Season 2 Update 0.2.0 on October 15, 2026. It belongs to the Driver progression track and requires Driver level 25 plus a $300,000 one-time unlock. Once unlocked, each vehicle purchase costs $14,000. The unlock fee does not have to be paid again after the Gepard is destroyed, but losing the vehicle means paying for another deployment.
| Specification | Current value | Practical meaning |
|---|---|---|
| Progression | Driver level 25 | Requires dedicated Driver progression before purchase |
| One-time unlock | $300,000 | Paid once, not after every loss |
| Vehicle purchase | $14,000 | Every destroyed Gepard represents another substantial expense |
| Crew capacity | 2 seats | Driver and turret gunner work as separate roles |
| Main weapon | Twin 35mm Oerlikon GDF cannons | Dedicated direct-fire anti-air armament |
| Listed weapon fire rate | 1,100 rounds/min | Rapid fire makes ammunition discipline important |
| Listed effective range | 1,000 m | A reference value, not a guaranteed hit distance |
| Listed reload time | 4 seconds | Reload during cover or a break in the attack |
| Vehicle health | 800 HP | Armored against small arms, but vulnerable to dedicated anti-vehicle weapons |
| Listed top speed | 65 km/h | Mobile enough to change firing areas, but not to outrun every threat |
| Countermeasure | Smoke | Helps break visual contact during withdrawal |
The progression and purchase prices are established in the official WARDOGS Season 2 patch notes. The health, speed, cannon rate, listed range and reload figures come from the current WARDOGS vehicle database. These weapon values describe the recorded configuration; they do not guarantee a specific time to destroy every helicopter.
Season 2 price warning: Some older Gepard articles still list a $10,000 purchase price or no unlock requirement. Those values do not match the October 2026 Season 2 progression and vehicle prices.
Best Gepard Positioning Against Enemy Helicopters
The strongest Gepard position provides a useful view of the sky while keeping the hull difficult for enemy infantry and tanks to attack. A completely exposed hilltop offers excellent visibility, but it also advertises your location and gives rocket-equipped helicopters a clear angle onto the vehicle. A low position hidden behind dense trees protects the hull but can prevent the gunner from tracking targets. Good positioning balances those problems.
Use Terrain to Protect the Hull
Look for ground where the driver can keep most of the vehicle behind a ridge, embankment, substantial building or other solid cover while the gunner still has an unobstructed firing lane. Avoid sitting directly on the skyline. If the vehicle is visible from every direction, enemy aircraft and anti-tank players can attack it without first discovering a safe approach.
The ideal position is usually behind the friendly infantry line rather than in front of it. Ground forces can spot approaching anti-tank players, protect the road leading to the Gepard and prevent a small enemy squad from walking into an easy firing position. The Gepard, in return, discourages helicopters from hovering over that infantry.
Cover Helicopter Routes, Not Just Open Sky
Enemy pilots commonly approach valuable areas: active objectives, FOBs, vehicle traffic and locations where ground forces are fighting. Position the Gepard so its gunner can observe one or more likely approach corridors. A helicopter crossing a predictable route is easier to acquire than one already passing directly overhead.
Do not interpret the cannon's listed 1,000 m range as a reason to engage every distant aircraft immediately. Terrain, visibility, target speed and tracking accuracy matter more than a single range value. A closer, clearly observed firing opportunity may be much more useful than a long burst at a distant helicopter that can easily change direction.
Prepare a Retreat Before Firing
Before the gunner opens fire, the driver should know which route leads behind solid cover, where the nearest safe turn is and whether a friendly repair or refuel location is accessible. A position with only one narrow exit becomes dangerous when an enemy tank blocks that route or a helicopter attacks from above. The vehicle should not have to reverse across a completely exposed hillside while taking rockets.
How to Aim the Gepard at Moving Helicopters
The Gepard's twin cannons fire directly at moving targets, so the gunner must account for the helicopter's movement during projectile travel. This is different from using the 9K333 Verba or Talon 9K-SAM, which rely on guided missiles. Do not assume that the Gepard's visible radar equipment provides an automatic target lock or guaranteed tracking solution: the official Season 2 notes do not establish a working radar-guidance mechanic for the player.
Track the Aircraft Before Shooting
When a helicopter appears, identify its direction of travel before firing. Is it crossing from left to right, approaching head-on, moving away or circling an objective? A gunner who fires as soon as a helicopter enters the sight may spend ammunition while the turret is still catching up to the target. Follow the aircraft smoothly first, then choose an opening where its movement is easier to predict.
Helicopters become more manageable targets when they hover, slow to attack, turn sharply or commit to a straight pass. A pilot who repeatedly attacks the same FOB or road may expose a recognizable pattern. The Gepard can exploit that pattern by waiting for the next pass instead of revealing its position during the first glimpse of the aircraft.
Lead the Target and Correct Each Burst
A crossing helicopter needs more lateral lead than one approaching nearly head-on. Start the aim ahead of its current position in the direction of travel, then use visible shot impacts or tracers, where available, to adjust. If the stream falls behind the aircraft, increase the lead. If it passes well ahead, reduce it. When the pilot changes direction, reset the estimate rather than continuing to follow the previous line.
Controlled bursts are generally more useful than continuous panic fire. A short burst shows whether the current aim is effective. The gunner can then correct without wasting a large portion of the available ammunition. Longer bursts make sense when the aircraft is already passing through a reliable firing lane and the shots are connecting.
Do not chase a helicopter indefinitely with the turret while ignoring nearby ground threats. If the target disappears behind terrain, stop firing, tell the driver its last direction and prepare for another approach. Continued fire into blocked sightlines wastes ammunition and keeps the Gepard's position obvious.
Reload Between Attack Windows
The recorded 4-second reload creates a predictable interval when the vehicle cannot apply its main anti-air pressure. Reload after the target has broken contact or when the hull is safely covered. Starting a reload while a rocket helicopter is lining up a direct attack can leave the crew unable to respond at the worst possible moment.
When working with a second player, the gunner should announce the reload and the driver's response should be immediate: maintain cover, move to a safer angle or prepare to retreat if the aircraft is still attacking.
Explore services related to this guide, selected from our Wardogs catalog.
View All Wardogs Services

Which Helicopters Should the Gepard Target First?
Not every helicopter deserves the same response. Prioritize aircraft based on what they are doing to your team, not simply their distance from the Gepard. An attack helicopter actively destroying friendly armor may be more urgent than a transport helicopter crossing the edge of the battlefield. However, an aircraft that is already lining up a strike against the Gepard itself becomes an immediate survival threat.
| Aircraft or situation | Main threat | Recommended response |
|---|---|---|
| AH-6R [Rockets] | Rocket attacks on vehicles, FOBs and grouped ground forces | High priority when it approaches the protected area; engage during a committed attack run |
| Havoc | Autocannon and rocket-pod pressure against ground positions | Coordinate sustained anti-air fire with allied systems; avoid an exposed head-on duel |
| AH-6M [Miniguns] | Repeated strafing passes against infantry | Track its approach pattern and punish predictable passes |
| Z20 Lakota [Miniguns] | Armed transport supporting infantry attacks | Engage when it threatens the objective or slows to support troops |
| MH-6 or unarmed Z20 Lakota | Transport and insertion of enemy infantry | Prioritize when a landing threatens the defended area; watch for the troops it delivers |
| Helicopter directly attacking the Gepard | Immediate risk of losing the vehicle | Return effective fire if possible while the driver moves toward solid cover |
The Havoc deserves particular respect because it combines heavier protection with offensive weapons. The Gepard's high fire rate does not mean every brief exposure will destroy it. A rocket-equipped Little Bird is also dangerous: its smaller profile makes hits difficult, and an experienced pilot can attack the Gepard from an unexpected angle. If a helicopter escapes, preserving the vehicle and its defended area can still be a useful result. Air denial is valuable even when no destruction reward appears.
Gepard Driver and Gunner: How to Work as a Crew
The Gepard has two seats, making communication central to its performance. The gunner needs time and visibility to follow aircraft. The driver must watch terrain, enemy ground forces, the vehicle's condition and possible escape routes. When both players focus exclusively on the helicopter, anti-tank infantry can approach unnoticed.
A simple crew arrangement prevents that failure:
- Driver: selects concealed routes, positions the hull, monitors ground threats, watches the tactical map and moves immediately when the position becomes unsafe.
- Gunner: scans expected air routes, identifies aircraft, tracks targets, controls ammunition use and announces when the vehicle is exposed or unable to fire.
- Both players: share short target calls and agree on the retreat route before entering the fight.
Useful communication should be specific enough to act on. “Rocket helicopter approaching from the west, crossing toward the FOB” gives the driver a direction and the gunner a target. “Heli somewhere above us” gives neither player much help. When the target breaks sight, call its last known movement rather than guessing where it will appear next.
A solo player can still use the Gepard, but switching between driving and firing increases reaction time. If an enemy team is actively hunting the vehicle, a dedicated second crew member makes it easier to relocate without abandoning air observation.
Combine the Gepard With Infantry and Other Anti-Air Defenses
The Gepard is strongest when it is part of the team's defense rather than the entire defense. Friendly infantry prevents anti-tank players from getting close, Recon players help locate aircraft, and other anti-air systems complicate enemy flight paths. The goal is to deny pilots an easy approach without forcing the Gepard to expose itself whenever a helicopter appears.
Use Talon, CIWS and Verba to Cover Different Openings
The Talon 9K-SAM uses a guided missile and can pressure helicopters approaching a defended FOB. The Vanguard CIWS provides direct-fire protection from a fixed position. The 9K333 Verba allows infantry to threaten aircraft with a shoulder-fired guided weapon. The Gepard adds mobility: it can protect an approach outside a fixed emplacement's useful firing arc or move when the frontline shifts.
These systems should cover complementary angles. If a helicopter avoids the Talon's missile threat by changing its route, the Gepard may gain a clearer opportunity. Conversely, the appearance of Gepard cannon fire can push a pilot toward a defended area. Neither outcome is guaranteed, so coordinate actual sightlines instead of assuming every weapon automatically covers the same sky.
Helicopter flares are intended to counter heat-seeking threats. They do not make the aircraft immune to the Gepard's physical cannon rounds. That distinction matters when choosing whether to continue a visually accurate gun engagement after a pilot releases flares.
For construction costs and maintaining anti-air emplacements, the WARDOGS FOB Building Guide covers Talon and CIWS placement, supplies and base defenses. A Gepard crew should use that infrastructure without parking so close to the FOB that both the vehicle and the base can be attacked together.
Let Ground Forces Screen the Vehicle
Ask nearby infantry to watch the road or slope through which anti-tank players would approach. A tank or armed transport can discourage enemy ground vehicles from rushing the Gepard, while the Gepard focuses on the sky. Keep enough spacing that a single rocket attack or concentrated artillery strike cannot punish the entire group.
The Gepard should not lead an assault on an enemy FOB. Its cannon configuration favors aircraft, and exposing a specialized anti-air vehicle to tanks, launchers and close infantry combat trades away its main advantage. If the team needs to push through hostile armor, a main battle tank is a more appropriate lead vehicle.
How to Protect the Gepard From Anti-Tank Weapons
The Gepard's armor protects it from ordinary rifle fire, but it is not a substitute for a main battle tank. Enemy players with RPG-7 launchers, MAAWS, mines or other dedicated anti-vehicle weapons remain serious threats. The hull has separate components for the engine, fuel tank and tracks, so surviving the first attack does not mean the vehicle can still move normally.
Protection begins before the first shot. Avoid predictable roads, exposed ridgelines and positions where infantry can approach the sides or rear without being seen. Do not assume a wall of bushes provides the same protection as a solid terrain feature. Vegetation may hide the Gepard from sight, but it is not a reliable barrier against explosives.
Keep Vulnerable Angles Away From Enemy Fire
Community damage testing indicates that attacks from certain rear and upper angles can be especially dangerous. Those observations are useful warnings, but exact hit counts depend on the weapon, impact location and the damage calculation. Do not treat any single test as a universal rule guaranteeing that the Gepard survives a particular number of rockets.
Whenever possible, make the enemy cross ground observed by friendly infantry before gaining access to the Gepard's flanks. If the crew spots a launcher user positioning for a shot, the driver should prioritize breaking line of sight. Waiting for the gunner to finish engaging a distant helicopter can turn an avoidable anti-tank attack into a destroyed vehicle.
Use Smoke to Escape, Not to Camp
The Gepard supports a smoke countermeasure, with current community databases listing a $750 purchase price. Smoke can interrupt visual contact and make it harder for opponents to track the vehicle during a retreat. It does not guarantee protection against rockets, splash damage or enemies who already know where the hull is located.
Deploy smoke when it supports a real movement decision: breaking contact, turning behind terrain or reaching another covered position. Sitting motionless in the same place after releasing smoke leaves the enemy free to fire into the known location. The driver should already have a destination before using the countermeasure.
Repair Only After Securing the Area
If the vehicle loses health or suffers component damage, first reach cover. WARDOGS supports vehicle repairs with repair tools and through friendly repair infrastructure. Returning to the faction's safe zone is another option when the route is practical. An active FOB equipped for repair or refueling can shorten downtime, provided the base itself is secure.
Do not send a crew member outside to repair the Gepard while an enemy helicopter is still making attack passes or anti-tank infantry are nearby. A partially damaged but mobile Gepard is more useful than a destroyed one whose crew was caught trying to repair it in the open.
When to Reposition the Gepard
Relocation is one of the most important parts of surviving with the Gepard. Its rapid cannon fire makes an active position easy to notice, and competent enemies will remember where that fire came from. Remaining in place after several engagements gives helicopter pilots, tanks and infantry time to coordinate against the same location.
Move when the battlefield gives you a specific reason, not on an arbitrary timer:
- After a visible engagement: if the enemy has likely identified your location, shift to another covered firing position before the next attack.
- After a helicopter retreats: use the break to reload, assess ammunition and change angles instead of chasing it across open ground.
- After spotting anti-tank infantry: disengage before they gain a clean shot at the hull.
- When the objective moves: adjust your position to protect the new ground fight rather than defending empty airspace.
- When damaged or low on supplies: plan a route toward repair, fuel or ammunition access before the vehicle becomes stranded.
A good rotation does not need to be a long cross-map drive. Sometimes moving behind a neighboring ridge or changing the side of a defended area is enough to force an enemy pilot to reacquire the vehicle. The important change is the enemy's line of sight and approach geometry, not the distance shown on the map.
Choose a new position that preserves the Gepard's relationship with friendly forces. Driving alone into an isolated field to pursue a damaged helicopter can eliminate all the protection that made the original position effective.
Gepard Ammunition, Operating Cost and When to Deploy
The one-time $300,000 unlock is a progression investment. The recurring risk is the $14,000 vehicle purchase, plus any additional ammunition, smoke or crew equipment. Purchasing smoke at its listed $750 price raises the vehicle-and-countermeasure cost to $14,750 before ammunition and personal loadouts. A current community item database lists 35x228mm anti-air cannon ammunition at $200 per purchase, but the total ammunition expense depends on how much the crew brings.
Check the cannon's available ammunition before leaving the safe zone. The 35x228mm ammunition listing describes rounds intended for aerial targets, and the vehicle's high fire rate makes careless sustained fire expensive in practical terms even when a particular burst misses no equipment other than ammunition. Confirm the actual loaded quantity and reserve in the current game interface; do not infer an exact starting magazine count from a database entry that leaves the field unspecified.
The official Season 2 economy also lists a $7,000 base reward for destroying an enemy Gepard, with attack-vehicle rewards affected by combat performance. That gives enemy players another reason to hunt an exposed anti-air tank. The financial danger is not merely the loss of your vehicle: your opponents may receive a reward for removing it.
Before buying another Gepard, ask three questions. Are enemy helicopters repeatedly interfering with an important objective? Can friendly ground forces protect the vehicle from infantry and tanks? Is there a usable firing position with an escape route? If the answer to all three is yes, a Gepard can justify its cost by denying helicopter attacks and preserving friendly vehicles. If the enemy has stopped using aircraft, another Gepard may offer less value than a ground-combat vehicle or additional team defenses.
The WARDOGS Vehicle Tier List compares the Gepard's situational value with tanks and other vehicles. The important distinction is that this vehicle earns its place through air control, not by replacing an L2A6 or T-72B3 in direct ground combat.
Common Gepard Mistakes That Get the Vehicle Destroyed
Most costly Gepard losses begin with a positioning or coordination mistake rather than an inability to fire the cannons. Avoid these habits before committing another $14,000 to the vehicle.
- Parking on the highest exposed hill: visibility is useful, but a full silhouette gives enemy rockets and anti-tank weapons an easy target.
- Operating without ground protection: a driver and gunner watching aircraft can miss infantry approaching from the rear.
- Firing continuously at distant helicopters: a listed weapon range does not mean every moving aircraft is a practical target.
- Ignoring helicopter movement: tracking the current position instead of leading a crossing target sends rounds behind it.
- Staying after revealing the position: repeated firing from one location allows enemies to plan their counterattack.
- Chasing damaged aircraft: pursuit can pull the Gepard beyond friendly infantry, repair support and safe retreat routes.
- Trying to duel main battle tanks: the Gepard is specialized for air defense and should not take over the frontline tank role.
- Using smoke without moving: concealment buys an opportunity to escape, not guaranteed immunity from incoming fire.
- Leaving without checking ammunition: a well-positioned Gepard cannot defend the sky if its main gun cannot sustain the next engagement.
- Buying one when the enemy has no meaningful air presence: specialist vehicles are valuable only when their specialty matters.
WARDOGS Gepard FAQ
These answers address additional questions about the Gepard's targeting, crew requirements and role against other vehicles.
Does the Gepard automatically lock onto helicopters with radar?
The official Season 2 information establishes the Gepard as an anti-air vehicle, but does not document an automatic radar lock or guaranteed tracking mechanic. Plan around visual acquisition and manual correction rather than relying on an unverified targeting feature.
Can a solo player use the Gepard effectively?
Yes, but the two-seat vehicle is more difficult to manage alone. Switching between driving and gunning slows reactions, especially when enemy helicopters and anti-tank infantry are attacking at the same time. A dedicated driver and gunner are preferable for sustained defense.
Do helicopter flares stop the Gepard's 35mm rounds?
No. Flares are intended to interfere with heat-seeking missile threats, while the Gepard fires cannon projectiles. A pilot must avoid the gunfire through movement, terrain or by breaking the gunner's line of sight.
Should the Gepard fight infantry and enemy tanks?
Its main assignment is shooting down or discouraging aircraft. Infantry and armored vehicles can threaten the Gepard, particularly at close range. Use friendly ground forces to handle those threats and reposition if the fight turns into a direct anti-tank engagement.
Conclusion
The Gepard is most effective when it protects a valuable area without becoming the easiest vehicle on the battlefield to locate and destroy. Keep the hull covered, follow helicopter routes instead of chasing aircraft, use accurate bursts, coordinate with friendly infantry and treat every exposed engagement as a reason to reconsider your position. A surviving Gepard that forces enemy pilots away from the fight can be more useful than one that secures a single helicopter kill and is immediately destroyed.