Black Temple is a 25-player Tier 6 raid where roster quality depends on assignments rather than a single perfect class list. A successful group needs enough tanks for Gurtogg Bloodboil and Mother Shahraz, enough raid healing for the Council and Illidan, and four specialized players who can switch into unusual tanking jobs. According to the official Phase 3 announcement, Black Temple opens globally on August 27, 2026 and contains nine encounters from High Warlord Naj'entus through Illidan Stormrage.
The safest starting point is three physical tanks, seven healers, and fifteen DPS. That roster can clear every encounter without replacing half the raid between bosses, provided one Mage is prepared for the Illidari Council, one Warlock owns a Shadow Resistance tank set, and two physical tanks own Fire Resistance sets for Illidan. This guide explains the full composition, five-party layout, class utility, healer coverage, and boss-specific assignments.
Best Black Temple Raid Composition
| Roster model | Tanks | Healers | DPS | When to use it |
|---|---|---|---|---|
| Balanced progression | 3 | 7 | 15 | Default setup for learning the full raid |
| Defensive progression | 3 | 8 | 14 | Gurtogg, Mother Shahraz, Council, or Illidan when deaths come from healing pressure |
| Farm setup | 3 | 6 | 16 | After assignments are stable and shorter fights reduce total incoming damage |
| Damage-focused farm | 2 plus one flexible off-tank | 5 to 6 | 17 to 18 | Only when the third tank can change role and return for mandatory three-tank encounters |
Do not build a permanent two-tank roster for Black Temple. Shade of Akama benefits from three add handlers, Gurtogg's Acidic Wound rotation is substantially safer with three tanks, Mother Shahraz divides Saber Lash between three targets, and the Council needs three conventional tank assignments in addition to its Mage tank. The third tank should be flexible enough to contribute damage on single-tank bosses without losing access to tank gear.
Every raider must also finish the entry requirements before the group forms. If one specialist is still blocked by the chain, the raid can lose an entire reset even when the composition itself is correct. The Black Temple Attunement Boost is a relevant optional route for players who still need the raid-dependent checkpoints and final Medallion of Karabor sequence.
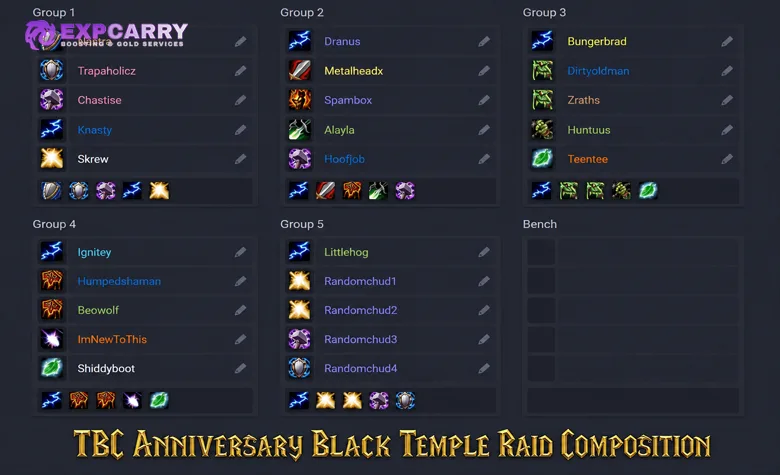
Recommended Seven-Healer Group Setup
The following roster includes every class, covers all four healing families, supplies five Shamans for party-specific totems, and keeps both special Illidan tank roles inside the regular 25-player group. It is a progression template rather than a rule. Replace duplicate classes according to attendance and player skill, but preserve the jobs listed in the final column.
| Party | Players | Purpose | Required preparation |
|---|---|---|---|
| Group 1 | Protection Warrior, Protection Paladin, Feral Druid, Restoration Shaman, Holy Paladin | Tank core with direct healing, defensive totems, and three physical tanks | Two tanks prepare Fire Resistance; the Warrior or Paladin prepares to main-tank Illidan |
| Group 2 | Enhancement Shaman, Arms Warrior, Fury Warrior, Rogue, Retribution Paladin | Melee damage, Windfury support, physical debuffs, interrupts, and healing reduction | Assign reliable interrupters for Reliquary and the Council |
| Group 3 | Enhancement Shaman, two Beast Mastery Hunters, Survival Hunter, Restoration Druid | Ranged physical group with Expose Weakness, attack-power support, and mobile healing | Hunters cover Misdirection, Tranquilizing Shot, traps, and rapid target swaps |
| Group 4 | Elemental Shaman, two Destruction Warlocks, Arcane Mage, Balance Druid | Caster group with Totem of Wrath, Wrath of Air, Moonkin Aura, and scalable spell damage | One Warlock prepares the Illidan Shadow Resistance set; the Mage prepares to tank Zerevor |
| Group 5 | Restoration Shaman, two Holy Priests, Holy Paladin, Shadow Priest | Raid-healing and mana-support group | Shadow Priest supports the healers; Priests cover Prayer of Shadow Protection and Mass Dispel |
This exact arrangement gives seven healers: a Restoration Shaman and Holy Paladin in Group 1, a Restoration Druid in Group 3, and four healers in Group 5. It also gives fifteen damage dealers, counting the support specializations. The three tanks are concentrated for clarity, but party membership should be adjusted between encounters when a different player benefits more from a totem, aura, Shadow Priest mana return, or Warlock Imp.
Anniversary Bloodlust and Party Buff Rules
Burning Crusade Classic Anniversary changes one of the old composition assumptions. The updated TBC Anniversary raid composition reference confirms that Heroism and Bloodlust are raid-wide and have a ten-minute restriction between applications. The associated Sated or Exhaustion restriction resets after a boss kill or wipe, so a raid no longer needs one Shaman in every party just to give every player Bloodlust.
Shaman totems remain party-specific, so additional Shamans still create meaningful value. Enhancement supports melee and Hunters, Elemental supports spell groups, and Restoration combines Chain Heal with mana or defensive totems. Bring several Shamans when those tools fit the roster, but do not remove a needed Mage tank, Warlock tank, Priest, or third physical tank simply to force five Shamans.
| Buff or utility | Coverage | Composition consequence |
|---|---|---|
| Heroism or Bloodlust | Raid-wide in Anniversary | One Shaman can provide the cooldown, although more remain useful for other reasons |
| Shaman totems | Party-specific | Place each Shaman with the physical, caster, healer, or tank group that uses its totems |
| Shadow Priest mana return | Party-specific | Use the Shadow Priest with healers on progression or Arcane Mages on damage checks |
| Leader of the Pack and Moonkin Aura | Party-specific | Keep the Feral Druid with physical players and the Balance Druid with casters when possible |
| Warlock Imp Blood Pact | Party-specific and range-limited | Move an Imp Warlock into the active tank group when extra health matters more than caster synergy |
| Paladin Greater Blessings | Applied by class across the raid | Multiple Paladins improve access to Kings, Salvation, Wisdom, and Might without controlling party layout |
Explore services related to this guide, selected from our TBC Raids catalog.
View All TBC Raids Services


Black Temple Tank Composition
The most adaptable tank trio is one Protection Warrior, one Protection Paladin, and one Feral Druid. This is not because each encounter demands those exact three classes; it is because their strengths cover different parts of the raid and reduce the number of roster substitutions. Two tanks must additionally carry Fire Resistance equipment, while one regular DPS Warlock becomes a fourth specialist tank during Illidan's demon phases.
| Tank | Primary strengths | Recommended Black Temple jobs | Preparation warning |
|---|---|---|---|
| Protection Warrior | Shield Block, defensive cooldowns, interrupts, Spell Reflection, and controlled single-target threat | Illidan ground phases, Supremus main tank, Reliquary Essence of Desire, Gathios or another Council member | Build a reliable Shear-avoidance setup for Illidan rather than relying on health alone |
| Protection Paladin | Area threat, block coverage, blessings, dispels, and flexible magical damage | Shade of Akama waves, trash packs, Illidan ground phases, Gurtogg rotation, Council control | Carry threat and mitigation sets; mana management changes sharply between bosses |
| Feral Druid | High armor and health, strong Hateful Strike soaking, mobility, and useful Cat-form damage when not tanking | Supremus secondary tank, Gurtogg rotation, Mother Shahraz Saber Lash, Flame of Azzinoth tank | Do not assign the Feral Druid as the default Illidan ground tank because avoiding Shear reliably favors block-capable tanks |
| Warlock tank | Ranged threat through Searing Pain and high Shadow Resistance | Illidan demon phases | Prepare capped or near-capped buffed Shadow Resistance, high health, spell hit, and a tested threat opener |
| Mage tank | Spellsteal and ranged threat while protected by stolen Dampen Magic | High Nethermancer Zerevor on the Illidari Council | Remove Salvation when appropriate, practice the pull, and never let Zerevor enter Arcane Explosion range of the raid |
The two Flame of Azzinoth tanks can be any suitable pair drawn from the Warrior, Paladin, and Feral Druid, but both need dedicated Fire Resistance gear and practiced movement. The Illidan main tank should be a Warrior or Protection Paladin capable of pushing Shear off the successful attack table through block, dodge, parry, and miss coverage.
Black Temple Healer Composition
A seven-healer roster should cover both sustained tank healing and rapid multi-target recovery. A practical mix is two Restoration Shamans, two Holy Priests, two Holy Paladins, and one Restoration Druid. One healer can be replaced by another capable player from a different healing class, but removing too much raid healing makes Naj'entus, Gurtogg, Mother Shahraz, the Council, and Illidan less stable.
| Healer | Core value | Best assignments |
|---|---|---|
| Restoration Shaman | Chain Heal, totems, Ancestral Fortitude, Mana Tide, and raid-wide Heroism or Bloodlust access | Naj'entus burst recovery, Gurtogg tank and soak coverage, Council raid healing, Illidan melee and tank support |
| Holy Priest | Flexible single-target and area healing, Prayer of Mending, Circle of Healing where talented, Mass Dispel, and Shadow Protection | Naj'entus, Mother Shahraz, Council, Soul Drain removal, and broad emergency coverage |
| Holy Paladin | Efficient direct tank healing, blessings, Cleanse, and strong single-target stability | Supremus tanks, Gurtogg active tank, Mother Shahraz tank trio, Gathios tank, Illidan main tank and Flame tanks |
| Restoration Druid | Mobile healing over time, Lifebloom maintenance, Swiftmend, and combat resurrection | Movement encounters, Gurtogg Fel Rage support, Mother Shahraz tanks, Illidan transitions and special tanks |
Assign healers by target instead of telling everyone to heal everything. On Gurtogg, name the active-tank healers, Bloodboil-group healers, and Fel Rage response team. On Mother Shahraz, divide tank healing from position-based raid coverage. On the Council, give Gathios at least two dedicated healers while the remaining healers cover three other tanks and random raid damage. On Illidan, identify the main-tank team, both Flame-tank teams, the Dark Barrage responder, and the Warlock-tank healers before the pull.
Black Temple DPS Composition
After three tanks and seven healers, the balanced roster has fifteen DPS positions. Raw damage matters, but Black Temple punishes groups that stack one damage profile while missing interrupts, Misdirection, magic dispels, ranged swaps, or the two specialist tank players. Every DPS position should contribute either exceptional output, unique utility, or both.
| Class or specialization | Recommended count | Black Temple value |
|---|---|---|
| Warlock | 2 to 4 | Strong scalable caster damage, Healthstones, curses, banish where applicable, and the required Illidan demon-form tank |
| Hunter | 2 to 4 | Misdirection, traps, ranged target switching, Tranquilizing Shot for Reliquary, and Survival Hunter Expose Weakness |
| Mage | At least 1 | Mandatory practical coverage for tanking Zerevor, Spellsteal, Counterspell, crowd control, and ranged burst |
| Rogue | 1 to 2 | Reliable interrupts, Wound Poison for Illidan, Evasion options, threat control, and strong single-target damage |
| Warrior DPS | 1 to 2 | Physical debuffs, Battle Shout, interrupts, Mortal Strike coverage, and strong melee scaling |
| Shadow Priest | 1 | Party mana support, Shadow damage synergy, emergency dispels, and flexible placement with healers or mana-heavy casters |
| Balance Druid | 0 to 1 | Moonkin Aura, Improved Faerie Fire, Innervate, combat resurrection, and caster-group support |
| Retribution Paladin | 0 to 1 | Additional blessing, judgement maintenance, aura utility, Cleanse, and physical-group support |
| Enhancement Shaman | 1 to 2 | Windfury, Strength of Earth, Grace of Air, Unleashed Rage, interrupts, and support for melee or Hunters |
| Elemental Shaman | 0 to 1 | Totem of Wrath, Wrath of Air, spell-hit support, ranged damage, and fast backup interrupts |
The suggested counts are ranges, not rejection rules. A skilled player with reliable attendance is usually more valuable than a theoretical perfect specialization played poorly. Preserve at least one Mage, one prepared Warlock tank, several strong interrupts, enough Hunters for comfortable Misdirection assignments, and sufficient ranged damage for Teron constructs and Illidan's airborne phase.
How to Build the Five Raid Groups
Party arrangement still matters even though Anniversary Bloodlust is raid-wide. Start by placing players around party-limited buffs, then move healers or specialists when a boss changes the priority. The original five-party template should be treated as a saved baseline, not a layout that can never be edited.
- Build the physical melee group around an Enhancement Shaman, then add the players who gain the most from Windfury and Unleashed Rage.
- Build the Hunter group around an Enhancement Shaman or other appropriate totem support and keep Survival Hunter utility available to the raid.
- Place the Elemental Shaman and Balance Druid with the strongest caster core.
- Put the Shadow Priest with healers during mana-intensive progression, or with Arcane-heavy casters when damage is the limiting factor.
- Place a Restoration Shaman with tanks when Stoneskin, Grace of Air, resistance totems, or Ancestral Fortitude improves survival.
- Move the Warlock tank and its assigned healers into a practical Illidan group before the pull; do not improvise party changes during the demon transition.
- For Alliance rosters, account for Draenei party hit auras when positioning Hunters, melee, and casters. Horde rosters must cover the same hit targets through gear and other buffs.
Do not weaken the entire raid to create one perfect damage party. A group layout is successful when tanks receive the defensive tools they need, healers can sustain assigned targets, specialist tanks function correctly, and both physical and caster damage groups retain their main synergies.
Boss-by-Boss Composition and Role Assignments
The exact player count does not change between bosses, but active tank and healer requirements do. The Black Temple raid overview is useful for checking the encounter order and individual boss references, while the table below shows how to deploy the same balanced roster through the full instance.
| Boss | Tank plan | Healer plan | DPS and specialist assignments |
|---|---|---|---|
| High Warlord Naj'entus | One active tank; off-tanks contribute damage | Six to seven healers with clear Tidal Burst recovery | Assign spine removers and one thrower; spread the raid without leaving healing range |
| Supremus | Main tank plus a high-health Hateful Strike tank | Two tank-healing lanes plus mobile raid coverage | Stop damage during the threat reset; every player must react to Fixate and volcanoes |
| Shade of Akama | Two doorway tanks plus one Defender handler | Six to seven healers; one can contribute damage when adds are controlled | Split Channeler DPS, prioritize Spiritbinders, and keep crowd control available |
| Teron Gorefiend | One active tank | Five to six are sufficient after practice; keep seven during early progression | Every non-tank must understand Vengeful Spirit controls; assign Incinerate dispels |
| Gurtogg Bloodboil | Three-tank Acidic Wound and Bewildering Strike rotation | Seven to eight with a named Fel Rage response team | Create three Bloodboil groups of five and keep all non-targets away from Fel Rage |
| Reliquary of Souls | Fixate rotation in phase one, Warrior preferred in phase two, one stable tank in phase three | Healers DPS in phase one, then use full output in phases two and three | Assign Spirit Shock interrupts, Rune Shield removal, Soul Drain dispels, and Tranquilizing Shot |
| Mother Shahraz | Three tanks stacked for Saber Lash | Seven to eight with tank and position-based raid assignments | All non-tanks prepare Shadow Resistance; Priests maintain Prayer of Shadow Protection |
| The Illidari Council | Three physical tanks plus one Mage tank | Seven to eight; give Gathios at least two dedicated healers | Cover Malande with physical and magical interrupts and use Misdirection for a controlled pull |
| Illidan Stormrage | One block-capable ground tank, two Fire Resistance Flame tanks, one Shadow Resistance Warlock | Seven to eight with separate main-tank, Flame-tank, Warlock-tank, and raid coverage | Assign parasite positions, ranged groups, Shadow Demon slows, healing reduction, and trap movement |
When to Use an Eighth Healer
Add an eighth healer when logs show unavoidable damage is exceeding assigned coverage, not whenever players die to unhandled mechanics. Another healer will not fix missed Spirit Shock interrupts, failed Teron ghosts, bad Fatal Attraction movement, Flames of Azzinoth leaving their tether area, or players standing in Council ground effects.
- Use eight healers on Gurtogg when tank spikes, overlapping Bloodboils, or Fel Rage targets die despite correct positioning.
- Use eight on Mother Shahraz when resistance sets are incomplete or Fatal Attraction recovery remains inconsistent.
- Use eight on the Council while four tanks and random raid targets regularly take overlapping damage.
- Use eight on Illidan while both Flame tanks, Dark Barrage targets, and the Warlock tank are still new assignments.
- Return to seven when the eighth healer spends long periods without a meaningful target or the fight fails to damage checks.
Replace a lower-impact DPS slot rather than one of the required specialists. Never remove the Mage tank, prepared Warlock tank, Survival Hunter, only reliable physical interrupter, or a class providing an essential dispel just to add healing. If a hybrid changes specialization, confirm that the character owns proper healing gear, enchants, consumables, and a practiced interface.
Minimum Utility Checklist
- Three physical tanks, including one block-capable Illidan main tank.
- Two Fire Resistance tank sets for Flames of Azzinoth.
- One Warlock with a complete Shadow Resistance tank set.
- One Mage prepared to Spellsteal and tank High Nethermancer Zerevor.
- At least one Priest for Prayer of Shadow Protection and Mass Dispel coverage.
- Physical and magical interrupts for Lady Malande.
- A fixed interrupt rotation for Spirit Shock during Reliquary of Souls.
- Magic dispels for Incinerate and Soul Drain.
- Healing-reduction coverage for Illidan's Draw Soul through Wound Poison, Mortal Strike, or Aimed Shot.
- Hunters for Misdirection, traps, and Tranquilizing Shot.
- At least one Shaman for raid-wide Heroism or Bloodlust and useful party totems.
- Enough ranged damage and slows for Illidan's Flames, parasites, and Shadow Demons.
- Three predetermined groups of five Bloodboil soakers.
- Combat resurrection, Innervate, Healthstones, and emergency personal consumables assigned before the pull.
Building a Reliable Thirty-Player Roster
A guild roster should be larger than the 25 players inside the raid. Aim for roughly thirty dependable raiders so absences do not remove a unique role. Bench planning is especially important when the missing player is the Council Mage tank, Illidan Warlock tank, third physical tank, only Priest, or one of the Fire Resistance tanks.
| Bench priority | Recommended coverage | Reason |
|---|---|---|
| Tank substitute | One flexible Feral Druid, Protection Paladin, or geared tank-capable hybrid | Preserves the mandatory three-tank encounters |
| Healer substitute | One raid healer and one tank-healing option across the wider roster | Supports both seven- and eight-healer versions |
| Specialist substitute | Second prepared Mage and second Warlock with access to resistance gear | Prevents Council or Illidan from being cancelled by one absence |
| Flexible DPS | Ranged player with interrupts, dispels, Misdirection, or another missing utility | Fills attendance gaps without creating a new assignment weakness |
Track attendance, resistance sets, off-spec gear, attunement status, and special-role practice in the same roster sheet. A name on the bench is not genuine coverage if that character cannot enter the instance or has never performed the role it is expected to replace.
Common Raid Composition Mistakes
- Copying an original TBC five-Shaman Bloodlust layout without accounting for Anniversary's raid-wide version.
- Building around only two tanks and discovering that the third tank cannot return for Gurtogg, Mother Shahraz, or the Council.
- Counting the Mage and Warlock as specialist tanks without verifying their resistance gear and practice.
- Stacking healers while leaving Spirit Shock, Malande, Incinerate, or Soul Drain without reliable coverage.
- Keeping party groups unchanged on every boss even when tank, mana, or caster support priorities change.
- Placing the Shadow Priest with damage dealers while healers are ending progression attempts without mana.
- Using eight healers to compensate for avoidable deaths, then failing the encounter because damage is too low.
- Removing ranged DPS until Illidan's Flames, parasites, or Shadow Demons cannot be killed safely.
- Recruiting only for damage rankings and ignoring attendance, interrupts, dispels, crowd control, and special jobs.
- Waiting until Illidan to discover that two Fire Resistance tanks and one Shadow Resistance Warlock were never equipped.
If a guild has the core roster but lacks consistent availability for a full 25-player clear, the formats listed on the Black Temple raid service provide an optional reference for scheduled boss access or full-clear support. Composition remains the raid leader's responsibility whenever the guild organizes the run independently.
Final Verdict
The strongest Black Temple composition is not twenty-five copies of the highest-ranked classes. Start with three physical tanks, seven healers, and fifteen DPS; include a Mage tank, a Shadow Resistance Warlock, and two Fire Resistance tanks; then organize the parties around totems, caster support, physical buffs, and healer mana. Anniversary's raid-wide Bloodlust makes the roster more flexible, but party-specific utility still rewards deliberate group placement. A raid that preserves every specialist assignment and changes healer coverage by encounter will progress more reliably than a theoretically faster roster that loses one essential role whenever attendance changes.