
Priest covers two very different raid jobs in TBC Anniversary: flexible healing through Holy or Discipline and support damage through Shadow. Holy is the default healing choice because it combines efficient single-target spells with powerful party healing. Discipline sacrifices much of that throughput to bring Improved Divine Spirit, Power Infusion, and Pain Suppression. Shadow supplies steady damage, Shadow Weaving, Misery, healing through Vampiric Embrace, and party mana through Vampiric Touch. Phase 3 adds Hyjal Summit, Black Temple, Tier 6, spell haste gear, and epic gems; Blizzard places the global raid opening on August 27 in its official Phase 3 announcement. This guide explains how every Priest PvE specialization should build, play, cap stats, and plan Phase 3 gear.
Priest PvE Specializations at a Glance
The correct Priest specialization depends on the raid slot, healing assignments, and party composition. Holy offers the broadest healing toolkit and the best general throughput. Discipline is a planned utility pick whose value rises only when the raid can exploit its cooldowns. Shadow is a support DPS that improves caster damage and returns mana to its own five-player party. The comparison below sets realistic expectations before the detailed builds.
| Specialization | Primary Role | Main Strength | Main Limitation |
|---|---|---|---|
| Holy | Raid healing with flexible single-target coverage | Circle of Healing, Prayer of Mending, strong spell selection, and high throughput | Fast casting and repeated party healing can exhaust mana quickly |
| Discipline | Cooldown support and assigned healing | Pain Suppression, Power Infusion, Improved Divine Spirit, and durable emergency tools | Lower healing output and efficiency than deep Holy |
| Shadow | Single-target support DPS | Vampiric Touch mana, Misery, Shadow Weaving, and reliable sustained pressure | No true TBC raid AoE and strict DoT, cooldown, mana, and threat management |
Holy normally occupies the highest number of Priest healing slots, while Discipline should enter the roster with a specific cooldown plan. Shadow commonly earns its place through total party and caster value rather than personal damage alone. That distinction also appears in the current ExpCarry Phase 3 healer overview and Phase 3 DPS overview.
Holy Priest Phase 3 PvE Guide
Holy is the safest all-purpose Priest healing specialization for Phase 3 raids. It can answer tank spikes, sustained raid damage, movement, and party-wide bursts without changing specialization. Its greatest advantage is spell choice: the player can match heal size, cast time, mana cost, and targeting pattern to each damage event. Its main weakness is that a poorly planned Holy Priest can spend mana at an unsustainable rate while producing avoidable overhealing.
Holy Priest Talents and Raid Role

The standard raid build is 20/41/0 with Circle of Healing. The Discipline investment secures Improved Power Word: Fortitude, Improved Power Word: Shield, Meditation, Inner Focus, and Mental Agility. The Holy tree supplies Healing Focus, Improved Renew, Divine Fury, Inspiration, Holy Reach, Healing Prayers, Spirit of Redemption, Spiritual Guidance, Spiritual Healing, and Circle of Healing. Empowered Healing points strengthen single-target casts, while Improved Healing becomes more attractive when the Priest regularly covers a tank.
Circle of Healing makes this build the strongest Priest answer to damage concentrated inside one party. Holy Reach expands its practical targeting radius, and Healing Prayers improves the mana cost of Prayer of Mending and Prayer of Healing. Inspiration gives critical direct heals a valuable armor buff, but it does not stack with the Shaman equivalent, so healing leaders should not build assignments around duplicate uptime.
A 23/38/0 Improved Divine Spirit variant is possible when the raid already has enough group healing and wants an additional caster buff. It gives up Circle of Healing and part of Empowered Healing, so it is normally assigned to tanks or predictable single targets. For most rosters, the 20/41/0 Circle of Healing setup is the better default. The Priest healing talent guide shows the current point frameworks and the few assignment-based swaps.
Holy Healing Priority and Core Abilities
Holy does not follow a repeating rotation. Before the pull, establish the tank assignment, identify which parties will take synchronized damage, and decide whether mana or peak throughput will limit the encounter. During combat, use Prayer of Mending when incoming hits will make it bounce; it has a 10-second cooldown and can jump up to five times after the initial application. Then choose the smallest spell that safely resolves the next damage event. Canceling an unnecessary cast protects mana, but finishing a controlled heal is better than reacting late with an expensive emergency spell.
Circle of Healing is the first response when several injured players are in the same party. It is instant and can be used while moving, but each cast only reaches the selected target and that target's party members. Prayer of Healing handles heavier party damage when there is time to stand still and complete the cast. Greater Heal is the efficient answer to large single-target deficits, Heal is useful when damage is moderate, and Flash Heal is reserved for targets that cannot safely wait for a longer cast.
Keep Renew on players taking predictable damage or use it while repositioning, but avoid covering healthy players without a reason. Power Word: Shield is an emergency buffer, a movement cast, or a preplanned absorb; Weakened Soul prevents immediate repeat shielding. Binding Heal is efficient when both the Priest and another target are hurt. Inner Focus is best attached to an expensive spell at a moment when the free cast and added critical chance matter. Shadowfiend should be used early enough that its full attack window connects and the cooldown is not saved past the encounter. The detailed Priest healing ability guide provides spell-by-spell use cases.
Holy Stats and Caps
Holy gearing is governed by the encounter's mana and cast-density requirements rather than one universal numerical cap. Phase 3 introduces enough spell haste to build a meaningful throughput set, but haste also compresses casts and spends mana faster. A progression healer should first survive the mechanic, then carry enough regeneration to finish the fight, and only then maximize the speed of useful healing.
- Bonus healing is the baseline throughput stat and improves nearly every healing button.
- Spirit supports regeneration through Meditation and also adds healing through Spiritual Guidance.
- Spell haste becomes a major Phase 3 throughput stat; 15.77 haste rating gives roughly 1 percent spell haste at level 70.
- Intellect expands the mana pool and adds a small amount of spell critical chance.
- Mana per 5 seconds is reliable while casting and gains value on long assignments with little time outside the five-second rule.
- Spell critical chance raises direct-heal output and Inspiration uptime, but it is less predictable than healing power or haste.
- Spell hit and expertise do not improve healing and have no Holy PvE cap.
- There is no universal defensive cap; Stamina and encounter resistance are taken only when survival demands them.
A practical Holy priority is survival and sufficient regeneration first, followed by bonus healing and the amount of haste the player can sustain. Spirit-heavy and haste-heavy sets should both remain available. The healing stat reference explains the level 70 conversions and regeneration interactions.
Holy Phase 3 Gear, Weapons, Tier Sets, and BiS
Holy does not have one correct Phase 3 loadout for every boss. The Avatar Raiment four-piece bonus remains competitive on Renew-heavy encounters, while the higher item-level Vestments of Absolution offers more raw healing and regeneration. Its two-piece bonus reduces Prayer of Healing's mana cost by 10 percent, and its four-piece bonus increases Greater Heal healing by 5 percent. Use four Tier 6 pieces when those bonuses fit the assignment; otherwise retain the Tier 5 set until the off-set upgrades create a clear gain.
| Slot | Holy Phase 3 Target | Source | Planning Note |
|---|---|---|---|
| Head | Cowl of Absolution | Archimonde, Hyjal Summit | Tier 6 set piece with healing, Spirit, and mana per 5 seconds |
| Shoulders | Swiftheal Mantle or Mantle of Absolution | Tailoring or Mother Shahraz | Use haste for chain-casting; use tier when needed to complete four pieces |
| Back | Shroud of the Highborne | Illidan Stormrage, Black Temple | Premium haste cloak with strong healing value and heavy caster competition |
| Chest | Vestments of Absolution | Illidan Stormrage, Black Temple | Central Tier 6 piece with three sockets and balanced sustain |
| Wrists | Swiftheal Wraps | Tailoring | Throughput choice for frequent Circle of Healing and dense casting |
| Hands | Gloves of Absolution | Azgalor, Hyjal Summit | Efficient tier slot for preserving the four-piece framework |
| Waist | Angelista's Sash | Kaz'rogal, Hyjal Summit | Haste target for global-cooldown-limited healing |
| Legs | Leggings of Eternity or Breeches of Absolution | Archimonde or Illidari Council | The off-set legs are stronger individually; tier legs can preserve four pieces with crafted shoulders |
| Feet | Boots of the Divine Light | Hyjal Summit and Black Temple trash | Balanced healing, Spirit, Stamina, and socket value |
| Neck | Nadina's Pendant of Purity | Mother Shahraz, Black Temple | Strong uncontested healing and regeneration profile |
| Rings | Two Blessed Bands of Karabor | Black Temple trash | The ring is not unique, so two copies form the maximum-throughput target |
| Trinkets | Essence of the Martyr and Eye of Gruul | Badge vendor and Gruul | Use the active trinket for burst; the proc trinket is exceptional when Circle of Healing hits several targets |
| Main Hand | Crystal Spire of Karabor | Illidan Stormrage, Black Temple | Top Holy priority because its low-health proc can trigger through multi-target healing |
| Off-hand | Scepter of Purification | Archimonde, Hyjal Summit | Best healing and regeneration partner for a one-handed weapon |
| Wand | Naaru-Blessed Life Rod | Reliquary of Souls, Black Temple | Strongest Phase 3 healing wand; avoid consuming raid shadow-vulnerability charges with wand attacks |
Build the set around assignment and kill time rather than copying every haste piece at once. The complete Phase 3 Priest healing BiS guide contains alternatives for every slot. The ExpCarry Tier 5 token guide is useful when preserving the older four-piece bonus, while the broader TBC progression hub places raid and character routes in one overview.
Discipline Priest Phase 3 PvE Guide
Discipline is a specialist PvE healer, not the normal replacement for Holy. Its reason to exist is a planned combination of Pain Suppression, Power Infusion, and Improved Divine Spirit. A raid that cannot name the tank burst, caster window, or composition problem those tools solve will usually gain more from a Circle of Healing Priest. When the plan is clear, Discipline can prevent lethal damage and concentrate utility into the exact moments that decide a pull.
Discipline Talents and Raid Role

The defining PvE build is 42/19/0. Deep Discipline takes Meditation, Inner Focus, Mental Agility, Mental Strength, Improved Divine Spirit, Power Infusion, Enlightenment, and Pain Suppression. The remaining Holy points should secure Healing Focus, Improved Renew, Inspiration, and cast or mana improvements that match the assignment. This build cannot reach Circle of Healing and loses many deep Holy throughput talents, so it should not be evaluated by the same raw healing standard.
Pain Suppression reduces the target's incoming damage by 40 percent for 8 seconds, lowers threat by 5 percent, and has a 2-minute cooldown. Its best PvE use is proactive: cast it just before a known tank burst or on a player who must survive a scripted mechanic. Power Infusion increases casting speed by 20 percent and reduces mana costs by 20 percent for 15 seconds on a 3-minute cooldown. Coordinate it with a caster who can remain active for the full duration; its haste does not combine with Bloodlust or Heroism, and the effect cannot be paired with Arcane Power.
Improved Divine Spirit converts part of each affected player's Spirit into spell damage and healing, making the Discipline Priest a raid-wide caster support. That value is composition dependent: Spirit-heavy groups gain more, and a second provider adds little. The build is therefore strongest when one player owns the buff and the raid schedules both external cooldowns. The same healing talent resource includes the 42/19/0 framework and explains why it remains a deliberate niche.
Discipline Healing Priority and Cooldown Use
Discipline also uses a priority system rather than a fixed sequence. Keep Prayer of Mending moving when the encounter will trigger jumps. Use Greater Heal for planned tank damage, Heal for moderate efficient coverage, and Flash Heal only when the target cannot wait. Renew covers movement and predictable pressure. Power Word: Shield prevents a near-term hit or protects a moving player, but repeated casts are limited by Weakened Soul and should not replace efficient direct healing.
Pain Suppression belongs on the timeline before the dangerous hit, not after the health bar has already collapsed. Confirm whether the tank's own defensive effect or another external cooldown is covering the same window. Power Infusion should be assigned before the pull and delayed only when movement, immunity, or target downtime would waste it. Discipline can cast it on the healer when survival demands faster throughput, but raid damage usually improves more when it supports an appropriate caster DPS.
Inner Focus removes the mana cost of the next eligible spell and adds critical chance, so combine it with a large, expensive heal when the free cast is likely to land effectively. Shadowfiend is still the main personal mana cooldown and should connect for its full duration. Dispel Magic, Mass Dispel, and abolish effects are part of the Priest's raid value, but unnecessary dispels can destroy the mana budget just as quickly as excessive Flash Heal use.
Discipline Stats and Caps
Discipline values reliable healing and sustain because the build lacks Holy's deep efficiency and throughput multipliers. Its cooldowns are talent effects and do not scale from a special utility stat, so gear should make the healer dependable between those windows. Tank assignments generally favor bonus healing, Spirit, Intellect, and mana per 5 seconds before aggressive haste stacking.
- Bonus healing directly raises the output of the single-target spells used between cooldown windows.
- Spirit improves out-of-cast regeneration, retains partial value through Meditation while casting, and strengthens Improved Divine Spirit's caster benefit.
- Intellect provides a larger starting mana pool for long attempts and a small critical-heal gain.
- Mana per 5 seconds is stable regeneration for assignments that permit almost no time outside the five-second rule.
- Spell haste shortens direct heals and the global cooldown, but it has no hard target and can worsen mana consumption.
- Spell critical chance supports Inspiration uptime, though it is not reliable enough to replace healing power or sustain.
- Healing spells need neither spell hit nor expertise, so Discipline has no offensive accuracy cap.
- No single defensive rating cap exists for a healer; select Stamina and resistance for the mechanics that can actually kill the player.
The correct Discipline balance is enough regeneration to reach the final cooldown cycle, enough health to survive unavoidable damage, then maximum effective healing. Haste pieces become better when the assignment requires uninterrupted casting, while Spirit and mana per 5 seconds are safer during early progression.
Discipline Phase 3 Gear, Weapons, Tier Sets, and BiS
Discipline gains more practical value from the Greater Heal bonus on four Vestments of Absolution pieces than a Circle of Healing specialist does. Even so, the four-piece set should be assembled as a package rather than by equipping every token immediately. Favor the regeneration alternatives in contested slots and carry separate throughput pieces for shorter or more intense encounters.
| Slot | Discipline Phase 3 Target | Source | Planning Note |
|---|---|---|---|
| Head | Cowl of Absolution | Archimonde, Hyjal Summit | Tier piece with the Spirit and mana profile Discipline wants |
| Shoulders | Mantle of Absolution | Mother Shahraz, Black Temple | Preferred set slot for the Greater Heal four-piece plan |
| Back | Shroud of Forgiveness | Gurtogg Bloodboil, Black Temple | Strong healing and Spirit without spending item budget on aggressive haste |
| Chest | Vestments of Absolution | Illidan Stormrage, Black Temple | High-value set piece with flexible sockets |
| Wrists | Bracers of Martyrdom | Rage Winterchill, Hyjal Summit | Regeneration choice for long single-target assignments |
| Hands | Gloves of Absolution | Azgalor, Hyjal Summit | Completes the most convenient four-piece structure |
| Waist | Belt of Divine Guidance | Illidari Council, Black Temple | Efficient sustain option when constant haste is unnecessary |
| Legs | Leggings of Eternity | Archimonde, Hyjal Summit | Best individual off-set legs once four tier pieces are secure elsewhere |
| Feet | Boots of the Divine Light | Hyjal Summit and Black Temple trash | Balanced survival, sockets, healing, and Spirit |
| Neck | Nadina's Pendant of Purity | Mother Shahraz, Black Temple | Reliable healing and mana support for assigned coverage |
| Rings | Two Blessed Bands of Karabor | Black Temple trash | Maximum set target; replace one temporarily when a longer fight needs more regeneration |
| Trinkets | Memento of Tyrande and Darkmoon Card: Blue Dragon | Illidan Stormrage and Darkmoon Faire | Static healing plus two complementary forms of mana recovery |
| Main Hand | Crystal Spire of Karabor or Hammer of Atonement | Illidan Stormrage or Kaz'rogal | The first is the raw target; the second is a practical single-target alternative with lower Priest priority |
| Off-hand | Scepter of Purification | Archimonde, Hyjal Summit | Pairs healing power with the regeneration needed for tank coverage |
| Wand | Naaru-Blessed Life Rod | Reliquary of Souls, Black Temple | Best healer wand for the phase |
Discipline uses the same healer loot pool as Holy but selects more regeneration pieces and values Tier 6 Greater Heal synergy more often. Use the Phase 3 Priest healing BiS list for every fallback, then judge each swap against the actual tank assignment and kill time.
Explore services related to this guide, selected from our WoW TBC Anniversary catalog.
View All WoW TBC Anniversary Services


Shadow Priest Phase 3 PvE Guide
Shadow is a sustained support DPS built around DoT uptime, Mind Blast and Shadow Word: Death cooldowns, efficient Mind Flay channels, and party mana. It improves caster damage through Shadow Weaving and Misery while Vampiric Touch converts 5 percent of the Priest's shadow damage into mana for the Priest's party. The specialization is valuable even when it trails pure damage classes, but it loses output rapidly when DoTs fall off, cooldowns drift, movement interrupts channels, or threat forces long periods of inactivity.
Shadow Talents and Raid Role
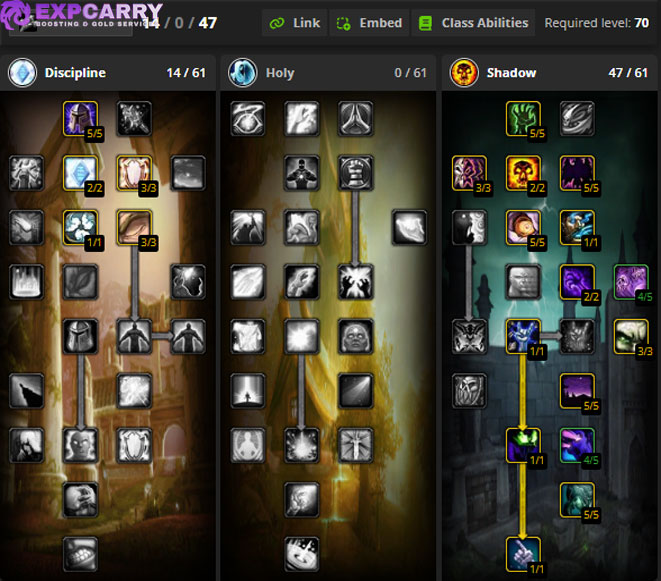
The standard PvE framework is 14/0/47. The Discipline portion reaches Meditation and Inner Focus after taking early utility such as Improved Power Word: Fortitude and Improved Power Word: Shield; the first-tier prerequisite can vary without changing the damage engine. Deep Shadow takes Shadow Affinity, Improved Shadow Word: Pain, Shadow Focus, Mind Flay, Shadow Reach, Shadow Weaving, Vampiric Embrace, Focused Mind, Darkness, Shadowform, Shadow Power, Misery, and Vampiric Touch.
The default 14/0/47 build uses 3/3 Focused Mind, 4/5 Shadow Weaving, and one fewer point in Shadow Power. This is the safer progression choice because running out of mana costs more damage than a small critical-strike gain. A maximum-output variant uses 1/3 Focused Mind with 5/5 Shadow Weaving and 5/5 Shadow Power; it becomes reasonable when kills are short and mana support is reliable.
Shadow Weaving increases shadow damage taken by the target and should reach five stacks quickly. Misery increases spell damage taken from all sources while the Priest's core DoTs are active. Vampiric Embrace converts a share of shadow damage into healing, while Vampiric Touch returns mana only to the Priest's party, not the entire raid. Those effects explain why party placement matters. The Shadow Priest talent guide compares the efficiency and maximum-output point distributions.
Shadow Single-Target Rotation and Multi-Target Play
Open with Vampiric Touch, apply Shadow Word: Pain, then use Mind Blast and Shadow Word: Death when available. Fill the space with Mind Flay and refresh each DoT only when it is about to expire. Mind Flay deals three ticks over its channel; learn the tick timing so movement or a higher-priority cooldown does not erase a tick. Do not delay Mind Blast to finish a low-value channel when the cooldown is already ready.
Shadow Word: Death is powerful but returns damage to the caster when the target survives. Skip or delay it when the recoil overlaps lethal raid damage. Vampiric Touch deserves high uptime because it supplies damage and party mana, while Shadow Word: Pain is efficient over its full duration. Keep Shadow Weaving active through normal spell use and treat threat as a real constraint: begin cleanly, use Fade before the limit becomes a problem, and avoid forcing the tank to recover from an early spike.
TBC Shadow has no Mind Sear and therefore no true sustained raid AoE spell. On two or more durable enemies, spread Vampiric Touch and Shadow Word: Pain only to targets that will live long enough for the DoTs to earn their mana cost, then keep Mind Blast, Shadow Word: Death, and Mind Flay focused according to the kill order. Shadowfiend should be cast early enough to complete all attacks. Use Inner Focus on an eligible direct spell when the free cast helps the mana plan. The full Shadow rotation reference covers cooldown timing and channel behavior.
Shadow Stats, Spell Hit Cap, and Defensive Requirements
Shadow must solve spell hit before optimizing the rest of the set. A level 73 raid boss requires 16 percent added spell hit to reach the practical cap because a 1 percent miss chance always remains. Five points in Shadow Focus supply 10 percent for shadow spells, leaving 6 percent from gear, equal to about 76 spell hit rating at level 70. A Draenei caster in the same party lowers the gear requirement to about 63 rating. Recalculate after every talent or party change rather than assuming the displayed set is capped.
- Spell hit reaches the required cap first; rating beyond the cap has no damage value.
- Spell power is the strongest uncapped general damage stat and improves every core shadow spell.
- Spell haste is extremely strong in Phase 3 because it shortens Mind Flay channels, casts, and the global cooldown; 15.77 rating is roughly 1 percent haste at level 70.
- Haste does not add ticks to Vampiric Touch or Shadow Word: Pain and does not shorten the Mind Blast cooldown.
- Spell critical strike rating is secondary because DoTs and Mind Flay cannot critically strike.
- Intellect, Spirit, and mana per 5 seconds improve longevity but normally do not outrank spell power or useful haste.
- Expertise has no value for a caster, and spell penetration is normally unnecessary against properly debuffed raid bosses.
- There is no universal defensive cap; carry enough Stamina and encounter resistance to survive the mechanic without abandoning the hit cap.
Once capped, a practical priority is spell power, spell haste, then spell critical chance, with mana stats judged by fight length. Phase 3 gear contains enough hit that some advanced sets can remove Shadow Focus points, but each removed point adds 2 percent to the gear requirement. The Shadow stat guide documents the conversions and later-phase haste behavior.
Shadow Phase 3 Gear, Weapons, Tier Set, and BiS
The Phase 3 objective is four pieces of Absolution Regalia. The two-piece bonus extends Shadow Word: Pain by 3 seconds, and the four-piece bonus increases Mind Blast damage by 10 percent. Head, shoulders, chest, and hands form the clean target because strong off-set legs and crafted wrists remain available. Spell hit must still be checked on the completed character, especially when replacing older hit-heavy pieces.
| Slot | Shadow Phase 3 Target | Source | Planning Note |
|---|---|---|---|
| Head | Hood of Absolution | Archimonde, Hyjal Summit | Tier piece with spell hit and access to the four-piece bonus |
| Shoulders | Shoulderpads of Absolution | Mother Shahraz, Black Temple | Best long-term tier shoulder target |
| Back | Nethervoid Cloak | Black Temple trash | Large spell-hit contribution and little healer competition |
| Chest | Shroud of Absolution | Illidan Stormrage, Black Temple | High spell power, sockets, hit, and Tier 6 progress in one slot |
| Wrists | Bracers of Nimble Thought | Tailoring | Crafted haste and spell-power target that can be purchased |
| Hands | Handguards of Absolution | Azgalor, Hyjal Summit | Completes the preferred four-piece tier arrangement |
| Waist | Waistwrap of Infinity | Supremus, Black Temple | Excellent spell haste and spell power |
| Legs | Leggings of Channeled Elements | Kaz'rogal, Hyjal Summit | Best off-set target, though highly contested by caster DPS |
| Feet | Frozen Shadoweave Boots or Slippers of the Seacaller | Shadoweave Tailoring or High Warlord Naj'entus | The crafted boots win with Phase 3 gem scaling; the raid boots are the close non-Tailoring choice |
| Neck | Translucent Spellthread Necklace | Reliquary of Souls, Black Temple | Small personal upgrade with substantial competition from other casters |
| Rings | Two Rings of Ancient Knowledge | Black Temple trash | Not unique, so the completed Phase 3 target uses two copies |
| Trinkets | The Skull of Gul'dan and Darkmoon Card: Crusade | Illidan Stormrage and Darkmoon Faire | Haste plus a strong stacked spell-power effect; protect the card's stacks through downtime |
| Weapon | Zhar'doom, Greatstaff of the Devourer | Illidan Stormrage, Black Temple | Best two-handed target and one of the phase's most contested caster drops |
| Off-hand Alternative | Orb of the Soul-Eater | Badge vendor | Equip only with a one-handed weapon; it cannot be used with the two-handed staff |
| Wand | Wand of the Forgotten Star | High Astromancer Solarian, Tempest Keep | Remains the maximum personal-damage wand target in Phase 3 |
Loot priority matters because the staff, trinket, cloak alternatives, and off-set legs are shared with several caster DPS. Secure the four-piece bonus and hit cap first, use crafted pieces to reduce raid competition, then chase the contested haste upgrades. The complete Phase 3 Shadow Priest BiS guide lists fallbacks for every slot. The ExpCarry Black Temple raid page can also be used to map the listed drops to the relevant clear.
Final Verdict
Holy is the default Priest healer for Phase 3 because it solves the widest range of raid damage with the fewest compromises. Discipline is worthwhile when the roster has a documented use for Pain Suppression, Power Infusion, and Improved Divine Spirit, but it should not be chosen merely because the tree is labeled as healing support. Shadow remains a valuable caster-party specialist whose real contribution combines damage, mana return, healing, and debuffs. Whichever path you choose, correct assignments, sustainable spell use, the relevant cap, and a coherent Tier 6 plan matter more than copying a gear score or a single static list.