
Nuke is one of the most strategically unusual maps in CS2 Premier because its two bombsites are stacked vertically. A is on the upper level, B sits underneath it, and routes such as Vents, Ramp and Secret let players move between floors extremely quickly.
That vertical structure makes Nuke less about simply choosing A or B and more about controlling information. Outside pressure can become Secret and B, Lobby pressure can become an A execute or Ramp split, and a single Vent rotation can completely change a round.
Is Nuke in CS2 Premier?
Yes. Nuke remains part of the current Active Duty and Premier map rotation.
See the complete CS2 Premier Map Pool.
Did Nuke Change in 2026?
Nuke has not required a major strategic relearn during the current 2026 Premier season.
The familiar core remains:
- Lobby pressure toward Hut and Squeaky;
- Outside control around Garage, Silo and Secret;
- Ramp as the second major route toward B;
- Vents connecting the upper and lower sites;
- Heaven and Rafters providing vertical control over A.
This makes Nuke a relatively stable map to learn, although exact grenade lineups should still be checked after future updates.
Nuke Map Structure
The easiest way to understand Nuke is to divide it into four strategic zones:
- Upper A: Hut, Squeaky, Main/Mini, Rafters, Heaven;
- Outside: Silo, Yard, Red, Garage, Mini, Secret;
- Ramp: Trophy/Radio → Ramp → lower level;
- Lower B: Decon, Double Doors, Dark, Window, Tunnels, Vents.
Explore services related to this guide, selected from our Counter Strike 2 catalog.
View All Counter Strike 2 Services


Essential Nuke Callouts
| Area | Important Callouts |
|---|---|
| Lobby / A Entry | Lobby, Hut, Squeaky, Trophy, Radio, Vending, Roof |
| A Site | A Site, Default, Tetris, Rafters, Heaven, Main, Mini, Vent |
| Outside | Outside/Yard, Silo, Red, Garage, Mini, Secret, CT Red |
| Ramp | Ramp, Headshot, Big Box, Control/Boost |
| B Site | B Site, Dark, Window, Double Doors, Decon, Back Vents, Tunnels |
| CT Side | CT Spawn, Heaven, Hell, Lockers, Admin |
Official Names vs Community Callouts
CS2 uses 29 official place names on Nuke, but community communication is usually more detailed.
| Community Name | Related Official Area |
|---|---|
| Yard | Outside |
| Red / T Red / CT Red | Outside |
| Main | Bombsite A / Outside-side entrance |
| Mini | Mini |
| Headshot / Big Box | Ramp |
| Double Doors | Tunnels / B |
| Dark / Window | Bombsite B |
| Back Vents | Vents / B |
| Turnpike | Hell / Ramp-side rotation |
Think in Floors
This is the most important Nuke concept for newer players.
Sound can be misleading because players may be almost directly above or below you.
If you hear movement around A, the opponent may actually be:
- dropping Vents;
- running toward B;
- moving through Ramp underneath another position.
Do not rotate only from footsteps. Use teammate information and known map control.
Why Outside Control Is So Important
Outside is Nuke's largest open area and one of the main strategic battles.
If Ts gain Outside, they can threaten:
- Secret → B;
- Garage;
- Mini/Main → A;
- CT-side rotations;
- late Yard lurks.
This forces the CT Outside player to give the rest of the defense accurate information.
Silo
Silo gives Ts an elevated reference point over Outside and is often used to support early Yard pressure.
A player around Silo can watch rotations and help teammates establish the first layer of Outside control.
Garage
Garage is one of the strongest CT positions for watching Yard.
An AWP can influence much of Outside from here, which is why smoke coverage and flashes are so important for T-side Yard control.
Red
Red provides important cover in Outside and is frequently used while Ts cross toward Secret or fight Garage.
Secret
Secret is one of the most important Nuke routes.
It converts Outside control into lower-site pressure.
Once Ts reach Secret, they can threaten:
- B;
- Decon;
- Double Doors;
- back-side rotations;
- late A rotations through lower routes.
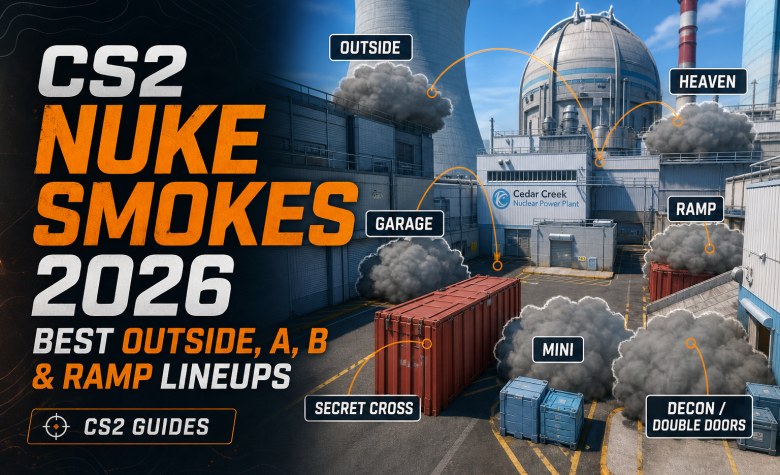
Outside Smoke Wall
A structured T side commonly uses a smoke wall to reduce Garage and CT vision while players cross Yard toward Secret.
The key strategic idea is more important than the exact pixel:
- remove long CT sightlines;
- create a protected crossing lane;
- make it unclear how many Ts crossed;
- keep Main/A pressure possible.
Exact current lineups belong on a dedicated Nuke Smokes guide.
Do Not Always Finish B After Secret
Taking Secret gives information and position, but it does not force a B execute.
You can:
- hold Secret and wait;
- pressure lower B;
- cut rotations;
- send one lurker down;
- return toward A through Outside/Main pressure.
How to Attack A on Nuke
A is usually attacked through combinations of:
- Hut;
- Squeaky;
- Main/Mini;
- sometimes Vent pressure.
Lobby
Lobby is the staging area for many T-side A and Ramp plays.
From Lobby, players can threaten:
- Hut;
- Squeaky;
- Radio/Trophy toward Ramp.
This is why Lobby control creates so much uncertainty for the CT defense.
Hut
Hut is one of the primary A entrances.
The first player entering Hut must be ready for close fights and vertical angles from Rafters or Heaven.
Squeaky
Squeaky gives another direct A entry and can also create fast Vent pressure.
A coordinated Hut + Squeaky hit is far stronger than five players trying to enter through one doorway.
Main / Mini
Main, often called Mini, connects Outside with A.
If Ts gain Outside and Main simultaneously, A defenders can be attacked from an additional direction.
Heaven and Rafters
Heaven and Rafters provide strong elevated defensive positions.
An A execute should account for:
- Heaven;
- Rafters;
- Hut roof-related angles;
- Site cover;
- Main.
Simple A Execute
- establish Lobby control;
- apply enough Outside pressure to occupy the CT Yard player;
- use utility against Heaven/Main sightlines;
- flash over the site;
- activate Hut and Squeaky together;
- clear close site positions;
- control Rafters/Heaven before assuming A is safe;
- plant for Lobby, Main or another controlled route.
Vent Drop
The Vent gives Ts one of Nuke's fastest vertical transitions.
A player dropping Vents can quickly reach the lower floor and transform an apparent A hit into B pressure.
This is powerful but risky if the player has no support or information below.
Why A Rushes Fail
- everyone enters through Hut;
- Squeaky timing is late;
- Heaven is ignored;
- Rafters remain active;
- no Outside pressure exists;
- Vent player drops alone;
- the bomb carrier enters first.
Ramp Control
Ramp is the second major T route toward the lower site.
It also acts as a rotation point between the upper and lower levels.
How to Take Ramp
A structured Ramp take should:
- clear Radio/Trophy-side approaches;
- flash the Ramp defender;
- trade the first fight;
- take the room without overchasing;
- decide whether to continue B or hold Ramp control.
Winning Ramp Does Not Mean You Must Rush B
Just like Banana on Inferno or Mid on Mirage, Ramp control creates options.
You can:
- continue to B;
- hold the rotation;
- force the B player to reposition;
- return Lobby and attack A;
- combine Ramp with Secret.
How to Attack B on Nuke
B can be attacked through several different routes:
- Ramp;
- Secret;
- Vents;
- Decon-side pressure after gaining lower control.
This is what makes B difficult to defend once Ts control more than one lower route.
Decon
Decon is an important B entrance and retake route.
It can become a dangerous crossfire with players deeper inside the site.
Double Doors
Double Doors is a common community call around the lower-site Tunnels route.
Control here can split the B defense and make rotations harder.
Dark
Dark is a deep B position that should be included in every site-clear sequence.
Window
B Window gives another angle over the lower site and can be important during defense or retake.
Simple B Execute
- gain either Ramp or Secret control;
- create pressure through a second lower route when possible;
- isolate Decon and other rotation lines;
- flash into B;
- clear Dark and deep site positions;
- watch Vents;
- plant for the route your team still controls.
Ramp + Secret B Split
This is one of the strongest lower-site concepts.
Instead of forcing five Ts through Ramp, one group enters from Ramp while another approaches through Secret.
The B defenders must now watch multiple directions and cannot concentrate all utility on one chokepoint.
Best T-Side Default on Nuke
A practical default can look like:
- one player controls Lobby/Hut information;
- one player controls Squeaky pressure;
- two players work Outside;
- one player holds Ramp/Radio information or supports the strongest lane.
The exact distribution should change according to spawns and previous CT tendencies.
Basic CT Setup
A common starting framework is approximately:
- two players around A/Hut/Heaven;
- one Outside player;
- one Ramp player;
- one lower-site or flexible B player.
Nuke rotations are extremely fast, so this setup can change within seconds.
Outside CT Player
The Outside player has one of the most information-heavy roles on the map.
Useful calls include:
- how many Ts crossed Yard;
- whether Secret is possible;
- whether Main is being pressured;
- whether smokes hide the crossing count.
Ramp CT Player
The Ramp player often needs to delay rather than fight to the death.
If Ramp is lost, falling toward B can preserve:
- information;
- utility;
- a second defensive position;
- time for rotations.
Heaven Player
Heaven gives strong information and rotation options between A, Hell and outside-related areas.
Do not become predictable by holding the exact same angle every round.
Fast Vertical Rotations
Nuke rewards players who understand vertical routes.
Important rotation paths include:
- A → Vents → B;
- A → Heaven/Hell;
- Ramp → B;
- Outside → Secret → B;
- B → Vents → A.
Do Not Over-Rotate From Sound
This is one of the most common Nuke mistakes.
Before changing floors, ask:
- was the bomb seen?
- which route is actually controlled?
- are the footsteps above or below?
- could it be a Vent fake?
- is Outside still active?
Nuke Retakes
Retakes are difficult when players arrive from separate floors at different times.
Try to synchronize:
- Heaven;
- Main;
- Hut/Squeaky on A;
- Decon;
- Double Doors;
- Vents on B.
AWP on Nuke
Strong AWP areas include:
- Garage watching Outside;
- Heaven;
- Ramp;
- outside-related lines toward Silo and Red.
Nuke rewards flexible AWP movement because the same weapon can influence multiple levels quickly.
Nuke in Solo Queue
Short, precise information matters more than complicated calls:
- “Three Outside.”
- “Two crossed Secret.”
- “One Ramp.”
- “Hut and Squeaky.”
- “Vent drop.”
- “Bomb lower.”
- “Last Heaven.”
Always include the floor when a callout could be ambiguous.
Nuke With a Duo or Stack
Coordinated teams can use:
- Outside smoke-wall crosses;
- Secret lurks;
- Hut + Squeaky A executes;
- Outside + Main A splits;
- Ramp + Secret B splits;
- Vent fakes;
- Lobby pressure followed by late Outside control.
Utility to Learn First
Exact lineups belong on a dedicated Nuke Smokes page. First learn the strategic targets:
- Outside smoke wall;
- Garage/Outside isolation;
- Secret crossing smoke;
- Heaven Smoke;
- Main/Mini Smoke;
- Hut and Squeaky flashes;
- Ramp entry flash;
- Ramp anti-rush incendiary;
- Decon/B isolation utility.
Common Nuke Mistakes
- not understanding which floor an enemy is on;
- crossing Outside without utility;
- taking Secret and immediately forcing B every round;
- five players entering A through Hut;
- dropping Vent alone;
- fighting Ramp to the death as CT;
- ignoring Heaven during A executes;
- ignoring Dark on B;
- rotating only from footsteps;
- failing to communicate how many players crossed Outside.
How to Practice Nuke
- learn the upper and lower radar separately;
- walk Lobby → Hut → A;
- walk Lobby → Radio → Ramp → B;
- walk Outside → Secret → B;
- practice Vents in both directions;
- learn one A execute;
- learn one Ramp + Secret B split;
- add exact smoke lineups afterward.
Nuke Practice Checklist
- Lobby;
- Hut;
- Squeaky;
- Rafters;
- Heaven;
- Hell;
- Main/Mini;
- Outside;
- Silo;
- Red;
- Garage;
- Secret;
- Ramp;
- Decon;
- Double Doors;
- Dark;
- Window;
- Vents.
Improve Your Premier Results on Nuke
For the current rotation, see CS2 Premier Map Pool.
For the current season, see CS2 Premier Season 5.
For rating progression, read How to Rank Up in CS2 Premier.
For a specific rating target, see our CS2 Premier Rating Boost.
Last verified: October 2026. Nuke remains in the current Active Duty/Premier rotation and uses 29 official CS2 place names across its upper and lower levels.