




Tangmazu, the Raven Trickster, is the current Delirium Pinnacle Boss in Path of Exile 2. He waits at the end of The Hare and the Raven storyline, after the Withered Willow, a Grand Mirror, the Trial of Madness, and a seven-wave Simulacrum. The encounter is built around deception: Tangmazu teleports between mirrors, creates convincing doubles, redirects beams through the arena, and interrupts the fight with a central blast that cannot be solved by standing still and trusting a late dodge.
This guide was checked against the live Path of Exile 2 0.5.4f patch notes. The latest patch does not list a Tangmazu mechanic change. First-time and repeat access still follow the 0.5 Delirium progression model: the quest encounter uses a quest version of Raven's Reflection and permits unlimited revivals, while repeat encounters consume the tradeable version, open the harder fight, and allow only two revivals.
The Raven Trickster Quick Answer
Reach the Withered Willow southwest of the Atlas starting area, complete Delirium Mirrors until a Grand Mirror appears, defeat both versions of its map boss, spread the Trial of Madness fog, and raise the Fog Bank to 100% Deliriousness. Complete the resulting seven-wave Simulacrum, collect Raven's Reflection, and bring it to the broken mirror in the Withered Willow. This activates the route to Tangmazu from the Withered Willow.
| Question | Current answer |
|---|---|
| Who is the Delirium Pinnacle Boss? | Tangmazu, the Raven Trickster. Kosis remains a Simulacrum boss but is not the current Delirium storyline Pinnacle. |
| What is the access key? | Raven's Reflection. |
| Where is the key used? | At the broken mirror in the Withered Willow. |
| Do Grand Mirrors open Tangmazu directly? | No. They begin the Trial of Madness loop that leads to a Simulacrum, which awards Raven's Reflection. |
| What defines the fight? | A short opening stage, a scripted heal and central blast, then a larger mirror phase with beams, projectiles, ground markers, doubles, and falling pillars. |
| What does the first clear award? | Storyline completion and six Delirium Atlas Passive Skill Points. |
Tangmazu Access Through the Delirium Storyline
The current access route belongs to The Hare and the Raven, not the old Realmgate version of Delirium. The official Return of the Ancients 0.5.0 notes place the Withered Willow southwest of the Atlas start and define the progression chain from Delirium Mirrors to Grand Mirrors, the Trial of Madness, Simulacrum, and the new Pinnacle key.
- Reach the Atlas endgame and travel southwest to the Withered Willow.
- Complete the surrounding Delirium maps and follow Elder Madox's quest dialogue.
- Run Delirium Mirrors and defeat their map bosses until a Grand Mirror appears on a nearby Atlas map.
- Enter the marked map and kill both the normal map boss and its mirrored duplicate.
- Use the Grand Mirror progression interaction and the quest Strange Fruit to spread a Fog Bank from an eligible Atlas map.
- Clear maps inside the bank, killing Rare monsters and map bosses to raise its shared Deliriousness.
- Reach 100% Deliriousness so a map in the Fog Bank is transformed into the required Simulacrum.
- Complete all seven Simulacrum waves and take Raven's Reflection.
- Return to the Withered Willow, place the Reflection in the broken mirror, and enter Tangmazu's encounter.
The generated Atlas determines the exact maps and connections, so no guide can provide one universal list of map names. Follow the quest tracker and complete the hub's nearby maps before pushing far away. For the full fog bar, mirror-shard, Liquid Emotion, Fog Bank, and Simulacrum systems, use the separate PoE 2 Delirium guide. This page keeps those systems concise so it can concentrate on Tangmazu himself.
How Grand Mirrors Lead to Repeat Attempts
A Grand Mirror is not a substitute for Raven's Reflection. Completing ordinary Delirium Mirrors can place a Grand Mirror on a nearby map, and that mirror duplicates the affected map boss. Defeating both bosses enables the Trial of Madness sequence. The resulting Fog Bank begins at 10% Deliriousness, increases through Rare and map-boss kills, and transforms a Simulacrum map when the shared bank reaches 100%.
The current transformation timing matters. The official 0.5.3 patch notes changed Simulacrum generation so it occurs when a Fog Bank reaches 100% rather than immediately when the fog is spread. Do not abandon a new bank because the Simulacrum is not visible at its initial 10%. Continue clearing eligible fogged maps until the unlock threshold is reached.
Quest Raven's Reflection
The first completed storyline Simulacrum provides the quest version of Raven's Reflection. It is a progression item, cannot be treated as an ordinary trade key, and opens the lower-level quest encounter with unlimited revivals. Use those revivals to learn the heal transition, the central blast, the mirror beam, and the safe recovery windows before paying for later entries.
Tradeable Raven's Reflection
Further completed Simulacrums provide the repeatable version of Raven's Reflection, and that version can also be traded. It activates at the same broken mirror but opens the higher-level repeat encounter with two revivals. The full repeat loop is therefore Delirium Mirrors, Grand Mirror, Fog Bank, 100% Deliriousness, Simulacrum, Raven's Reflection, then Tangmazu. Buying the key skips that farming loop, not the need for a boss-ready character.
Raven's Reflection should not be confused with Tangmazu's Reliquary Key: the Reflection opens the boss encounter, while the Reliquary Key belongs to a separate reward system.
Raven Trickster Readiness Check
Tangmazu attacks with several damage types and deliberately obscures the true source of each cast. A ready build has capped endgame elemental resistances, a useful chaos defence baseline, protection against physical impacts, reliable recovery without normal-monster kills, and single-target damage that remains active while the character moves. There is no universal tooltip DPS or Life number that accurately describes every archetype.
| Readiness area | What to verify | Failure signal |
|---|---|---|
| Elemental defence | Fire, Cold, and Lightning resistances meet the build's endgame cap. | Ordinary fireballs, frost shards, or lightning markers remove most of the effective health pool. |
| Physical and chaos plan | The build has mitigation for physical impacts and does not leave Chaos Resistance completely neglected. | Pillars, waves, or altered mirror beams produce unrecoverable burst damage. |
| Single-target uptime | The main skill can damage a teleporting boss without long stationary commitment. | Every mirror reposition cancels the rotation and the main phase lasts long enough for repeated overlaps. |
| Recovery | Life, Energy Shield, mana, Guard, and other resources recover in a standalone boss room. | The character survives one hit but dies to the next marker before resetting. |
| Mobility | Sprint, dodge roll, and any movement skill remain available after the damage rotation. | The central blast begins while the movement resource is empty. |
| Control protection | Freeze, Chill, Shock, stun, or similar vulnerabilities are handled by the build or charms. | A minor projectile prevents movement into the next safe lane. |
| Visual clarity | Mirrors, ground circles, beam lines, and Tangmazu's current position remain visible through allied effects. | The player follows a double or notices the main blast only after it has filled the arena. |
If several rows fail in the quest version, improve the character before consuming a tradeable Reflection. The PoE 2 defence guide can help diagnose whether Armour, Evasion, Deflection, Energy Shield, resistances, recovery, or Guard is the missing layer. The objective is not to tank every mechanic; it is to survive a normal mistake and recover before the next deceptive pattern begins.
Tangmazu Fight Structure
The cleanest practical description is a short opening stage followed by a scripted reset and an expanded main stage. Some players count the reset as a separate phase, creating a three-phase label, but it is not a normal damage phase. Partway through the opening stage, Tangmazu moves to the arena center, restores his Life, and prepares the transition blast. Afterward, the full mirror toolkit becomes the encounter's real test.
| Fight state | Primary objective | Main danger |
|---|---|---|
| Opening stage | Keep medium range, identify the real Tangmazu, and deal safe damage until the scripted reset. | Fire projectiles, lightning ground markers, mirror doubles, and teleports. |
| Heal transition | Stop attacking and move away from the growing central blast. | Remaining near Tangmazu and attempting to dodge at the moment of impact. |
| Main mirror stage | Track the real boss, read mirror connections, and punish completed spell sequences. | Reflected beams, Frost Walls and comets, falling pillars, mixed damage, and overlapping delayed markers. |
Keep Tangmazu and at least part of the mirror ring on screen. Extreme range can hide which mirror has activated, while standing directly beside the boss makes the transition circle and redirected projectiles harder to read. Medium range provides space to strafe and still shows the animation that begins each major pattern.
Opening Stage: Fireballs, Storm Calls, and Doubles
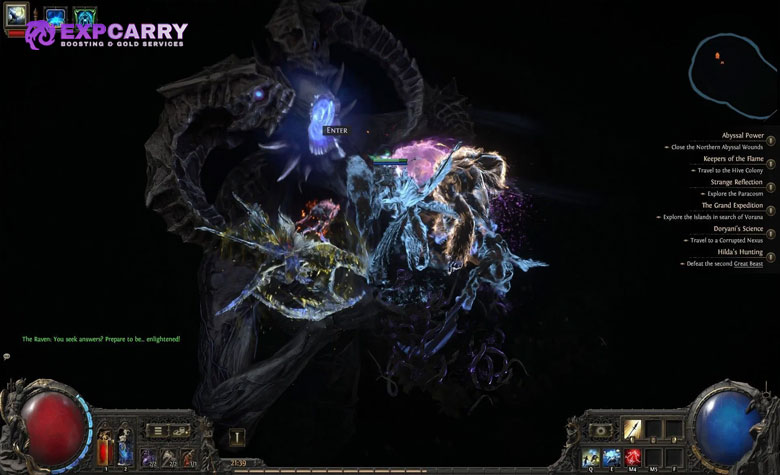
The opening stage teaches the encounter's visual language with a smaller attack pool. Tangmazu teleports between positions and activates mirrors that can present another copy of him. He launches fire projectiles and places delayed lightning impacts around the player's current route. These attacks are dangerous mainly when the player stops to identify a target or reverses direction into an old marker.
| Visual cue | What follows | Safe response |
|---|---|---|
| Tangmazu or a mirror copy raises an arm toward the player | A fire projectile travels across the arena and can be redirected from an unexpected angle. | Strafe across its path, then continue moving until every visible projectile has passed. |
| Lightning marker forms beneath or ahead of the character | A delayed Storm Call impact strikes the marked area. | Move in a broad arc and avoid doubling back through the previous marker. |
| Two Tangmazu figures appear | A mirror double repeats or disguises the next cast. | Use the boss bar, target indicator, and damage feedback to maintain pressure on the real target without chasing every figure. |
| The boss disappears into a mirror | Tangmazu teleports to another point in the ring. | Release an unsafe channel, locate the new position, and re-establish medium range before attacking. |
Move around the arena rather than directly away from every cast. A circular route keeps old lightning markers behind the character and makes projectile angles predictable. Do not spend all movement tools to chase the first teleport. Tangmazu needs to lose only the opening portion of his Life before the scripted reset, so safe, repeatable damage is enough.
Heal Transition and Central Blast
At the transition, Tangmazu moves to the center and restores his Life. This healing is scripted and does not mean the build failed a damage check. Stop casting as soon as he becomes committed to the center. A large circular blast grows around him and the central impact is flagged as a skill that cannot be avoided through ordinary evasion, block, or a last-second dodge roll.
- Recognize the center teleport and immediately cancel stationary damage.
- Run toward the nearest clear outer lane rather than circling beside the boss.
- Do not collide with Tangmazu's model while sprinting away.
- Cross any small marker early so it cannot overlap the final escape path.
- Remain outside the displayed blast area until the impact and visual aftermath finish.
- Re-enter at medium range only after the arena becomes readable again.
The common failure is waiting for Tangmazu's Life to finish refilling before moving. The heal is the warning, not the damage window. A character already near the edge can simply maintain distance, while melee should disengage as soon as the center movement begins. Trying to roll through the explosion from its middle converts an easily solved positioning check into an unreliable timing gamble.
Main Phase: Mirrors and Refraction
After the reset, Tangmazu gains the broader spell set recorded in the current encounter data: piercing frost shards, redirected fireballs, Frost Walls and a heavy comet, repeated lightning markers, floating mirrors, reflected beams, physical pillar impacts, raven-shaped waves, and additional teleports. Individual mechanics remain readable, but mirrors allow them to arrive from a direction other than the boss's current location.
The correct priority is source, path, destination. First find the real Tangmazu or activated mirror. Next read the projectile or beam line. Finally move into a destination that is not already occupied by a marker, wall, or falling pillar. Looking only at the character's feet solves delayed circles but misses reflected attacks crossing the arena.
Refraction Beam and the black sweep
Tangmazu links attacks through active mirrors and sends a broad beam across the arena. Depending on the active reflection, the beam can represent different damage types, so one resistance cannot replace correct movement. Move perpendicular to the line. If its sweep closes the available lane, use one deliberate dodge through the narrow edge and continue away from the next reflected path. Running parallel keeps the character inside the damaging line for too long.
Frost Walls, frost shards, and comet
Frost Walls restrict movement before a heavy Cold impact, while piercing shards punish standing directly in front of the cast. Leave the wall pattern through an open side before the comet lands. Do not roll along the wall and become trapped at its end. After the impact, check for a second projectile angle before returning to damage, because an activated mirror can continue the sequence.
Falling pillars and burning ground
Pillars create physical impact zones and can leave a short-lived fire hazard after the slam. Move away from the shadow or ground telegraph, then rotate toward clean space rather than cutting through the new burning patch. The upward and falling portions are separate threats, so the first visible movement is not permission to stop.
Dangerous Tangmazu Mechanics
The following table combines the main-stage cues into one combat reference. The names are descriptive labels for recognition; hidden internal skill names are not presented as player-facing terminology.
| Mechanic | Danger | Correct reaction |
|---|---|---|
| Growing central circle | A heavy area blast with extreme central damage that is not a normal block, evade, or roll-through check. | Run outside the complete circle before impact and wait for the animation to finish. |
| Redirected fireball | A Fire projectile changes angle through the mirror setup and can approach from off-screen. | Keep moving across its route and avoid reversing into the redirected path. |
| Piercing frost fan | Several Cold projectiles cover adjacent lanes and pass through targets. | Move through the widest gap or cross the outer projectile with one roll. |
| Frost Wall and comet | Walls restrict movement before a major Cold area impact. | Exit through an open side immediately and do not wait inside for the comet marker. |
| Storm Call markers | Delayed Lightning impacts stack where the player has recently stood. | Maintain a smooth arc and return to old ground only after every marker resolves. |
| Refraction Beam | A mirror redirects a sweeping or crossing beam, potentially with a different damage type. | Read the mirror line, move perpendicular, and roll through an edge only when the lane closes. |
| Falling pillar | A heavy physical impact can be followed by an upward hit and burning ground. | Leave the marked zone, keep moving through the follow-up, and rotate around the residual fire. |
| Raven wave | A physical wave crosses a broad section of the arena while another cast may begin. | Cross the thinnest edge decisively and reacquire Tangmazu after reaching clean ground. |
| Mirror teleport | The boss changes position and immediately attacks from the new angle. | Stop target-locked movement, turn the camera, and rebuild spacing before committing. |
The largest overlaps happen when a wall or pillar removes the lane needed for a reflected beam. Preserve one movement tool for these combinations. A dodge used to gain a tiny amount of damage uptime may be unavailable when two mechanics intersect seconds later.
How to Identify the Real Tangmazu
Mirror copies are designed to waste targeting time and make attacks appear to come from several directions. The real boss remains the target connected to the encounter Life bar and produces valid damage feedback. Do not choose a target only because its model appeared closest to the character. Check whether the health bar moves, whether ailments or marks remain attached, and whether target lock follows the next teleport.
- Release target lock when it pulls the character toward a mirror or through a ground marker.
- Use persistent damage, marks, curses, or minion focus behavior as secondary identification tools.
- Do not stand still while comparing two models; continue a wide strafe until the real target is clear.
- Treat every activated copy as a possible attack source even when it cannot receive meaningful damage.
- Re-center the camera after each teleport so the next mirror line is visible.
High visual-effect builds should reduce cosmetic clutter before the attempt. The relevant information is not only beneath the character. Tangmazu's hand animation, the active side mirrors, projectile direction, and falling-pillar shadow all matter. Clear visuals produce more real damage uptime than another effect that hides the arena. For broader build and endgame preparation outside this encounter, use the Path of Exile 2 Guides hub.
Positioning by Build Archetype
Every archetype wants medium-range awareness, but the route to that position differs. The safest damage window begins after Tangmazu completes a teleport, beam, comet, or pillar sequence. Starting a long rotation while mirrors are activating usually forces an immediate cancel.
Melee and short-range builds
Attack from a flank and leave before Tangmazu reaches the center for the reset. Use compact damage bursts after a beam or pillar lands. Do not chase every mirror teleport with a movement skill; walk or Sprint to re-establish range, then save the movement skill for a closed beam lane or Frost Wall escape.
Ranged attacks and spellcasters
Medium range shows more of the mirror ring than extreme range. Strafe in one direction while firing short volleys, and stop casting when a wall, comet, or central circle appears. Long-range target lock can pull a character into a redirected projectile, so release the input when Tangmazu disappears.
Minion and companion builds
Independent damage helps during teleports, but minions can cover markers and may attack a double. Keep the player moving even when allies remain engaged, use the build's focus command if available, and test companion survival in the unlimited-revival quest encounter. On-kill minion effects are unreliable in a standalone Pinnacle room.
Damage-over-time and channeling builds
Damage-over-time characters should refresh effects after Tangmazu commits to a position, then move through the next pattern. Channeling and staged attacks need the longer post-comet, post-beam, or post-transition windows. If the main skill cannot be cancelled quickly, shorten the channel voluntarily instead of waiting for maximum stages inside a growing circle.
Recovering After a Mistake
A normal hit becomes fatal when the player immediately attacks from compromised ground. Recovery should follow a fixed order: break target lock, reach clean space, identify the next cast, restore resources, then resume damage. Tangmazu frequently follows a projectile with a marker or follows a teleport with a beam, so reacting only to the first hit is not enough.
- After a projectile hit: continue across the projectile line before using recovery; another reflected shot may share its path.
- After being trapped by Frost Wall: exit through the closest open side and do not attack until the comet and remaining shards resolve.
- After missing a lightning marker: keep moving in the current direction instead of stepping back into earlier marks.
- After losing the boss: release target lock, locate the active mirror, and use the Life bar to confirm the real Tangmazu.
- After entering the central circle late: Sprint directly outward. Do not weave around minor damage and do not attempt to iframe the center.
- After a death in the quest fight: name the failed cue and practise it with the unlimited revival rather than rushing back unchanged.
- After a repeat death: count the remaining revivals and correct visibility, charms, supports, or controls before re-entering.
Pinnacle encounters do not award or remove experience, so the meaningful cost is access and the limited repeat lives. That makes the quest version the correct training environment. The PoE 2 Pinnacle Boss Access guide covers the current quest-key, repeat-key, activation, and revival rules across the other endgame routes. A repeatable Raven's Reflection should fund a farming attempt, not the first opportunity to discover what the center heal means.
Tangmazu Rewards and Exclusive Drops
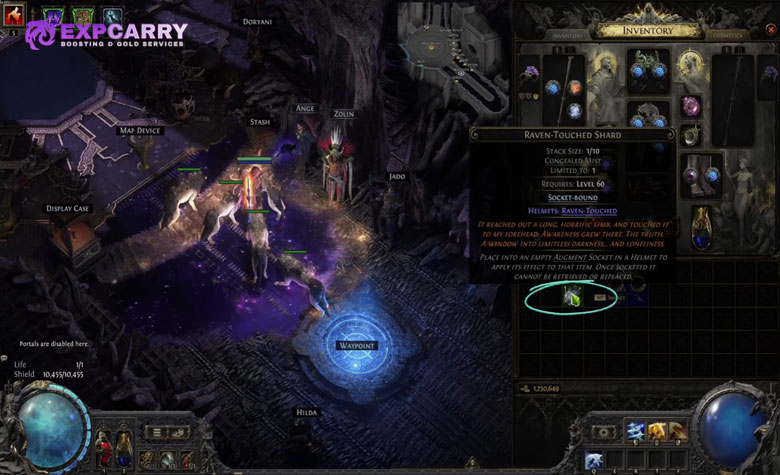
The first quest victory completes the Delirium Pinnacle storyline and awards six Delirium Atlas Passive Skill Points. Repeat kills target a dedicated pool containing six named Uniques, two Lineage Supports, Raven-Touched outcomes, and the exceptionally important Raven-Touched Shard. No current official source publishes fixed drop rates, so sample percentages and permanent profit claims are excluded.
| Reward | Type | Practical identity |
|---|---|---|
| Horror's Flight | Unique Engraved Bracers | Grants Crushing Fear, adds Evasion, Attack Speed, Dexterity, and Chaos Attack damage, and generates Fear Incarnate when the wearer Culls a target. A Raven-Touched variant can also appear. |
| Sadist's Mercy | Unique Flanged Mace | Grants Harbinger of Madness, provides strong Physical weapon scaling, and applies Gruelling Madness through weapon Hits. |
| Split Personality | Unique Ruby Jewel | A corrupted Jewel that allows Passive allocation from the class starting point displayed by its variant. |
| The Auspex | Unique Exquisite Vest | Grants Mist Raven, combines Evasion and maximum Life, makes Deflection lucky while on Low Life, and applies Gruelling Madness to nearby enemies. A Raven-Touched form can drop. |
| The Raven's Flock | Unique Perching Staff | Grants Spiraling Conspiracy and supports a minion setup with Cast Speed, Intelligence, Minion Damage, Gruelling Madness application, and Spirit Reservation Efficiency. |
| Veilpiercer | Unique Amethyst Ring | Provides Chaos Resistance, Mana, and Intelligence while allowing Curses to affect Hexproof enemies, spread on death, and generate Dark Whisper. |
| Trickster's Shard | Lineage Support | Supports self-cast non-instant Spells, generating Fragments that create a Fractured Mimic capable of casting the supported Spell. |
| Tangmazu's Thurible | Lineage Support | Makes supported Companions Gigantic and grants them Evasion and Deflection based on the player's values. |
| Raven-Touched Shard | Socket-bound Augment | Permanently applies Raven-Touched to an eligible Helmet, allowing it to receive a Notable instilment at the Withered Willow. |
Evaluate the actual modifiers and their rolls before pricing a Unique. Split Personality depends heavily on the displayed class start, while companion and minion items require a buyer whose build can use their Spirit and Gruelling Madness interactions. The PoE 2 trading guide explains how to compare current listings without assuming that every item sharing a name has the same value.
Raven-Touched Items and the Shard
Raven-Touched is a special Delirium property that lets an eligible item receive a Notable Passive instilment at the Withered Willow. It does not grant a free passive point or the small passives leading to that Notable. An item that is already instillable cannot gain an additional instilment merely because it becomes Raven-Touched.
The Raven-Touched Shard requires an empty Augment Socket in a Helmet and is socket-bound. Once inserted, it cannot be removed, replaced, or recovered by extraction. Confirm the Helmet base, affixes, item level, sockets, and intended Notable before using the shard. Applying a rare reward to a temporary Helmet destroys much of its practical value even when the chosen passive is strong.
Horror's Flight and The Auspex can also appear as Raven-Touched boss-drop variants. Treat that property as part of the item, not as an ordinary numerical roll. Its value depends on both the Unique's base use case and the Notable that the eventual owner intends to instil.
Repeat Farming Strategy
Repeat farming has two costs: producing or purchasing Raven's Reflection and clearing a harder two-revival encounter consistently. Self-farming adds the Grand Mirror, Fog Bank, and seven-wave Simulacrum time, but it also yields the broader Delirium rewards collected along that route. Buying Reflections removes setup time while exposing the strategy directly to the current key price.
- Learn the complete fight in the unlimited-revival quest version.
- Check the live price of Raven's Reflection before buying a batch.
- Compare current listings for all six Uniques, both Lineage Supports, and Raven-Touched Shards.
- Record actual kill time, deaths, valuable modifier rolls, and time required to sell each reward.
- Run a small sample before committing the entire currency budget.
- Stop if two-revival failures or slow sales reduce the return below an alternative Delirium route.
Players farming the entire chain should specialize only after ordinary Mirrors, the double map boss, 100% Fog Bank maps, and Simulacrum are all reliable. Additional Delirium scaling can increase rewards while also making the key-production route slower or less consistent. If time is the main limitation, a contextual PoE 2 hourly farming option can be compared with self-farming, but the target should be stated precisely as Delirium progression, Simulacrum access, Raven's Reflection, or another measurable objective.
Common Raven Trickster Failures
Most failed attempts come from confusing the access stages, interpreting the scripted heal as regeneration that must be out-damaged, or following a mirror copy while the real attack forms elsewhere. Each mistake has a direct correction.
| Failure | Why it fails | Correction |
|---|---|---|
| Expecting a Grand Mirror to open Tangmazu | The mirror starts the Trial of Madness progression rather than the Pinnacle arena. | Raise the Fog Bank to 100%, complete Simulacrum, and use Raven's Reflection at the Willow. |
| Searching for Simulacrum at 10% | The current 0.5.3 rule transforms it when the bank reaches 100%. | Continue killing Rares and map bosses inside the affected region. |
| Using Simulacrum Splinters at the Realmgate | That belongs to an obsolete access route. | Follow the current Atlas Fog Bank and Simulacrum transformation system. |
| Attacking through the scripted heal | The reset is mandatory and leads directly to the central blast. | Disengage when Tangmazu moves to the center and run outside the circle. |
| Rolling inside the center blast | The impact is not a standard evade, block, or dodge-through mechanic. | Leave its entire displayed area before detonation. |
| Chasing the closest Tangmazu model | A mirror double can waste movement and hide the true attack source. | Confirm the target through the Life bar, damage feedback, and persistent effects. |
| Running parallel to the beam | The character remains inside the damaging path. | Move perpendicular or cross the narrow edge with one deliberate roll. |
| Stopping after the first pillar movement | The pattern can include falling, upward, and residual fire hazards. | Keep moving until the impact chain and ground effect are fully visible. |
| Learning with tradeable keys | Only two revivals protect a repeat Reflection. | Practise transitions and mirror cues in the quest encounter. |
| Applying Raven-Touched Shard to temporary gear | The socket-bound Augment cannot be removed, replaced, or extracted. | Finish and verify the long-term Helmet before socketing the shard. |
Pre-Entry Checklist
Complete this check before placing Raven's Reflection in the broken mirror. It is especially important for the repeat version because an avoidable setup issue can consume one of only two revivals.
- Confirm whether the Reflection is the quest item or the tradeable repeat key.
- Verify capped endgame Fire, Cold, and Lightning resistances.
- Review physical mitigation, Chaos Resistance, and protection from Shock, Chill, Freeze, and stun.
- Equip recovery that works without normal-monster kills.
- Use a true single-target setup with damage uptime during movement.
- Test Sprint, dodge roll, movement skill, and target-lock cancellation.
- Reduce visual effects that hide mirror lines, circles, walls, or pillar shadows.
- Remember the transition rule: the full heal is scripted, so leave the center.
- Remember the beam rule: move across its path rather than beside it.
- Leave inventory space for Uniques, Supports, currency, and any rare Raven-Touched reward.
Final Verdict
Tangmazu is a positioning and visual-recognition fight hidden behind a substantial Delirium progression loop. Use ordinary Mirrors to reach a Grand Mirror, complete the Trial of Madness Fog Bank at 100%, clear all seven Simulacrum waves, and carry Raven's Reflection to the Withered Willow. During the fight, move continuously through the opening projectiles, disengage immediately when the scripted heal begins, leave the central blast instead of rolling inside it, and read the mirror path before crossing the main-stage beams. The unlimited-revival quest encounter is the place to learn these rules; the harder two-revival version should be reserved for consistent farming. With clear visuals, mobile single-target damage, broad elemental defence, physical and chaos protection, and disciplined recovery, the Raven Trickster becomes a repeatable source of specialized Uniques, Lineage Supports, and Raven-Touched rewards rather than an expensive exercise in chasing illusions.


