Marathon Bungie Guide: Best Runner Shells, Loot Routes, and Extraction Tactics

Dying fifty meters from extraction with a full bag of loot is the most common way Marathon punishes new Runners, and it almost never comes down to bad aim. It comes down to picking the wrong shell for the situation, looting a hot zone without a route back out, or misreading audio cues in a system Bungie has been actively patching since launch. This covers which Runner shells hold up in solo versus squad play in Season 2: Nightfall, how to route loot across all four zones without walking into a third-party fight, and how Marathon's audio actually works once you understand what it is and is not telling you.
Runner Shell Tier List: Solo vs Squad in Season 2
The single biggest mistake new Runners make is treating shell rankings as universal across all modes. Shell value splits sharply between solo queue and three-person squads, and a shell that dominates one mode can fall to the middle of the pack in the other. The current Season 2 roster has eight shells: the six launch options plus Rook and the new Sentinel, and each one serves a different role depending on whether you are running with a coordinated crew or alone.
Best shells for squad play
In squads, Triage and Recon sit at the top of nearly every current ranking. Triage's Med Drone and ranged Reboot+ revive turn a single bad trade into a recoverable situation rather than a wipe, and that sustain consistently outweighs raw damage across a full match. Recon's Echo Pulse and Interrogation trait reveal enemy positions on demand, which matters more than personal firepower in a genre where avoiding an unfavorable fight is usually worth more than winning one. Bungie has already buffed Recon mid-season with an improved Echo Pulse and a more aggressive tracker drone, confirming it as a long-term squad staple rather than a launch fluke.
Sentinel, added on June 2, 2026 with Season 2: Nightfall, fits naturally alongside Triage and Recon in three-person crews. Its Defender System deploys an automated platform that destroys incoming grenades and missiles while boosting weapon handling for nearby crewmates, and Snare Mine locks enemies in place during pushes. Bungie designed Sentinel specifically to counter aggressive grenade spam and fast-closing squads, which makes it strong when your team is holding a position or controlling extraction timing. Its Castle Doctrine passive also buffs handling and reload on SMGs, pistols, and shotguns based on how many hostiles are nearby, so it rewards playing close with a short-range loadout in the tight corridors of Outpost and Cryo Archive.
Best shells for solo play
Solo queue inverts much of the squad ranking. Triage loses the majority of its value without teammates to heal or revive, dropping it out of the solo top tier entirely, while Recon and Assassin rise because their kits are built around self-sufficient information and escape. Assassin's Smoke Screen and Shadow Dive let a solo Runner break contact and reposition without needing anyone to trade for them, which is far more valuable when there is no backup. Thief is also a strong solo pick because of its high mobility and loot-focused kit, making it easier to grab and leave before a fight becomes unavoidable.
Rook occupies a separate category. It is not a normal shell: it drops you into an existing match with basic gear rather than using your vaulted loadout, removing gear loss risk entirely. That makes it a strong option for learning maps, grinding faction progression, or running when you do not want to risk good equipment. Sentinel's solo value is map-dependent: its defensive kit excels in the tight corridors of Outpost and Cryo Archive but loses much of its impact on the wide sightlines of Perimeter and Dire Marsh. Because Bungie has already patched shell balance once mid-season, treat any specific tier placement as a current-patch snapshot rather than a permanent ranking.
Loot Zones: How to Route Each Map Without Getting Third-Partied
Marathon's four zones scale in both loot quality and player density, and routing through them correctly matters more than winning any individual gunfight. The correct approach for each zone is different enough that treating them as one generic loop will get you killed consistently in the higher-tier maps.
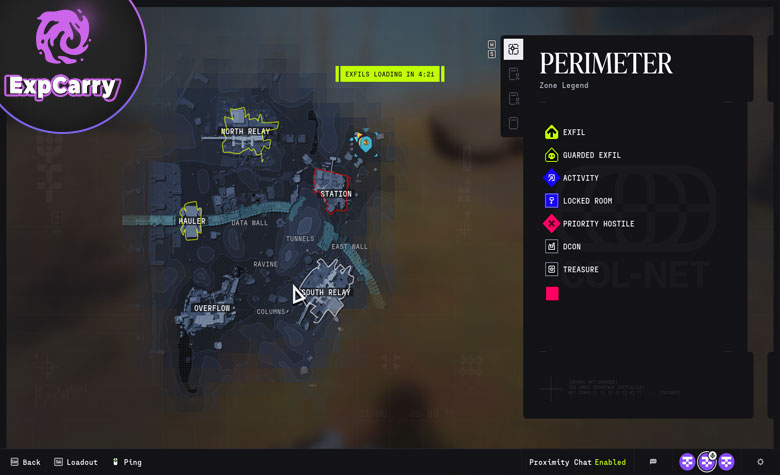
Perimeter and Dire Marsh: learning the fundamentals
Perimeter is the entry zone, holding five teams of three across open terrain split by the Data Wall energy barrier. Its wide sightlines and lower enemy density make it the safest place to learn contract routes, and most early deaths here come from rotating blind toward North Relay or Overflow rather than from being outgunned. Bungie's April 2026 Update 1.0.6 increased the number of med cabinets in Perimeter specifically to make early mistakes less punishing, so the zone is more forgiving than it was at launch. Dire Marsh steps up both the risk and the reward, packing six teams into a denser swamp layout where tunnel chokepoints force encounters that Perimeter's open ground lets you avoid. Control of the tunnel network early in a run is what decides whether that loot reaches extraction. Season 2 added Night Marsh as a full nighttime version of Dire Marsh with drastically reduced visibility, new Anomaly-linked enemies, and flashlights that reveal your position as much as they illuminate threats. Night Marsh runs slower than the daytime version and plays closer to a survival horror experience, with slightly fewer players per lobby.
Outpost: Pinwheel access and noise discipline
Outpost requires Runner Level 12 and caps at twelve players, trading map size for verticality and enemy density built around the structure players call the Pinwheel. The Pinwheel holds some of the best surface loot in the game, but every clearance code you activate to access it makes noise that announces your position to every other squad on the map. The correct route is to clear the ground floor for supplies first and only commit to the Pinwheel once you know the attention it draws is worth what is inside. Pushing straight for the Pinwheel without clearing the floor beneath it is the fastest way to get sandwiched between the squad already inside and the squad that heard you activate the code outside.
Cryo Archive: Security Clearance, Vaults, and extraction rules
Cryo Archive, the endgame zone aboard the UESC Marathon colony ship, has the strictest entry requirements in the game. You need Runner Level 25, all six faction liaison contracts completed, a minimum loadout value of 5,000 credits, and a full crew of three. Solo Runners cannot enter. Bungie offers a one-time free Sponsored Kit to cover the 5,000-credit threshold for your first run.
Inside, the map replaces open routing with a Security Clearance system. Your squad collectively gathers Security Tags from UESC enemies and terminals to advance through four clearance levels, and Clearance Level 3 is the practical target for most runs because it reveals Vault Battery locations and opens every locked door with a safe behind it. Each of the seven Vaults requires a Cryo Archive key plus Batteries and filled Coolant containers brought from the Control section on the lowest floor. The sixth standard Vault contains an AI Subroutine, and carrying all six Subroutines into a single run unlocks Vault 7, which holds the rarest loot in the game and the Compiler boss. Exfil terminals only appear on your scanner after reaching Clearance Level 4, so running straight for a Vault without building clearance first is a route to dying on the ship with no way off. The correct approach is to loot the lower-traffic outer sectors first, build clearance through the mid-sections, then push vaults once you can actually see where the exit is.
How Marathon's Audio System Works
Sound is one of Marathon's core information tools, with footsteps, reloads, ziplines, drones, doors, and vault interactions routed through the SFX channel so a Runner can react to a threat before it becomes visible. In practice the system has been inconsistent enough that Bungie addressed it publicly twice in the first six weeks after launch.
The audio range controversy and what it means for your runs
Update 1.0.0.4 on March 12, 2026 increased the range at which gunfire and explosions could be heard, with the stated goal of giving players better map-wide awareness. The change instead caused constant third-partying as squads across the entire map converged on any active fight. Within 24 hours, the Marathon development team called it an overcorrection and confirmed a rollback. Audio director Chase Combs described the team's ongoing search for a middle-ground mix, and game director Joe Ziegler admitted the studio overdid it. April's Update 1.0.6 included a small improvement to enemy footstep clarity at close and mid range, but the underlying tuning was still iterating as Season 2 launched. A separate footstep audibility bug where players sprinting indoors or in rain left no audio trace at all was also confirmed by Bungie support and under investigation through the same period.
Practical audio settings and habits that actually help
The practical takeaway is that Marathon's audio gives real, usable information but should not be treated as a precise wallhack the way a fully mature competitive shooter's sound design can be. A footstep cue is a warning to check a corner, not a guarantee of an enemy's exact position. Raising effects volume relative to music keeps footsteps and gadget sounds from getting buried under the soundtrack, and disabling any virtual surround processing in headset software prevents double-processing that smears the game's own directional audio. Stopping movement for a second before entering a new room or pushing around a blind corner remains the cheapest way to gather information before a fight, specifically because your own footsteps mask everything else you would otherwise hear.
Building a Loadout That Survives Extraction
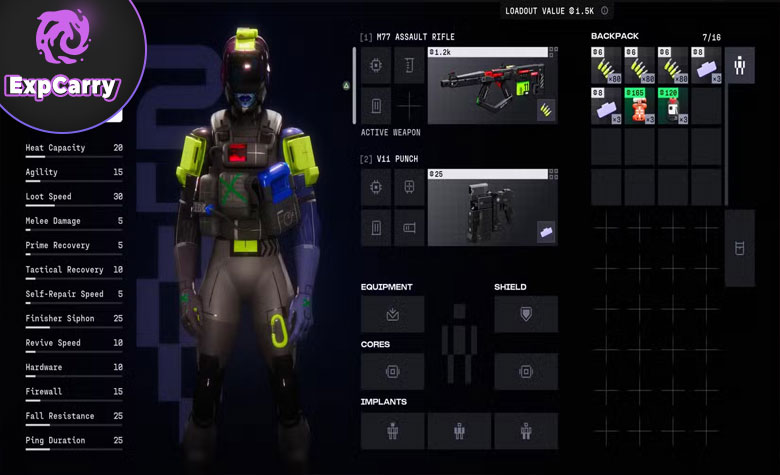
Customization in Marathon runs through weapons, implants, and the Season 2 Cradle system. The most common mistake is optimizing a build for winning a gunfight while ignoring what happens after it ends.
The Cradle system and how to spend it
The Cradle, introduced in Season 2, lets players allocate points directly across six stat categories by converting loot, weapons, and implants into Energy through the Matter Converter. This replaces the old faction-level gating that tied stat upgrades to specific reputations. The Cradle resets at the end of every season along with faction progress and Vault inventory, and reallocation carries no penalty during a season, so the correct approach is to shift Cradle spending as your playstyle develops rather than locking in a distribution early. The practical decision each season is whether to spread points evenly for flexibility or commit heavily to the stats that support a specific extraction plan, such as stacking Endurance for longer survivability on Cryo Archive runs versus Dexterity for faster play on Perimeter.
Implants and build priorities
Head, torso, and leg implants each grant a stat bonus that scales with rarity from gray up to gold. Season 2 locked some of the strongest utility perks, including Logic Bomb and the Triage Cloaking Device, behind higher rarity tiers specifically to stop a single early-game implant from trivializing extraction risk across a full run. The strongest loadouts treat the fight as the midpoint of a run rather than the goal. A build that wins an engagement but leaves a Runner with no mobility tool, no smoke, and no way to disengage from a third squad converging on the noise is a build that wins fights and still dies before extraction.
Final Thoughts
Surviving extraction consistently in Marathon comes down to matching the shell to the mode you are actually playing, routing loot with an exit already in mind, and treating audio as a directional hint rather than a certainty given how much Bungie has already adjusted it since launch. Shell rankings shift with balance patches, the Cradle resets every season, and the audio mix is still being tuned going into Season 2. A Runner who understands those moving parts rather than memorizing one fixed meta will keep reaching extraction long after the specific numbers behind today's tier list have changed.