
Druid is the most flexible raid class in TBC Anniversary because one character can provide ranged spell damage, melee damage, main-tank durability, off-tank coverage, or mobile healing. That flexibility does not make the specializations interchangeable: Balance depends on spell support and long cast windows, Feral Cat converts exact energy timing and powershifting into damage, Feral Bear balances threat against survival, and Restoration builds healing plans around layered heal-over-time effects. Phase 3 adds the Battle for Mount Hyjal, Black Temple, epic gems, Netherwing content, Arena Season 3, and the first five Tier 6 set positions. Blizzard confirms that content in the official Phase 3 overview. This hub explains practical talent choices, rotations, healing and tanking priorities, stat caps, weapons, Tier 6, and Phase 3 BiS targets for every Druid PvE role.
Comparing Druid PvE Roles
A raid does not bring a Druid only for raw output. Mark of the Wild, Gift of the Wild, Innervate, Rebirth, Remove Curse, Abolish Poison, and flexible forms let the class solve problems that a narrow damage comparison misses. Balance adds caster-group critical strike chance and a physical hit debuff. Feral adds a melee critical strike aura and can change between damage and tanking with a gear swap. Restoration supplies exceptionally efficient tank coverage while moving. The table shows the normal Phase 3 job of each specialization before the detailed sections explain how to execute it.
| Specialization | Primary PvE Role | Typical Raid Build | Signature Value | Main Constraint |
|---|---|---|---|---|
| Balance | Ranged spell damage and caster support | 48/0/13 | Moonkin Aura, Improved Faerie Fire, Innervate, and steady Starfire damage | Mana, movement, and cast uptime strongly affect output |
| Feral Cat | Melee damage with emergency off-tank flexibility | 0/44/17 | Leader of the Pack, physical damage, and rapid role changes | Powershifting, positional access, and mana require precise management |
| Feral Bear | Main tank, off tank, and high-health physical tank | 0/44/17 | Large armor and health pools, strong threat, mobility, and Cat flexibility | No block or parry, so Bear cannot remove crushing blows from the attack table |
| Restoration | Tank healing and mobile heal-over-time coverage | 0/0/61 Tree of Life | Efficient Lifebloom rolling, Swiftmend, Rebirth, and a Spirit-based healing aura | Limited instant burst and weaker broad raid recovery than dedicated area healers |
Most optimized raids value at least one Balance Druid, one Feral Druid, and one Restoration Druid when the roster and encounters support them. That is a planning guideline rather than a mandatory formula. Player execution, group buffs, available tanks, healing assignments, and loot distribution can justify a different mix. The Phase 3 DPS comparison helps place Balance and Cat output beside other damage options without ignoring their raid utility.
Shared Druid Raid Setup for Phase 3
Every Druid role improves when the raid settles forms, group placement, Innervate ownership, combat resurrection calls, and debuff assignments before the pull. Form changes consume mana and can remove the character from an intended action for a global cooldown, so flexibility works best when it is planned. Black Temple and Mount Hyjal also reward carrying role-specific consumables and alternate gear rather than treating one equipment set as correct for every boss.
Raid Utility, Forms, and Pull Preparation
Apply Gift of the Wild before the pull and carry enough reagents for repeated attempts. Rebirth should follow a raid-leader call because a revived tank, healer, or player with a unique assignment can be worth far more than the nearest dead damage dealer. Innervate is similarly assignment driven. Balance and Feral often reserve it for a healer unless the encounter and raid plan make personal mana more valuable, while Restoration may need it to maintain a demanding Lifebloom schedule. Remove Curse and Abolish Poison can outweigh a damage or healing global when the effect threatens control or survival.
| Before the Pull | Decision | Reason |
|---|---|---|
| Group placement | Put Balance with spell casters, Feral with physical attackers, and Restoration where Tree of Life can reach its assigned party | Moonkin Aura, Leader of the Pack, and Tree of Life aura are party-based benefits |
| Faerie Fire owner | Assign Balance to Improved Faerie Fire when present; otherwise decide which Druid maintains the basic effect | The armor reduction helps physical damage, while the improved talent adds physical hit chance |
| Innervate | Name a primary target and a backup condition | Late improvisation can leave the recipient unable to exploit the full mana-return window |
| Rebirth | Agree on the caller and priority roles | The cooldown is too valuable to spend twice on the same death or on an unneeded recovery |
| Form and gear | Enter the correct form with the correct weapon, idol, consumables, and resistance or survival swaps | A role change after combat begins cannot repair an incorrect equipment set |
| Threat plan | Identify Cat opening restraint, Bear pickup targets, and Balance threat limits | Early critical strikes and cooldowns can exceed an unfinished tank lead |
Feral players should carry distinct Cat and Bear sets even when assigned to only one role at the start. Restoration may need a haste set and a regeneration set, while Balance commonly keeps alternate hit pieces for different group support. Players organizing attunements, reputations, and raid access can connect those preparations through the WoW TBC progression hub.
Rating Conversions and Cap Reference
Caps are targets, not automatic orders to replace a stronger item. A stat has full value only when it affects the actions that matter in the current encounter. Balance must recalculate spell hit whenever Inspiring Presence or Totem of Wrath changes. Cat and Bear must account for Improved Faerie Fire and Heroic Presence. Bear also needs a verified anti-critical combination, while Restoration has no offensive hit requirement. The following values use level 70 characters against a level 73 raid boss.
| Role | Cap or Breakpoint | Rating Target | Important Qualification |
|---|---|---|---|
| Balance | 16 percent spell hit total | 152 spell hit from gear after 4 percent from Balance of Power, or less with group buffs | Improved Faerie Fire does not increase spell hit |
| Feral Cat | 9 percent physical hit | 142 hit rating alone, 95 with Improved Faerie Fire, or 79 with that debuff plus Heroic Presence | Going below the cap can still be correct when a much stronger item wins in simulation |
| Feral Cat | 6.5 percent dodge removal from behind | 26 expertise, equal to about 103 expertise rating | Attacks from behind cannot be parried, so this is the relevant expertise soft cap |
| Feral Bear | Boss critical-hit immunity | 154 defense rating with no resilience, 103 resilience with no defense, or a valid mixture | Survival of the Fittest supplies 3 percent of the required 5.6 percent reduction |
| Feral Bear | Armor cap against a level 73 target | 35,880 armor | With a 25 percent armor-increasing inspiration effect active, roughly 28,704 displayed armor reaches the cap |
| Restoration | Additional Lifebloom global window | About 113 haste rating in theory and roughly 125 in practical play | Latency makes the practical target safer; around 242 gear haste reaches the global-cooldown floor only during a 30 percent Bloodlust or Heroism effect |
Rating needs should be checked on the fully buffed character sheet or with a trusted simulator, not inferred from an item list. Party composition is especially important in Phase 3 because optimal gear may assume a Draenei, Shaman, or assigned debuff that is absent from another raid. The Phase 3 BiS overview by class and specialization is useful for comparing alternatives, but the cap-aware rules in each section remain the final filter.
Consumables, Professions, Gems, and Enchants
Use a complete raid-consumable package that matches the active role. Balance normally combines Flask of Pure Death, Destruction Potion, Blackened Basilisk, and Superior Wizard Oil. Cat favors Flask of Relentless Assault, Haste Potion, Warp Burger, and Adamantite Weightstone. Bear commonly starts from Flask of Fortification, Ironshield Potion, and Spicy Crawdad. Restoration uses Flask of Mighty Restoration, Super Mana Potion, Golden Fish Sticks, and Brilliant Mana Oil. Encounter duration, expected incoming damage, and raid rules can change the exact potion or guardian-versus-battle elixir plan.
Leatherworking is exceptional for several Phase 3 crafted pieces and for Drums of Battle where the raid permits their use. Tailoring creates valuable caster and healer bracers even though a Druid can wear leather. Engineering supplies utility and explosives, while Enchanting and Jewelcrafting provide personal stat options. Epic gems improve final optimization but should repair an actual cap or increase a high-value stat; socket color alone is not a reason to accept a weak bonus. The Phase 3 epic gem guide explains sources and allocation priorities.
Balance Druid Phase 3 PvE Guide
Balance is a support-oriented ranged damage specialization whose value reaches beyond its own casts. Moonkin Aura grants 5 percent spell critical strike chance to the Druid's party. Improved Faerie Fire adds 3 percent melee and ranged hit chance against the marked target, and Insect Swarm can reduce the target's chance to hit by 2 percent. The specialization also retains Innervate, Rebirth, decursing, poison removal, and emergency healing. In return, the raid should provide a stable caster group, mana support, and enough stationary time for Starfire to work.
| Balance Strength | Why It Matters | Balance Limitation | How to Manage It |
|---|---|---|---|
| Moonkin Aura | Raises critical strike chance for a caster party | Party restricted | Place the Druid with four players who convert spell critical strike chance into meaningful output |
| Improved Faerie Fire | Supports the raid's physical hit requirements while maintaining armor reduction | Does not help Balance spell hit | Build the Druid's spell-hit set independently from this debuff |
| Long, efficient Starfire cycle | Scales well with spell damage, critical strike chance, and caster support | Movement interrupts the core cast | Pre-position, finish safe casts, and spend necessary movement on useful instant actions |
| Druid utility | Solves recovery, mana, poison, curse, and emergency-healing problems | Utility globals lower personal damage | Follow assignments and judge success by raid survival rather than uninterrupted casting |
Balance Talents: The 48/0/13 Raid Build
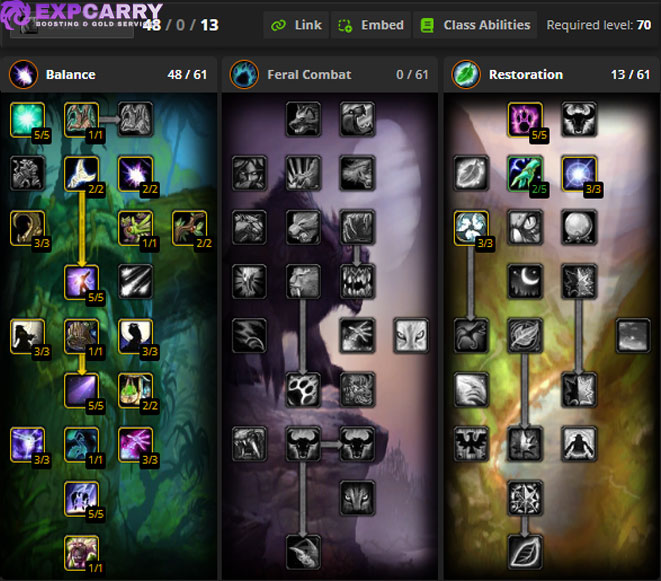
The standard raid recommendation is 48 points in Balance and 13 in Restoration. Use the Wowhead Balance talent build as the tree-image reference. Starlight Wrath and Focused Starlight establish the direct-cast foundation, while Vengeance, Nature's Grace, Moonfury, and Wrath of Cenarius turn critical strikes and scaling into damage. Improved Moonfire, Insect Swarm, and Nature's Reach support instant effects and positioning. Lunar Guidance, Moonglow, Dreamstate, Balance of Power, Moonkin Form, and Improved Faerie Fire finish the attribute, mana, hit, form, and raid-utility package. The Restoration investment reaches Improved Mark of the Wild, Natural Shapeshifter, and Intensity, with the remaining prerequisite ranks serving as filler.
| Talent Package | Recommendation | Raid Purpose | When to Adjust |
|---|---|---|---|
| Core damage | Keep the full Starfire, spell-damage, and critical-strike package | It defines the specialization's sustained boss output | Do not remove core ranks for narrow convenience talents |
| Balance of Power | Take both ranks | Provides 4 percent spell hit and lowers the gear requirement | Never count Improved Faerie Fire as spell hit when planning around it |
| Improved Faerie Fire | Take all three ranks in the normal raid build | Provides a major physical raid debuff and reliable armor-reduction coverage | Only consider moving these points if another Balance Druid guarantees the debuff on every target |
| Intensity and mana support | Retain the Restoration investment | Improves regeneration during casting and makes long encounters more stable | A shorter farm encounter may tolerate a more aggressive minor-point arrangement |
| Utility flex points | Choose around control and encounter demands | Can improve roots, pushback resistance, or situational utility | Change only the optional edge of the build, not the raid-defining talents |
This is the natural insertion point for the talent-tree image because the build recommendation, purpose, and allowed deviations are already clear. Confirm the tree against the linked TBC page rather than a Retail or later Classic calculator. Improved Faerie Fire is the most important raid choice: it benefits physical attackers, but the Balance Druid still needs the spell-hit totals listed below.
Balance Priority for Bosses, Movement, and Multiple Targets
Balance uses a priority system rather than a long fixed sequence. Before the pull, verify Faerie Fire ownership and allow the tank to establish threat. Maintain Improved Faerie Fire unless another assigned Druid has reliable coverage. Cast Force of Nature when the treants can reach the target, survive, and attack for most of their duration. Moonfire is worth maintaining when it receives its full duration and mana is not the limiting factor. Starfire fills safe stationary time. Insect Swarm is mainly a movement tool, an assigned defensive debuff, or an efficient effect when its miss reduction matters.
| Priority | Action | Condition | Execution Note |
|---|---|---|---|
| 1 | Maintain Improved Faerie Fire | The raid expects your physical hit and armor debuff | Refresh before it expires without clipping a large part of its duration |
| 2 | Use Force of Nature | Treants can connect safely and the tank has threat | Avoid hazards or target transitions that waste their uptime |
| 3 | Maintain Moonfire | The target will live for the full effect and mana supports it | Do not refresh early merely because movement is possible soon |
| 4 | Use Insect Swarm | The miss debuff is assigned, movement prevents casting, or the target lives long enough | Its defensive contribution can be more valuable than the damage line suggests |
| 5 | Cast Starfire | No higher priority action is due | Start the next cast promptly and cancel only when the mechanic demands it |
During movement, use a needed instant effect, refresh Faerie Fire when appropriate, activate an assigned consumable, select the next priority target, decurse, or support the raid. Treants cannot be directed after they are summoned, so choose their target and placement carefully before activation. Do not turn movement into automatic Moonfire spam when the target will die too quickly or mana is tight. Wrath is situational: its shorter cast can fit a brief window or a target that will die before Starfire lands, but Starfire remains the normal raid filler.
| Target Pattern | Balance Response | Reasoning |
|---|---|---|
| Two long-lived targets | Maintain assigned debuffs, apply efficient Moonfires, then Starfire the priority target | Multiple full-duration effects add value without abandoning the kill target |
| Several spread targets | Use Moonfire selectively on enemies that will survive; preserve mana for the main target | Blind multidotting can spend globals on effects that never finish |
| Dense stacked pack | Use Hurricane when the enemies will remain controlled for its channel | Density raises its value; use Barkskin if incoming damage could otherwise cause pushback |
| Short-lived wave | Favor immediate damage and assigned utility | Long effects and slow casts may complete after the target is already dead |
Haste shortens Starfire and the global cooldown until its floor, but it does not create extra Moonfire or Insect Swarm ticks in TBC. Bloodlust or Heroism, trinkets, and potion timing should overlap a period of uninterrupted Starfire casting. Enter that period with adequate mana, all essential debuffs established, and movement already solved.
Balance Stats, Spell Hit, and Gear Decisions
The base miss chance against a raid boss is 16 percent. Two ranks of Balance of Power supply 4 percent spell hit, leaving 12 percent from gear and party support. That equals about 152 spell-hit rating with no external help. Inspiring Presence reduces the gear need to 11 percent, about 139 rating. Totem of Wrath reduces it to 9 percent, about 114 rating. Both together leave 8 percent, about 101 rating. Improved Faerie Fire does not alter any of these spell-hit values.
- Reach the current spell-hit requirement for the group that will actually be present.
- Prioritize spell damage once missing is no longer the largest expected loss.
- Value haste highly in Phase 3 because it increases the number of direct casts completed in safe windows.
- Use critical strike chance after hit, spell damage, and haste are accounted for.
- Treat Intellect as damage, mana, and critical strike support rather than a replacement for primary caster stats.
- Use Spirit and mana per five seconds when encounter length makes regeneration restrictive.
Aldor and Scryer choices, professions, support groups, and existing equipment can change the best route to the cap. A higher item level is not automatically an upgrade if it leaves the character far below hit or wastes a large amount above the active requirement. Build at least two saved sets when group support changes regularly. Balance uses caster weapons for their stats and spell damage; the weapon's physical damage has no meaningful role in the Starfire rotation.
Balance Tier 6, Weapons, and Phase 3 BiS
Balance Tier 6 is Thunderheart Regalia. The two-piece bonus extends Moonfire by 3 seconds, improving damage per cast and reducing refresh frequency. The four-piece bonus adds 5 percent Starfire critical strike chance, directly strengthening the main filler. The first five pieces come from Vanquisher tokens shared with Rogue and Mage. Gloves drop from Azgalor, helm from Archimonde, shoulders from Mother Shahraz, legs from the Illidari Council, and chest from Illidan Stormrage. Those five sources define the complete Phase 3 token route for the set. The current Wowhead Balance Phase 3 BiS guide provides additional slot alternatives.
| Slot | Phase 3 Target | Source | Selection Note |
|---|---|---|---|
| Head | Thunderheart Headguard | Archimonde | Tier 6 set position |
| Neck | The Sun King's Talisman | Raid source: Tempest Keep, from Kael'thas Sunstrider | Strong spell-damage carryover piece |
| Shoulders | Thunderheart Shoulderpads | Mother Shahraz | Tier 6 set position |
| Back | Cloak of the Illidari Council | Raid source: Black Temple council encounter | Excellent balanced caster cloak |
| Chest | Thunderheart Vest | Black Temple, from Illidan Stormrage | Tier 6 set position |
| Wrists | Bracers of Nimble Thought | Tailoring | High-value haste craft |
| Hands | Thunderheart Handguards | Azgalor | Tier 6 set position |
| Waist | Belt of Blasting | Tailoring | Spell hit, critical strike chance, damage, and two flexible sockets |
| Legs | Leggings of Channeled Elements | Kaz'rogal | Strong off-set option when four Tier 6 pieces are retained elsewhere |
| Boots | Slippers of the Seacaller | High Warlord Naj'entus in Black Temple | High spell damage and critical strike chance for the four-piece shell |
| Finger | Ring of Ancient Knowledge | Black Temple trash | High spell damage and haste |
| Finger | Band of the Eternal Sage | The Scale of the Sands, Exalted | Powerful reputation ring with an offensive proc |
| Trinket | The Skull of Gul'dan | Illidan Stormrage | Spell hit, spell damage, and controllable haste |
| Trinket | Ashtongue Talisman of Equilibrium | Ashtongue Deathsworn, Exalted | Balance-specific Starfire proc |
| Weapon | Zhar'doom, Greatstaff of the Devourer | Raid source: Illidan Stormrage | Exceptional two-handed caster package |
| Idol | Idol of the Raven Goddess | Swift Flight Form quest chain | Improves Moonkin Aura for the caster party |
Treat these rows as a cap-aware planning set rather than an inflexible loadout. Adjust rings, belt, cloak, gems, and off-set positions to the exact spell-hit support in the raid. Keep four Thunderheart pieces for the Starfire bonus, then compare the remaining Tier slot against the strongest off-set item available. The raid-wide value of Idol of the Raven Goddess also depends on who shares the party. A personal idol can be preferable if the group does not convert its aura bonus efficiently.
Explore services related to this guide, selected from our WoW TBC Anniversary catalog.
View All WoW TBC Anniversary Services


Feral Druid Phase 3 PvE Guide
Feral contains two complete PvE jobs inside one talent framework. Cat supplies melee damage and Leader of the Pack, while Bear supplies tanking, add control, and exceptional physical effective health. The standard 0/44/17 build supports both without giving up essential talents, but equipment and moment-to-moment decisions remain role specific. A Cat set is not safe tank gear, and a survival-heavy Bear set is not a competitive damage set. Treat the shared build as flexibility, not permission to ignore role preparation.
| Feral Mode | Primary Resource | Core Loop | Key Cap | Weapon Rule |
|---|---|---|---|---|
| Cat | Energy, combo points, and mana for powershifting | Maintain Mangle, Shred from behind, finish with Rip, and shift at controlled low energy | 9 percent hit and 6.5 percent dodge removal | Feral attack power and stats matter; listed weapon damage does not set form damage |
| Bear | Rage, threat lead, health, and defensive cooldown planning | Mangle, Lacerate or Swipe, controlled Maul queues, and target management | Boss critical-hit immunity before threat optimization | Feral attack power, armor, attributes, and defensive stats determine value |
Feral Talents for Cat and Bear
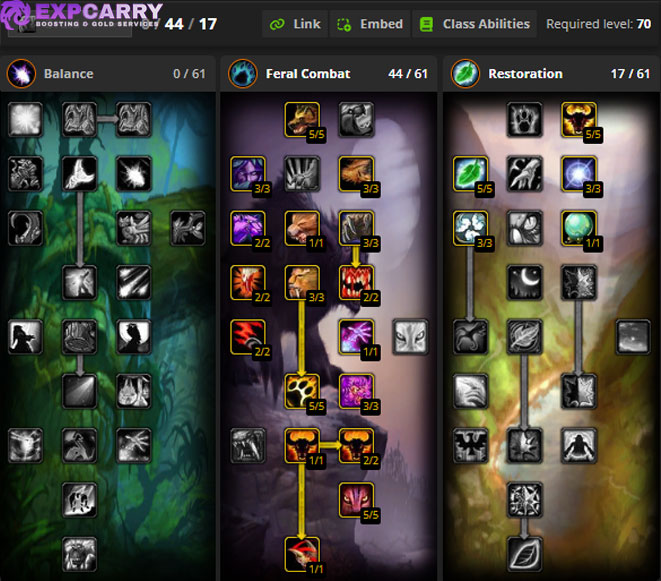
The default Feral raid build is 0/44/17. The Wowhead Feral Cat talent page and Wowhead Feral Bear talent page provide the two tree-image references. Feral Instinct, Feral Charge, and Survival of the Fittest establish Bear utility and safety. Shredding Attacks and Predatory Instincts protect Cat output. Ferocity, Sharpened Claws, Predatory Strikes, Heart of the Wild, Leader of the Pack, and Mangle benefit the shared physical framework. Restoration adds Furor, Natural Shapeshifter, and Naturalist, which support powershifting, efficiency, and physical damage.
| Build | Use Case | What It Preserves | Tradeoff |
|---|---|---|---|
| 0/44/17 hybrid | Default Cat, default Bear, or a player changing roles between encounters | All essential Cat damage, Bear survival, threat, and powershifting tools | Optional utility points remain limited |
| 0/47/14 utility Bear | The raid specifically needs Improved Demoralizing Roar and lacks equivalent Warrior coverage | Core Bear durability and threat | Moves points away from some hybrid convenience and damage support |
| Cat-focused minor variation | A player who never tanks and follows a roster-specific utility plan | Mangle, Shredding Attacks, Predatory Instincts, Furor, and Natural Shapeshifter | Reduces emergency Bear flexibility without changing the main Cat loop |
Place the appropriate Wowhead talent-tree image immediately after this explanation in the published layout. The shared 0/44/17 recommendation is deliberate: Shredding Attacks and powershifting talents matter to Cat, while Survival of the Fittest and Feral Instinct matter to Bear. Do not remove Survival of the Fittest from a raid-tank build because its 3 percent critical-hit reduction is part of the anti-critical calculation.
Feral Cat Damage Priority and Powershifting
Cat damage is a resource-timing system. Mangle raises bleed and Shred damage, Shred converts energy into combo points from behind, and Rip spends combo points on the default finishing effect. Powershifting turns mana into energy: leave Cat Form at low energy and immediately return with Furor. Wolfshead Helm adds 20 energy when entering Cat Form, so Furor plus the helm starts the new form at 60 energy. Timing the shift around the energy tick can produce 80 energy quickly and supports two efficient attacks before the next shift.
| Priority | Cat Action | Condition | Common Error |
|---|---|---|---|
| 1 | Keep Mangle active | No assigned Feral maintains the bleed and Shred amplifier | Refreshing far too early and losing a Shred opportunity |
| 2 | Use Rip at four or five combo points | The target will live for the full bleed | Applying Rip to an enemy that dies before the effect pays back |
| 3 | Use Ferocious Bite at four or five combo points | Rip already has sufficient remaining time or the target will die before a new Rip finishes | Dumping excess energy into Bite and delaying the next cycle |
| 4 | Cast Shred | Behind the target and no higher priority action is due | Failing to plan around a boss turn or positional restriction |
| 5 | Powershift | Energy is low, the next tick is understood, and mana can sustain the cycle | Shifting with useful energy remaining or missing the tick rhythm |
Use Omen of Clarity procs on Shred when positioning allows, because the expensive builder gains the most practical value. Do not wait so long for a perfect proc use that energy caps or a finisher falls off. Tiger's Fury is generally a pre-pull tool when its energy can regenerate before contact; using it during the normal raid loop costs a global and tends to lose more than it adds. The ideal pace depends on latency, mana, Haste Potion timing, energy ticks, and fight length, so practice the shift macro and rhythm before progression.
| Situation | Cat Response | Execution Detail |
|---|---|---|
| Cannot stand behind the target | Use Mangle as the builder and keep required debuffs active | Do not waste energy repeatedly attempting an unavailable Shred angle |
| Target dies soon | Replace a new Rip with Ferocious Bite when the direct damage will land in time | Estimate remaining life rather than following a fixed combo-point rule |
| Mana is nearly exhausted | Slow powershifting and use natural energy ticks | Preserve enough mana for a necessary form change or emergency utility action |
| Several enemies are stacked | Stay on the priority target and use controlled single-target damage | Cat has no true sustained class area rotation comparable to dedicated area specialists |
| Emergency off-tank call | Change only if tank gear was equipped before combat or the assignment is survivable in the current set | Bear Form alone does not transform Cat equipment into a raid-tank set |
Feral Cat Stats, Caps, and Weapon Rules
Against a level 73 boss, Cat needs 9 percent physical hit to remove ordinary misses: 142 hit rating without support, about 95 with Improved Faerie Fire, or about 79 with Improved Faerie Fire and Heroic Presence. From behind, attacks cannot be parried but can still be dodged. Countering 6.5 percent boss dodge requires 26 expertise, approximately 103 expertise rating. Both caps improve consistency, yet Agility and other damage stats can make a nominally under-capped set stronger, so compare complete sets instead of treating every cap as an absolute commandment.
- Agility is the central scaling stat because it supplies attack power, critical strike chance, and armor.
- Hit and expertise gain high value until the active caps, especially when missed finishers or dodged builders disrupt the cycle.
- Strength provides 2 attack power per point in Cat Form before multipliers.
- Critical strike chance accelerates combo-point generation, although white-hit critical value declines near the practical critical-strike ceiling.
- Haste adds melee swings and Omen of Clarity opportunities but does not accelerate energy regeneration.
- Attack power and armor penetration remain useful after stronger cap and attribute decisions are solved.
Form attacks use a normalized form damage model. The large damage range printed on a staff or mace does not become Cat weapon damage. Judge the item by feral attack power, Agility, Strength, hit, expertise, secondary stats, and any applicable effect. This is why a lower-level weapon with exceptional feral attack power can beat a conventional melee weapon. Critical strike value changes as misses, dodges, glancing blows, and combo-point overflow change, so evaluate the complete attack table instead of following a universal displayed critical-strike ceiling. Use a Feral simulator for final gem and item decisions.
Feral Cat Tier 6 and Phase 3 BiS
Feral Tier 6 is Thunderheart Harness. Its two-piece bonus lowers Cat Mangle's energy cost by 5 and raises Bear Mangle threat by 15 percent. Its four-piece bonus increases Rip, Swipe, and Ferocious Bite damage by 15 percent. Cat normally keeps Wolfshead Helm for powershifting and obtains four Tier 6 pieces from shoulders, chest, hands, and legs. This produces the important four-piece bonus without surrendering the helm that defines the energy loop. The current Wowhead Feral Cat Phase 3 BiS guide covers alternative helm and hybrid-role configurations.
| Slot | Phase 3 Cat Target | Source | Selection Note |
|---|---|---|---|
| Head | Wolfshead Helm | Leatherworking | The powershifting energy effect outweighs its low item level |
| Neck | Telonicus's Pendant of Mayhem | Kael'thas Sunstrider | Strong physical carryover target |
| Shoulders | Thunderheart Pauldrons | Mother Shahraz | Tier 6 set position |
| Back | Shadowmoon Destroyer's Drape | Teron Gorefiend | Excellent physical damage cloak |
| Chest | Thunderheart Chestguard | Illidan Stormrage | Tier 6 set position |
| Wrists | Insidious Bands | Teron Gorefiend | High-value offensive leather |
| Hands | Thunderheart Gauntlets | Azgalor | Tier 6 set position |
| Waist | Belt of One-Hundred Deaths | Raid source: Lady Vashj | Exceptional expertise and physical stats |
| Legs | Thunderheart Leggings | Illidari Council | Tier 6 set position |
| Feet | Shadowmaster's Boots | Mother Shahraz | Strong hit and physical damage package |
| Finger | Band of the Eternal Champion | The Scale of the Sands, Exalted | Powerful melee reputation ring |
| Finger | Stormrage Signet Ring | Illidan Stormrage | High offensive stats; swap if the set needs more hit |
| Trinket | Tsunami Talisman | Leotheras the Blind | Hit, critical strike chance, and attack-power proc |
| Trinket | Madness of the Betrayer | Illidari Council | Strong passive stats and armor-penetration proc |
| Weapon | Vengeful Gladiator's Staff | Arena Season 3 | Top feral attack power target; PvE alternative is listed below |
| Idol | Everbloom Idol | Badge of Justice vendor | Direct Shred support for personal damage |
Pillar of Ferocity is the premier raid-obtainable weapon alternative when the Arena staff is unavailable. Idol of the Raven Goddess can surpass a personal-damage idol when its Leader of the Pack improvement benefits a strong physical party. Recalculate hit and expertise after every ring, boot, belt, and gem change. The final Cat set should retain the Tier 6 four-piece bonus, preserve powershifting, and match the support present in the actual group.
Feral Bear Threat, Survival, and Multiple-Target Priority
Bear tanking begins with survival and control, then converts spare rage into threat. Keep Faerie Fire active when assigned and maintain Demoralizing Roar if no stronger equivalent covers the target. Mangle is the highest-priority rotational attack and should be used whenever available. Build and preserve five Lacerate stacks on a long-lived boss. At high Phase 3 attack power, Swipe becomes an efficient filler even on one target; around 2,700 raid-buffed attack power is a useful point to begin testing it against repeated Lacerate. Queue Maul only when rage is safely above the amount needed for the next global and emergency action.
| Priority | Bear Action | Use Condition | Control Rule |
|---|---|---|---|
| 1 | Keep assigned debuffs active | Faerie Fire or Demoralizing Roar is missing or about to expire | Do not let personal threat erase a raid survival or physical damage assignment |
| 2 | Use Mangle | The ability is ready | The Tier 6 two-piece bonus further improves its Bear threat |
| 3 | Reach and maintain five Lacerate stacks | The boss will live long enough for the bleed and threat to matter | Refresh before expiration without spending every filler global on an established stack |
| 4 | Use Swipe or Lacerate as filler | Choose from current attack power, target count, and threat needs | Test the character's actual gear rather than treating one attack-power estimate as universal |
| 5 | Queue Maul | Rage is abundant and the next required ability remains affordable | Maul replaces the next normal attack and can starve the global-cooldown rotation |
For three or more controlled enemies, Swipe is the basic global-cooldown attack. Tab between targets so normal attacks and selective Mauls build distributed threat, while Mangle secures the most dangerous enemy. Feral Charge closes distance or interrupts positioning, Bash can stop an assigned cast, Growl recovers one loose target, and Challenging Roar is an emergency temporary pickup rather than a substitute for established threat. In Mount Hyjal waves, coordinate these tools with area stuns, slows, and kill targets instead of chasing every enemy independently.
| Tank Situation | Immediate Response | Follow-Through |
|---|---|---|
| Initial boss contact | Enter with rage where possible, establish Mangle, and begin Lacerate | Queue Maul only after the core sequence is funded |
| Three or more enemies | Swipe and rotate the main attack across targets | Mangle the priority target and use controlled Mauls on enemies that need more threat |
| One enemy escapes | Growl, Feral Charge, or intercept its path according to range | Land direct threat immediately because Growl alone does not create a permanent lead |
| Heavy physical burst approaches | Use Frenzied Regeneration when its rage conversion fits the damage pattern and call for an external cooldown | Bear has no normal in-form damage-reduction button, so healer coordination must be planned |
| Tank swap | Stop Maul queues and high-threat attacks when the other tank must pass you | Remain ready to taunt back at the planned stack or timer |
Threat meters are mandatory information, but the damage intake timeline matters just as much. A Bear cannot block or parry and does not push crushing blows off a raid boss's attack table. Barkskin forces the Druid out of Bear Form in TBC, so it is not an active-tanking defensive; reserve it for a safe transition or caster-form assignment. Armor, Stamina, Agility, dodge, anti-critical stats, consumables, and healer coordination therefore carry the survival plan. The Phase 3 tank comparison gives raid-level context for Bear strengths without replacing encounter-specific gearing.
Feral Bear Defensive Caps and Gear Sets
A level 73 raid boss has a 5.6 percent base chance to critically hit a level 70 tank. Survival of the Fittest removes 3 percent, leaving 2.6 percent to solve through defense, resilience, or both. With no resilience, 154 defense rating adds 65 defense skill and reaches 415 total defense skill. With no defense rating, about 103 resilience reaches the remaining reduction. Mixed sets are valid, but the final equipped character must be checked after every swap. Defense above critical immunity still adds dodge and miss chance, while resilience adds no avoidance.
Armor reaches its 75 percent reduction ceiling against a level 73 attacker at 35,880. If Inspiration or Ancestral Fortitude reliably increases armor by 25 percent, approximately 28,704 armor before that effect reaches the same ceiling while it is active. Do not assume permanent uptime during a pull, transition, silence, healer death, or target swap. Stamina remains the most dependable answer to mixed physical and magical burst, while Agility combines armor, dodge, critical strike chance, and threat.
- Reach critical-hit immunity in the exact set equipped for the encounter.
- Use armor and Stamina to create enough effective health for the largest credible burst.
- Reach the 6.5 percent expertise soft cap, about 103 rating, when threat and available gear permit; further expertise still reduces parries up to the much higher 14 percent parry cap.
- Use the 9 percent physical hit targets of 142 rating alone, 95 with Improved Faerie Fire, or 79 with that debuff and Heroic Presence.
- Value Agility for avoidance, armor, and threat once survival requirements are stable.
- Keep separate maximum-survival, balanced, resistance, and maximum-threat sets rather than forcing one list onto every boss.
Expertise is especially useful from the front because it reduces both dodges and parries until the dodge component reaches its soft cap. Reducing parries also lowers the chance of boss parry-haste interactions where applicable. Hit improves taunt reliability only if the specific taunt mechanic uses the relevant spell calculation, so physical hit alone should not be presented as guaranteed taunt coverage. Evaluate threat stats as a complete package and never sacrifice critical immunity for a small damage increase unless the encounter explicitly cannot deal a critical melee attack.
Feral Bear Tier 6 and Phase 3 BiS
Bear uses the same Thunderheart Harness bonuses as Cat. The two-piece Mangle threat increase and four-piece Swipe damage increase are both valuable for raid tanking. Unlike Cat, Bear normally uses the Tier 6 helm because Wolfshead Helm does not supply raid-tank durability. The following setup is a survival-balanced target list. It intentionally includes older pieces where their defensive allocation remains competitive and assumes the player will maintain alternatives for threat, resistance, and critical immunity. The current Wowhead Feral Bear Phase 3 BiS guide separates mitigation-skewed and threat-skewed alternatives.
| Slot | Phase 3 Bear Target | Source | Selection Note |
|---|---|---|---|
| Head | Thunderheart Cover | Archimonde | Tier 6 durability and set position |
| Neck | Pendant of Titans | Reliquary of Souls | Strong armor and tanking allocation |
| Shoulders | Thunderheart Pauldrons | Mother Shahraz | Tier 6 set position |
| Back | Gilded Thorium Cloak | Terestian Illhoof | Defense-oriented critical-immunity option |
| Chest | Thunderheart Chestguard | Illidan Stormrage | Tier 6 set position |
| Wrists | Vindicator's Dragonhide Bracers | Arena Season 3 honor gear | Resilience helps complete critical immunity |
| Hands | Thunderheart Gauntlets | Azgalor | Tier 6 set position |
| Waist | Belt of One-Hundred Deaths | Raid source: Lady Vashj | Expertise-heavy threat choice for a stable survival set |
| Legs | Thunderheart Leggings | Illidari Council | Tier 6 set position |
| Feet | Treads of the Den Mother | Black Temple trash | Armor, Agility, Stamina, and Feral-oriented stats |
| Finger | Violet Signet of the Great Protector | The Violet Eye, Exalted | Reliable armor and defensive ring |
| Finger | Band of the Eternal Champion | The Scale of the Sands, Exalted | Threat-oriented reputation ring |
| Trinket | Shadowmoon Insignia | Gurtogg Bloodboil | High dodge with an emergency armor activation |
| Trinket | Badge of Tenacity | BoE Apexis reward | Armor plus controllable Agility |
| Weapon | Pillar of Ferocity | Anetheron | Exceptional Feral attack power, armor, and attributes |
| Idol | Idol of the White Stag | Supremus | Adds a repeatable attack-power effect through Mangle |
Shadowmoon Destroyer's Drape is a useful threat swap when the cloak slot is not needed to maintain critical immunity. Idol of the Raven Goddess can create more total raid value than the personal-threat idol in a stacked physical party. Similar swaps exist in belt, rings, trinkets, gems, and PvP offset pieces. Verify total defense and resilience after equipping every alternate. There is no honest universal Bear BiS set for all Black Temple and Mount Hyjal bosses because magical damage, physical burst, resistance checks, add count, and threat pressure change the best allocation.
Restoration Druid Phase 3 PvE Guide
Restoration is a mobile, mana-efficient healer built around anticipating damage rather than reacting after a health bar collapses. Lifebloom provides rolling tank coverage, Rejuvenation supports predictable damage, Regrowth combines immediate healing with a long effect, and Swiftmend converts an existing Rejuvenation or Regrowth into fast recovery. Tree of Life strengthens healing received by the Druid's party based on Spirit and reduces the mana cost of supported heal-over-time spells, but it also slows movement and restricts the direct-heal toolkit. Good Restoration play therefore begins with assignments, range, timers, and form decisions.
| Restoration Strength | Practical Value | Restoration Limitation | Answer |
|---|---|---|---|
| Layered tank coverage | Several heal-over-time effects soften repeated damage and support another healer's direct casts | Requires preparation before the hit | Track boss timers and apply effects early enough to tick during danger |
| High mobility | Lifebloom, Rejuvenation, and Swiftmend work while repositioning | Tree of Life reduces movement speed | Move before the mechanic, leave form only when the saved time or required spell justifies it |
| Efficient sustained healing | Supports long progression attempts and several tank assignments | Weak emergency area recovery | Coordinate with Chain Heal, Circle of Healing, and raid cooldown planning |
| Swiftmend | Provides immediate single-target healing without a cast time | Consumes an eligible effect | Understand which Rejuvenation or Regrowth has the shortest remaining duration |
The raid should place Tree of Life where its party aura reaches players taking consistent damage, but healing assignment remains more important than maximizing a theoretical aura total. Restoration is strongest when it owns one or more tanks and pre-covers selected raid targets. It is not a substitute for every other healing profile. The Phase 3 healer comparison explains how that niche fits a complete roster.
Restoration Talents: Deep Tree of Life and Dreamstate
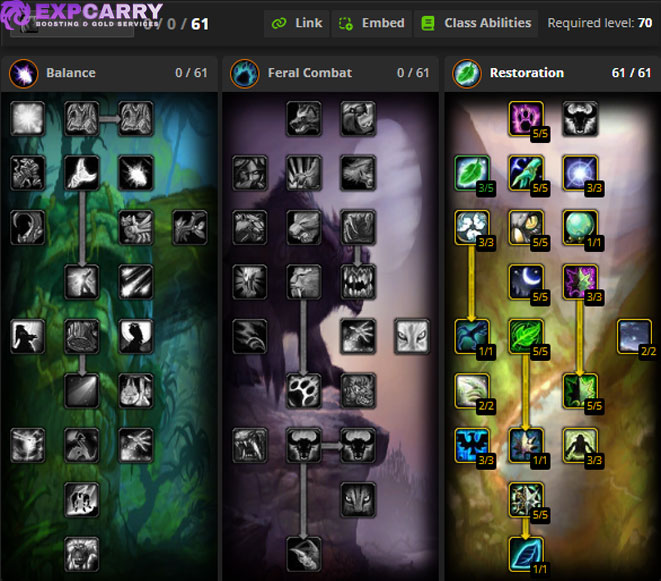
The default raid recommendation is a deep Restoration Tree of Life build, commonly expressed as 0/0/61. Use the Wowhead Restoration talent page as the published tree-image reference. Tree of Life, Empowered Rejuvenation, and Swiftmend define the periodic-healing engine. Intensity and Living Spirit support sustained mana and Spirit scaling, while Gift of Nature and Nature's Swiftness strengthen general output and emergency response. Improved Mark of the Wild completes the shared raid-buff package.
| Talent Approach | Best Assignment | Advantage | Cost |
|---|---|---|---|
| Deep Tree of Life | Tank heal-over-time coverage and mobile sustained healing | Efficient Lifebloom, Rejuvenation, Regrowth, Swiftmend, Spirit, and party aura support | Healing Touch and Tranquility require leaving Tree Form |
| Dreamstate variation | A roster that specifically needs more direct casting or Improved Faerie Fire coverage | Additional mana regeneration and a different direct-heal profile | Less efficient for the standard Tree-based heal-over-time assignment |
| Minor utility variation | Encounter-specific control, pushback, or dispel requirements | Solves a defined progression problem | Must not remove Swiftmend, Empowered Rejuvenation, or the build's core healing engine |
The deep build should be the image and recommendation shown to most readers. Dreamstate is a real niche, not a default upgrade: it changes spell usage, group value, regeneration, and gear weighting. Select it only when the healing lead has a clear direct-cast plan or the raid lacks required Improved Faerie Fire coverage. A player who spends nearly the entire encounter rolling Lifebloom gains more from the standard Tree framework.
Restoration Healing Priorities and Lifebloom Cycles
Lifebloom lasts 7 seconds, stacks up to three times, and produces a final bloom when it expires or is dispelled. Maintaining three stacks on a tank delivers excellent sustained healing, but rolling is not always mandatory. Allow the bloom when a tank swap ends the assignment, when the target needs the final heal, when movement makes the next refresh unsafe, or when the mana plan benefits from ending the stack. Rejuvenation lasts 12 seconds and Regrowth leaves a 21-second periodic effect, giving the healer several layers with different refresh rhythms.
| Healing Priority | Action | When It Is Correct | Failure to Avoid |
|---|---|---|---|
| 1 | Keep the assigned tank alive | Refresh Lifebloom before expiration and layer Rejuvenation or Regrowth for incoming danger | Refreshing so late that latency drops a full three-stack roll |
| 2 | Use Swiftmend | An eligible effect is active and immediate healing is required | Consuming the wrong short-duration effect and leaving a planned target uncovered |
| 3 | Pre-cover predictable raid damage | Selected targets will take meaningful damage during the effect | Blanketing players who remain healthy and exhausting mana before the dangerous phase |
| 4 | Use Regrowth for combined direct and periodic healing | The immediate heal is needed and the target will benefit from the long effect | Spamming its expensive direct component into low-value damage |
| 5 | Leave Tree of Life for Healing Touch or Tranquility | The required direct burst or area channel exceeds the value of remaining in form | Leaving without accounting for mana, movement, and the global needed to return |
Swiftmend consumes the eligible Rejuvenation or Regrowth with the shortest remaining duration; it does not consume Lifebloom. Track every eligible effect so the emergency heal does not unexpectedly remove a coverage layer you intended to keep. Nature's Swiftness paired with a maximum-rank Healing Touch is a major emergency option, but Healing Touch requires leaving Tree of Life. Build the form-change global and mana cost into the response instead of pressing the macro after the target has already died.
| Assignment Pattern | Recommended Cycle | Adjustment Trigger |
|---|---|---|
| One active tank | Maintain three Lifebloom stacks, add Rejuvenation, then use Regrowth and Swiftmend around damage | Let Lifebloom bloom when the assignment ends or the final heal is intentionally required |
| Two active tanks | Roll Lifebloom on both, add Rejuvenation according to danger, and preserve a Swiftmend target | Reduce optional raid coverage if latency or movement threatens the tank rolls |
| Three active tanks | Use a strict Lifebloom refresh order and only add spells that fit without risking expiration | Ask for reassignment if mechanics make three stable rolls unrealistic |
| Predictable raid pulse | Pre-cast Rejuvenation on selected high-risk players and Swiftmend where actual damage lands | Stop blanketing when the next phase demands mana for tanks |
| Emergency area damage | Leave Tree for Tranquility only when the channel can complete and other healers need the coverage | Use Barkskin before the channel when pushback is a risk and the encounter permits the timing |
Haste improves the number of global-cooldown actions that fit inside a Lifebloom window, but it does not add periodic ticks or shorten the interval between them in TBC. Four globals naturally fit between refreshes. About 113 haste rating creates the theoretical fifth-global window, while roughly 125 is a safer practical target because input delay and latency consume part of it. During a 30 percent Bloodlust or Heroism effect, about 242 haste from gear reaches the 1-second global-cooldown floor; outside that buff, 242 is not a general hard cap.
Restoration Stats, Mana, and Gear Priorities
Restoration has no spell-hit cap because its primary actions heal friendly targets. Bonus healing is the basic throughput stat. Haste becomes exceptionally useful when it changes how many assignments fit between Lifebloom refreshes. Spirit supports regeneration and Tree of Life aura value, mana per five seconds supplies dependable in-combat recovery, and Intellect expands the mana pool while adding a small amount of spell critical strike chance. Critical strike chance affects direct portions such as Regrowth and Healing Touch but does not make Lifebloom, Rejuvenation, or Regrowth's periodic ticks critically heal.
- Prioritize enough bonus healing to make each global meaningful for the assigned damage pattern.
- Build toward the practical haste window only if the player can execute the extra global without losing Lifebloom stacks.
- Use Spirit for regeneration and stronger Tree of Life party support.
- Value mana per five seconds when long encounters or heavy Regrowth use strain the mana plan.
- Add Intellect for a larger starting pool and modest critical-strike support.
- Keep regeneration and haste alternatives because one universal set cannot optimize both short farm kills and long progression attempts.
Mana management begins before the bar is low. Use Super Mana Potion early enough to gain another use later, schedule Innervate while enough mana is missing to avoid waste, and coordinate Shadow Priest or Shaman support through group placement. Downranked spells may improve efficiency in specific assignments, but Lifebloom rank, bloom behavior, and spell coefficients should be tested against the encounter rather than copied from a fixed one-button rule.
Restoration Tier 6, Weapons, and Phase 3 BiS
Restoration Tier 6 is Thunderheart Raiment. The two-piece bonus lowers Swiftmend's cooldown by 2 seconds, which improves emergency availability. The four-piece bonus raises Healing Touch healing by 5 percent, but that spell is outside the standard Tree of Life rolling cycle. Consequently, the four-piece bonus is less mandatory than the Balance and Feral equivalents. Restoration can mix the best leather and cloth pieces, maintain the two-piece bonus when useful, and prioritize the haste and regeneration profile demanded by its assignment. The current Wowhead Restoration Phase 3 BiS guide lists throughput, regeneration, and profession alternatives.
| Slot | Phase 3 Restoration Target | Source | Selection Note |
|---|---|---|---|
| Head | Thunderheart Helmet | Archimonde | Tier 6 set position and strong healing stats |
| Neck | Lord Sanguinar's Claim | Kael'thas Sunstrider | Excellent healing and regeneration carryover piece |
| Shoulders | Shoulderpads of Renewed Life | Leatherworking | Powerful crafted healing shoulders |
| Back | Shroud of the Highborne | Illidan Stormrage | Haste and healing throughput |
| Chest | Thunderheart Tunic | Illidan Stormrage | Tier 6 set position |
| Wrists | Swiftheal Wraps | Tailoring | Important crafted haste option |
| Hands | Botanist's Gloves of Growth | Raid source: Teron Gorefiend | Strong raw healing and regeneration |
| Waist | Angelista's Sash | Kaz'rogal | Haste-focused belt for tighter global windows |
| Legs | Leggings of Eternity | Archimonde | Exceptional off-set healing legs |
| Feet | Boots of the Divine Light | Mount Hyjal trash | High throughput and useful haste |
| Finger | Two Blessed Bands of Karabor | Raid source: Black Temple trash | Excellent healing rings where duplicate loot is available |
| Trinket | Memento of Tyrande | Illidan Stormrage | Healing power with valuable sustained mana return |
| Trinket | Essence of the Martyr | Badge of Justice vendor | Controllable healing burst |
| Main hand | Crystal Spire of Karabor | Raid source: Illidan Stormrage | Top one-handed healing stats, but its special effect does not trigger from periodic ticks |
| Off hand | Scepter of Purification | Archimonde | Strong healing and regeneration companion |
| Idol | Idol of the Emerald Queen | Ambassador Hellmaw | Directly improves the primary Lifebloom assignment |
This target list emphasizes a practical haste-and-throughput Tree set, not the only valid configuration. A healer struggling with mana should exchange some haste for Spirit or mana per five seconds before losing Lifebloom rolls late in the fight. A player with excellent latency and short kill times can push a more aggressive global schedule. Cloth is valid when it offers the best healing allocation, but raid loot rules and competition should be respected. Teams building toward Illidan loot can use the Black Temple progression page alongside their own roster and drop plan.
Choosing Balance, Feral, or Restoration
The correct specialization is the one that fills a real raid job and matches the player's preferred type of responsibility. Balance rewards cast planning and group support. Cat rewards mechanical rhythm and proactive positioning. Bear rewards encounter knowledge, gear discipline, and control. Restoration rewards damage prediction and multi-target tracking. A flexible Druid can maintain several sets, but learning one job deeply is more valuable than changing forms without mastering the underlying decisions.
| If You Prefer | Best Starting Choice | Why | Preparation Burden |
|---|---|---|---|
| Ranged casting plus visible raid support | Balance | Moonkin Aura, Improved Faerie Fire, Innervate, and Starfire create a clear caster-support identity | Hit sets, mana planning, and group composition |
| Fast melee decisions and a technical resource loop | Feral Cat | Powershifting, combo points, bleed timing, and positional Shreds reward practice | Shift execution, consumable mana, several idols, and a separate Bear set for flexibility |
| Tanking with strong physical effective health | Feral Bear | Large armor and health pools support main-tank and off-tank assignments | Critical-immunity math, encounter sets, resistance gear, and threat alternatives |
| Mobile healing and proactive tank coverage | Restoration | Lifebloom, Rejuvenation, Regrowth, and Swiftmend reward anticipation and tracking | Haste breakpoints, mana sets, assignment planning, and form management |
For a raid leader, the decision starts with missing buffs and assignments. A caster group may gain more from its first Balance Druid than from another pure damage slot. A roster needing a tank who can deal meaningful damage when not tanking gains unusual value from Feral. A healing team that already has broad area coverage can use Restoration to stabilize tanks efficiently. None of these conclusions remove the need to evaluate the individual player, because the specialization's utility only exists when its debuffs, auras, resources, and emergency tools are executed correctly.
Final Verdict
Druid enters TBC Anniversary Phase 3 as four practical PvE roles organized across three talent specializations. Balance supports physical and spell groups while delivering planned ranged damage. Feral Cat turns energy timing, positioning, and powershifting into melee output. Feral Bear combines exceptional physical effective health with strong threat and encounter flexibility. Restoration layers efficient healing ahead of damage and protects tanks through movement. Choose the role the raid genuinely needs, use the talent framework designed for that role, calculate caps from the group that will actually be present, and maintain alternate equipment for changing encounters. A Druid prepared this way contributes far more than a single damage, healing, or tanking number can show.