Warlock is a ranged damage class whose three PvE specializations solve different raid problems in TBC Anniversary. Affliction exchanges some personal ceiling for curses and debuffs that improve the roster, Demonology turns pet survival and positioning into damage, and Destruction converts caster support into exceptional Shadow Bolt or Incinerate throughput. Phase 3 opens the Battle for Mount Hyjal and Black Temple, introduces the original five Tier 6 set positions, and places unusually valuable haste gear into the caster loot pool. Blizzard lists both raids, their bosses, epic gems, and Arena Season 3 in the official Phase 3 announcement. This Warlock class hub covers raid roles, talent builds, readable priority systems, curses, demons, spell-hit caps, stat decisions, Tier 6, weapons, and complete Phase 3 BiS targets for Affliction, Demonology, and Destruction.
Warlock PvE Specializations at a Glance
Every Warlock supplies strong ranged damage, healthstones, combat-recovery planning through a soulstone, summons, curses, Fear, Banish, and Seed of Corruption. The meaningful choice is where the character's damage and raid value come from. Affliction manages several effects and normally owns the enhanced caster curse. Demonology divides output between the player and an active demon. Destruction has the simplest boss priority and the highest supported single-target ceiling, but it is also the most sensitive to uninterrupted casting and threat.
| Specialization | Typical Phase 3 Raid Build | Primary Contribution | Best Environment | Main Limitation |
|---|---|---|---|---|
| Affliction | 40/0/21 Ruin | Malediction, Shadow Embrace, several maintained effects, and respectable Shadow damage | A roster that needs one dedicated utility Warlock and can keep long-lived targets available | Periodic effects cannot critically strike or gain extra ticks from haste in TBC |
| Demonology | 1/41/19 Felguard | Player damage, permanent pet pressure, Soul Link durability, and useful movement uptime | Encounters where a properly controlled demon can attack safely for most of the fight | A dead or repeatedly recalled pet removes a large part of the specialization's output |
| Destruction | 0/21/40 Demonic Sacrifice | High direct spell damage through Shadow Bolt or Incinerate | A caster group with reliable hit support, spell buffs, threat control, and stable cast windows | Forced movement, early Life Taps, and poor threat discipline quickly reduce real damage |
A typical progression roster wants one Affliction Warlock for amplified Curse of the Elements, then fills additional Warlock positions with Destruction. Demonology remains a credible alternative when the player can protect the pet and the encounter rewards damage during movement or caster downtime. The exact ranking changes with support, kill time, target resistance, and execution; the ExpCarry Phase 3 DPS tier list supplies the broader raid context.
Shared Warlock Raid Setup and Core Mechanics
Warlock performance begins before the first damaging spell. The raid needs a curse map, healthstone talent-rank plan, soulstone target, demon decision, and enough Soul Shards for repeated pulls. Those assignments prevent duplicated debuffs, missing utility, and last-second summoning. They also make the individual damage priority simpler because every player knows which curse cannot be replaced by a personal damage curse.
Curses, Demons, Armor, and Pull Preparation
Only one curse from the same Warlock can remain on a target, so a new cast removes that player's previous curse. Affliction normally maintains Curse of the Elements because Malediction increases its raid benefit. Another Warlock can cover Curse of Recklessness for physical attackers. Once all mandatory curses are assigned, an unassigned player may use Curse of Doom when the target will live through its full one-minute delay or Curse of Agony for a shorter target. Utility always wins over a private meter: if the raid leader assigns Curse of Tongues, that is the rotation until the assignment changes.
| Checkpoint | Required Decision | Practical Rule |
|---|---|---|
| Before the raid | Coordinate healthstone talent ranks and soulstone coverage | Different Warlocks can provide distinct healthstone versions; agree on ranks instead of duplicating the same one |
| Before each pull | Confirm the curse owner for every priority target | Never replace an assigned raid debuff with a damage curse without approval |
| Demon plan | Choose active Imp, Felguard, Succubus, or a sacrifice buff | Know whether the demon attacks, stays passive for a buff, or is sacrificed before combat |
| Armor | Keep Fel Armor active | Its spell-damage and healing-received effects support both damage and Life Tap recovery |
| Pet buffs | Include active demons in appropriate raid buffs | Extra pet attributes improve survival and also feed Demonology's Demonic Knowledge |
| Pull resources | Carry enough Soul Shards for summons, stones, Shadowburn, and repeated attempts | Drain Soul near the end of suitable trash targets rather than entering a boss with an empty shard bag |
Phase 3 magnifies this preparation. Hyjal contains repeated waves where Seed of Corruption and controlled fears are valuable, while Black Temple mixes pet hazards, demon targets, resistance concerns, and long boss sequences. ExpCarry's Black Temple raid-composition guide helps establish curse and group assignments. Players still completing entry requirements can use the TBC Anniversary attunement roadmap, and the WoW TBC progression hub connects raids, equipment, reputations, and access planning.
Mana, Threat, Movement, and Warlock Utility
Life Tap makes Warlock mana renewable, but it does not make mana management free. Every tap consumes a global cooldown, creates healing work, and can become lethal immediately before raid damage. Enter Bloodlust or Heroism and trinket windows with enough mana to cast throughout them. Use movement, target immunity, and other forced downtime for Life Tap whenever health is safe. If a boss mechanic is about to damage the raid, wait for recovery or communicate with a healer rather than converting the last safe health into mana.
| Situation | Correct Response | Common Failure |
|---|---|---|
| Approaching the tank's threat | Use Soulshatter after meaningful threat has accumulated, then resume at a safe pace | Using it near the pull when halving a small threat total provides little value |
| Forced movement | Reposition early, refresh an expiring instant effect, or Life Tap if health and mana justify it | Canceling a nearly completed Shadow Bolt or Incinerate because movement started late |
| Large enemy pack | Apply Seed of Corruption across different targets and watch the tank's threat lead | Triggering several detonations before the pack is controlled |
| Demon or elemental control | Use Banish for the assigned duration and communicate every early break or resist | Refreshing automatically when the raid intends to kill the target |
| Fear assignment | Control the path and use Curse of Recklessness when an immediate Fear break is required | Letting a feared target reach another group |
| Target nearly dead | Use Drain Soul only when a shard is needed and the lost direct cast is acceptable | Channeling too early and surrendering useful execute damage |
Damage-over-time effects should not be clipped. Begin a casted refresh early enough that it lands just after the old effect expires, but never overwrite a remaining final tick. Seed of Corruption is the standard ranged area tool; Hellfire is a situational close-range follow-up only when incoming damage and positioning are safe. Rain of Fire is normally weaker for raw throughput, though range or encounter constraints can still make it the safer answer.
Universal Spell Hit Cap and Level 70 Rating Reference
A level 73 raid boss leaves a caster with a 17 percent base miss chance. TBC preserves an unavoidable final 1 percent miss, so effective hit stops improving at 16 percent. Destruction and Demonology have no general PvE talent that supplies spell hit to their main filler. Affliction's Suppression is different: it helps Affliction-category spells, but it does not improve Shadow Bolt. Gear must therefore be evaluated against the exact spell that matters, not a single number copied from another build.
| Reference | Level 70 Value | How to Use It |
|---|---|---|
| Boss spell-hit target | 16 percent effective hit | The remaining 1 percent miss chance cannot be removed |
| No external hit support | 202 spell hit rating | Default Shadow Bolt and Incinerate cap for all three specializations |
| Totem of Wrath active | 164 spell hit rating | The Shaman supplies 3 percent while the Warlock remains in range and in that party |
| Totem of Wrath plus Inspiring Presence | 152 spell hit rating | The Draenei party aura removes one additional percentage point |
| One percent spell hit | 12.62 rating | Round practical gear totals upward when converting a missing percentage |
| One percent spell haste | 15.77 rating | Haste shortens casts and the global cooldown within its floor, but raises mana use per minute |
| One percent spell critical strike | 22.08 rating | Critical strike primarily improves direct spells; normal Warlock periodic ticks do not crit |
| Intellect conversion | 15 mana per point; about 81.92 Intellect per 1 percent spell crit | Useful, but not a reason to replace stronger spell damage, haste, or required hit |
Recalculate the cap whenever group composition, gems, a weapon, or a hit-heavy cloak changes. Rating beyond the active cap contributes no damage to spells already capped. The current Warlock stat and rating reference confirms the boss threshold and level 70 conversions.
Three special swaps sit outside a normal slot-by-slot list. Eye of the Night can provide a temporary spell-damage aura to nearby party members while equipped, so one coordinated caster may create more group value than a personal neck upgrade. Mark of the Champion is an exceptional legacy trinket against demons and undead for characters that obtained it in Classic. During the matching seasonal event, Dark Iron Smoking Pipe duplicates the on-use profile of the badge spell-damage trinket. Until two copies of the trash-drop haste ring are available, Ring of Captured Storms and Band of the Eternal Sage are practical substitutes. Treat these as encounter or availability swaps rather than universal BiS.
Affliction Warlock Phase 3 PvE Guide
Affliction is the raid-support Warlock that still deals competitive ranged damage. Its defining contributions are an improved Curse of the Elements through Malediction, the physical-damage reduction from a fully developed Shadow Embrace, reliable periodic damage during movement, and Blood Pact access through an active Imp. In Phase 3 gear, the raid build normally trades Unstable Affliction for Ruin because Shadow Bolt critical strikes occupy a larger share of total output. The specialization is strongest on durable targets and multi-target encounters that allow effects to finish; it loses efficiency when enemies die before those effects return their full damage.
| Affliction Strength | Why It Matters | Affliction Weakness | How to Reduce It |
|---|---|---|---|
| Enhanced caster curse | Malediction increases the raid value of Curse of the Elements | Lower direct-damage scaling than Destruction | Use a Phase 3 Ruin build and preserve Shadow Bolt uptime |
| Damage during movement | Instant Corruption, Siphon Life, and timely refreshes preserve useful globals | Several timers compete for attention | Track each effect separately and refresh only after its last tick |
| Tank support | Shadow Embrace reduces the target's physical damage when stacked | Short targets waste periodic damage | Use Shadow Bolt or Seed instead of fully loading enemies that will die quickly |
Affliction Talents: 40/0/21 Ruin Raid Build
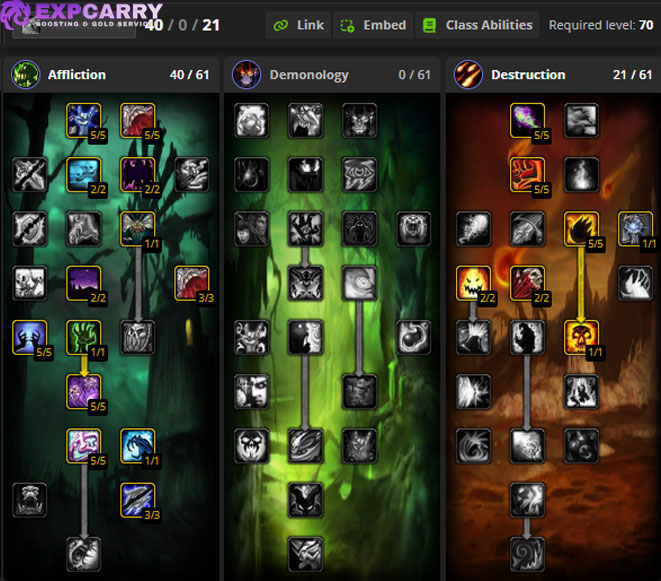
Recommended Phase 3 raid build: 40 points in Affliction and 21 in Destruction, ending with Ruin. The build retains the complete raid-utility package and changes the final damage talent from Unstable Affliction to Ruin, allowing every Shadow Bolt critical strike to gain a much larger bonus.
| Build | Best Use | Key Gain | What Changes in Play |
|---|---|---|---|
| 40/0/21 Ruin | Standard Phase 3 raiding with meaningful spell critical strike | Ruin improves Shadow Bolt critical damage | Unstable Affliction leaves the priority; direct filler becomes more important |
| 41/0/20 Unstable Affliction | Lower-crit gear, dungeons, movement-heavy fights, or a player who wants another maintained effect | Unstable Affliction adds steady periodic damage | Use the extra DoT after the assigned curse and before Corruption |
The mandatory Affliction core is Suppression, Improved Corruption, Improved Life Tap, Empowered Corruption, Shadow Embrace, Siphon Life, Shadow Mastery, Contagion, and Malediction. These talents make Corruption instant, improve health-to-mana conversion, scale periodic damage, create the tank-support debuff, and strengthen the assigned caster curse. The Destruction investment reaches Improved Shadow Bolt, Bane, Devastation, and Ruin so the specialization still has an efficient hard-cast filler.
Flexible points usually move among Dark Pact, Grim Reach, Intensity, Destructive Reach, Shadowburn, and Imp-improvement talents. Dark Pact is optional because an Affliction Warlock can already sustain mana with Life Tap. Range is more valuable when encounter positioning keeps the player near maximum distance, while pushback resistance helps fights with repeated raid damage. Suppression can be reduced only after gear and party buffs replace the lost Affliction-only hit. The current Warlock talent guide provides a visual tree for the standard frameworks.
Affliction Quick Rotation, DoT Timing, and Area Damage
Affliction uses a priority, not a rigid loop. Apply the raid curse first, establish effects that will complete most of their duration, and fill every free cast with Shadow Bolt. The table gives the pull order and the condition that can change it.
| Priority | Action | Cast or Refresh When | Skip or Delay When |
|---|---|---|---|
| 1 | Assigned curse | The target becomes active or the curse expires | Never skip a required raid curse for personal damage |
| 2 | Unstable Affliction | Only when using the 41/0/20 build and the target will live long enough | The 40/0/21 Phase 3 build does not have this spell |
| 3 | Corruption | The target will survive its useful duration and the old effect has ended | A short-lived add will die before enough ticks occur |
| 4 | Siphon Life | A durable target is available and Shadow support makes the global worthwhile | The target is nearly dead or a Shadow Bolt will land before a transition |
| 5 | Immolate | The target will remain active for its duration and Fire resistance is not a concern | Movement, target life, or the current damage profile makes another Shadow Bolt stronger |
| 6 | Shadow Bolt | No higher-priority effect needs application or refresh | Only interrupt the cast for a required mechanic, threat stop, or planned movement |
Nightfall procs make the next Shadow Bolt instant and should be used before the proc expires. Never overwrite a periodic effect merely because it is close to ending; let the final tick occur, then land the replacement. On two durable targets, multi-dotting can win if both targets live through the effects and the raid still has debuff room. On short adds, direct casts or Seed of Corruption are usually better than applying the full package.
| Situation | Affliction Response | Execution Check |
|---|---|---|
| Forced movement | Refresh an effect that is genuinely expiring, spend a Nightfall proc, or Life Tap safely | Do not clip a DoT just to fill movement |
| Three or more stacked enemies | Cycle Seed of Corruption across separate targets | Give the tank enough time before chained detonations |
| Seeds already cover all useful targets | Continue seeding as detonations clear or use Hellfire only from a safe position | Watch personal health and incoming area damage |
| Mana running low | Life Tap during movement or a low-value gap | Avoid tapping inside haste, trinket, or damage-vulnerability windows |
| Threat becoming unsafe | Use Soulshatter after enough threat exists to make the reduction meaningful | Resume only after checking the tank's lead |
Affliction's complexity comes from deciding which effects deserve a global, not from pressing every available spell. Target lifetime, Shadow vulnerability, movement, and remaining debuff duration all change that answer. The Warlock rotation and abilities reference gives additional spell-by-spell context.
Affliction Stats, Suppression, and Spell Hit Caps
Affliction has two hit thresholds in the same gear set. Five points in Suppression provide 10 percent hit to Affliction spells, so curses, Corruption, Siphon Life, and other affected spells need much less rating. Shadow Bolt receives nothing from Suppression and remains a major Phase 3 damage source, especially in the Ruin build. A serious raid set therefore continues toward the full filler cap instead of stopping as soon as the DoTs stop missing.
- Affliction effects with 5/5 Suppression need 6 percent from gear without party help, equal to about 76 spell hit rating.
- Those same effects need roughly 38 rating with Totem of Wrath, or about 26 when the Shaman totem and Inspiring Presence are provided together.
- Shadow Bolt still needs 202 rating alone, 164 with Totem of Wrath, or 152 with both party bonuses.
- Reach the relevant hit target first; excess rating does not improve a spell that is already capped.
- After hit, spell damage is broadly reliable. Haste and critical strike mainly improve Shadow Bolt rather than normal periodic ticks.
- Haste does not accelerate Warlock DoT tick frequency in TBC, and standard periodic ticks cannot critically strike.
- Critical strike gains value in the 40/0/21 build because Ruin magnifies direct Destruction-spell criticals.
- Intellect extends time before the next Life Tap, while Stamina adds survival and a larger health-to-mana buffer.
- Spell penetration is not a normal raid gearing target; handle a resistance-specific encounter with a dedicated swap if required.
Practical priority is affected-spell hit to its threshold, Shadow Bolt hit toward the group-adjusted boss cap, then a simulated balance of spell damage, haste, and critical strike. A piece with less hit can become an upgrade only if the complete set remains capped. Do not evaluate Affliction haste with a modern rule set: it produces more filler casts and shorter globals, but it does not insert extra Corruption or Siphon Life ticks.
Affliction Phase 3 Tier 6, Weapons, and BiS Gear
Affliction wants four pieces of Malefic Raiment. The two-piece effect heals the Warlock for 70 health whenever Corruption or Immolate deals periodic damage, which supports Life Tap. The decisive bonus is four pieces: Shadow Bolt and Incinerate deal 6 percent more damage. The table uses the Tier 6 robe with the strongest Phase 3 off-set legs. A player who already owns Vestments of the Sea-Witch can instead use Leggings of the Malefic and keep the same four-piece bonus.
| Slot | Affliction Phase 3 Target | Source | Why It Fits |
|---|---|---|---|
| Head | Hood of the Malefic | Archimonde, Hyjal Summit | Tier slot with hit, critical strike, and four-piece progress |
| Shoulders | Mantle of the Malefic | Mother Shahraz, Black Temple | Efficient set slot that helps control Shadow Bolt hit |
| Back | Cloak of the Illidari Council; use Nethervoid Cloak when its hit is needed | Illidari Council or Black Temple trash | Choose critical strike or hit according to the complete loadout |
| Chest | Robe of the Malefic | Illidan Stormrage, Black Temple | Completes the preferred four-piece arrangement with off-set legs |
| Wrists | Bracers of Nimble Thought | Tailoring craft; bind on equip | High spell damage and haste without waiting for a raid token |
| Hands | Gloves of the Malefic | Azgalor, Hyjal Summit | Low-conflict set position and the fourth Tier component |
| Waist | Belt of Blasting; swap to Anetheron's Noose when capped | Tailoring craft or Anetheron, Hyjal Summit | The first option supplies hit; the second converts excess hit into damage and crit |
| Legs | Leggings of Channeled Elements | Hyjal Summit, obtained from Kaz'rogal | Excellent spell-damage budget in the off-set armor slot |
| Feet | Slippers of the Seacaller | Black Temple, obtained from High Warlord Naj'entus | Haste, spell damage, and sockets without unwanted hit |
| Neck | The Sun King's Talisman; hit swap: Translucent Spellthread Necklace | Kael'thas Sunstrider or Reliquary of Souls | Use the first for uncapped damage stats and the second to repair a hit deficit |
| Finger 1 | Ring of Ancient Knowledge | Black Temple trash | Exceptional haste ring that is not unique |
| Finger 2 | Ring of Ancient Knowledge | Black Temple trash | A second copy is the theoretical target; realistic alternatives remain close |
| Trinket 1 | The Skull of Gul'dan | Illidan Stormrage, Black Temple | Long-lived spell-damage item with a controllable haste window |
| Trinket 2 | Quagmirran's Eye or Icon of the Silver Crescent | Heroic Slave Pens or Badge of Justice vendor | Choose passive haste procs or a planned spell-damage activation |
| Staff | Zhar'doom, Greatstaff of the Devourer as the primary staff | Black Temple, obtained from Illidan Stormrage | Outstanding haste, spell damage, and Intellect without a hit-heavy budget |
| One-Hand Alternative | Tempest of Chaos paired with the off-hand Chronicle of Dark Secrets | Hyjal Summit, from Archimonde and Rage Winterchill | A competitive modular pair when its added hit is useful |
| Ranged | Wand of the Forgotten Star | Tempest Keep, from High Astromancer Solarian | The strongest general Phase 3 wand despite coming from an earlier raid |
This is a complete target set, not a claim that every isolated row remains best after another slot changes. The weapon package, cloak, belt, and neck can move hit by several percentage points. Assemble the full combination, preserve four Tier 6 pieces, then socket around the actual party cap. The current Affliction Phase 3 BiS guide lists further alternatives, while the ExpCarry Phase 3 BiS index helps compare contested caster drops across the raid.
Explore services related to this guide, selected from our WoW TBC Anniversary catalog.
View All WoW TBC Anniversary Services


Demonology Warlock Phase 3 PvE Guide
Demonology is a two-unit damage specialization. The standard build keeps a Felguard active, uses Soul Link and Master Demonologist, gains spell damage through Demonic Knowledge, and continues dealing pet damage when the Warlock must move. Its ceiling depends less on a single perfect cast sequence than Destruction's, but much more on encounter knowledge: a pet standing in a cleave, fire patch, or lethal area effect can erase several talents and force an expensive resummon. The specialization becomes rewarding when the player treats pet positioning, buffs, mana, and survival as part of the main rotation.
| Demonology Strength | Practical Benefit | Demonology Weakness | Required Answer |
|---|---|---|---|
| Pet damage during caster downtime | The Felguard can continue attacking through movement and some target transitions | Pet death removes damage and multiple passive bonuses | Move the demon early and keep emergency resummoning ready |
| Soul Link durability | Damage sharing improves personal survival and grants a damage bonus | Shared damage pressures the demon | Keep the pet buffed, positioned safely, and healed when saving it is efficient |
| Demonic Knowledge scaling | Pet Stamina and Intellect add spell damage to the player | Raw Stamina remains a weak offensive item stat | Prefer normal caster upgrades and treat pet attributes as an added benefit |
Demonology Talents: 1/41/19 Felguard Build
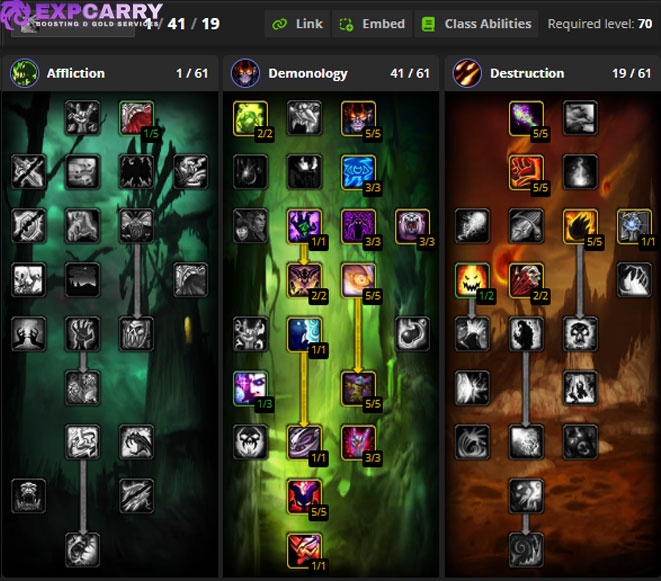
Recommended Phase 3 raid build: 1 point in Affliction, 41 in Demonology, and 19 in Destruction. The build reaches Summon Felguard, places one point in Improved Corruption to bring its cast close to the global cooldown, and invests far enough into Destruction for faster and more reliable Shadow Bolt casting.
| Build | Demon | When to Choose It | Main Tradeoff |
|---|---|---|---|
| 1/41/19 Felguard | Felguard | Default progression, movement, cleave, and encounters with manageable pet damage | Cannot reach Ruin, so more output sits in the active demon |
| 1/39/21 Master Demonologist and Ruin | Succubus | High-crit gear and a fight where the more fragile pet can remain safe | Loses the Felguard and requires strict Succubus protection |
The Felguard build centers on Demonic Embrace, Fel Intellect, Fel Stamina, Fel Domination, Demonic Aegis, Master Summoner, Unholy Power, Master Demonologist, Soul Link, Demonic Knowledge, Demonic Tactics, and Summon Felguard. One point in Mana Feed is normally enough to support frequent Felguard Cleaves as the Warlock restores mana. Demonic Sacrifice appears in the path only to unlock deeper talents; sacrificing the active demon removes the package that makes Demonology work.
Destruction points secure Improved Shadow Bolt, Bane, Devastation, and useful range or pushback protection. Flexible points can move between Intensity, Destructive Reach, Shadowburn, and the early healthstone talents. The 1/39/21 alternative stops short of the Felguard, reaches Ruin, and keeps a Succubus for the larger Master Demonologist damage bonus. Disable Lash of Pain in that variant because it can consume Improved Shadow Bolt charges that are more valuable to raid Shadow spells.
Demonology Quick Rotation and Pet Control
Demonology has a short player priority and a continuous pet checklist. The Warlock maintains curse and DoTs, then fills with Shadow Bolt. At the same time, the Felguard must be attacking the correct target, using Cleave when appropriate, approaching from a safe angle, and leaving harmful ground effects before its health collapses.
| Priority | Player Action | Pet Action | Condition |
|---|---|---|---|
| Pre-pull | Activate Fel Armor and Soul Link; confirm curse and mana | Summon, buff, and place the Felguard on passive | Send the pet only after the tank has stable control |
| 1 | Apply the assigned curse | Attack the primary target from a safe side or rear position | Raid utility remains the first global |
| 2 | Maintain Corruption without clipping | Keep Cleave available for adjacent valid enemies | Skip a DoT that cannot complete enough ticks |
| 3 | Maintain Immolate when its full duration is valuable | Recall before cleaves, lethal ground effects, or unsafe transitions | Pet survival is worth more than a few extra melee swings |
| 4 | Cast Shadow Bolt as the filler | Return to attack only when the route is safe | Do not delay a required pet recall for one cast |
Use Life Tap during movement when health is safe; Mana Feed transfers part of that restored mana to the Felguard. Death Coil can fill movement when its healing and control are useful, while Shadowburn is an optional shard-spending finisher if the build includes it. For area damage, send the Felguard only after tanks gather the pack, enable Cleave, and spread Seed of Corruption across different enemies. Chained Seed detonations can create extreme threat, so pet engagement does not replace waiting for a clean pickup.
| Pet Problem | Immediate Response | Follow-up |
|---|---|---|
| Boss turns toward the pet | Recall immediately | Re-engage from a safe side after the tank restores facing |
| Ground hazard appears | Move the pet manually or return it to the Warlock | Do not rely on automatic pathing to escape |
| Pet is low but recoverable | Recall and use Health Funnel only when the channel is safer than a death | Ask healers whether raid healing can cover the demon |
| Pet dies | Combine Fel Domination with Master Summoner for the fastest replacement | Restore Soul Link, pet buffs, and the attack command before normal filler |
| Succubus variant faces lethal area damage | Keep it passive and invisible if preserving the Master Demonologist bonus is more valuable | Resume pet attacks only when survival is realistic |
The best Demonology log is usually the result of preventing downtime rather than adding another spell. Review pet active time, deaths, recalls, target selection, and Cleave usage after each pull. Those measurements expose more lost damage than minor changes to the player's four-spell priority.
Demonology Stats, Pet Scaling, and Hit Caps
Demonology receives no spell-hit talent for Shadow Bolt, so it uses the full class cap. Its pet has separate attack behavior and can miss independently; player spell hit should still be solved first because it directly protects curses, DoTs, and the main filler. After cap, spell damage, haste, and critical strike improve the player portion, while selected attributes also increase pet statistics and Demonic Knowledge.
- Shadow Bolt needs 202 spell hit rating without a party bonus, 164 with Totem of Wrath, or 152 with Totem of Wrath and Inspiring Presence.
- Spell damage is a dependable post-cap gain because it improves the Warlock's direct casts and periodic effects.
- Haste shortens Shadow Bolt and increases casts per minute, but it also creates more Life Tap pressure.
- Critical strike supports Improved Shadow Bolt and gains additional value in the 1/39/21 Ruin alternative.
- Intellect adds player mana and transfers a portion to the demon; it also contributes indirectly through Demonic Knowledge.
- Stamina improves survival and pet scaling, yet its offensive conversion is too small to justify replacing normal caster stats.
- Pet uptime is an effective stat: an item-level upgrade cannot compensate for repeatedly losing Soul Link, Master Demonologist, Demonic Knowledge, and pet attacks.
- Spirit remains weak because Life Tap, not time outside the five-second rule, sustains Warlock mana.
Evaluate haste against the encounter. If an additional Shadow Bolt arrives before movement and the pet stays active, haste performs well. If the same item breaks hit cap or only makes the Warlock tap during a damage window, its paper value overstates the result. Raid buffs on the demon increase both survival and some inherited scaling, so pet buff coverage belongs in any meaningful gear comparison.
Demonology Phase 3 Tier 6, Survival Swaps, and BiS Gear
The default Demonology target is four pieces of Malefic Raiment for the 6 percent Shadow Bolt increase. Pet-hostile progression creates one exceptional alternative: two pieces of Corruptor Raiment heal the demon for 15 percent of damage dealt, and Void Star Talisman sharply reduces area-effect damage suffered by the pet. That survival package sacrifices substantial player damage and the Tier 6 four-piece, so equip it only when repeated pet deaths would cost even more.
| Slot | Demonology Phase 3 Target | Source | Demonology Reason |
|---|---|---|---|
| Head | Hood of the Malefic | Archimonde, Hyjal Summit | Set progress plus Intellect, hit, and critical strike |
| Shoulders | Mantle of the Malefic | Mother Shahraz, Black Temple | Strong Tier placement with useful cap flexibility |
| Back | Cloak of the Illidari Council; hit option: Nethervoid Cloak | Illidari Council or Black Temple trash | Swap by player spell-hit requirement, not pet statistics |
| Chest | Robe of the Malefic | Illidan Stormrage, Black Temple | Completes the four-piece arrangement when legs are off-set |
| Wrists | Bracers of Nimble Thought | Tailoring craft; bind on equip | High player spell throughput from an accessible crafted slot |
| Hands | Gloves of the Malefic | Azgalor, Hyjal Summit | Secures the 6 percent Shadow Bolt bonus |
| Waist | Belt of Blasting or Anetheron's Noose | Tailoring craft or Anetheron, Hyjal Summit | Use hit until capped, then prefer the cleaner damage-and-crit budget |
| Legs | Leggings of Channeled Elements | Hyjal Summit, looted from Kaz'rogal | Large spell damage in the selected off-set slot |
| Feet | Slippers of the Seacaller | Black Temple, looted from High Warlord Naj'entus | Strong haste and spell damage with no forced hit |
| Neck | The Sun King's Talisman; cap option: Translucent Spellthread Necklace | Kael'thas Sunstrider or Reliquary of Souls | Pick the stat profile that leaves Shadow Bolt at the active cap |
| Finger 1 | Ring of Ancient Knowledge | Black Temple trash | Excellent haste for the player casting component |
| Finger 2 | Ring of Ancient Knowledge | Black Temple trash | Two copies form the theoretical target because the ring is not unique |
| Trinket 1 | The Skull of Gul'dan | Illidan Stormrage, Black Temple | Major Phase 3 player upgrade that remains valuable beyond this tier |
| Trinket 2 | Quagmirran's Eye; survival swap: Void Star Talisman | Heroic Slave Pens or High Astromancer Solarian | Use throughput by default and pet mitigation only when the encounter demands it |
| Staff | Zhar'doom, Greatstaff of the Devourer as the primary staff | Black Temple, looted from Illidan Stormrage | High-value spell package with Intellect that also helps pet scaling |
| One-Hand Alternative | Tempest of Chaos alongside the off-hand Chronicle of Dark Secrets | Hyjal Summit drops from Archimonde and Rage Winterchill | Competitive pair and an easy way to tune hit through the off-hand |
| Ranged | Wand of the Forgotten Star | Tempest Keep drop from High Astromancer Solarian | Best general wand when hit is already solved elsewhere |
Do not stack Stamina merely to inflate Demonic Knowledge; its conversion is too small to beat well-itemized caster equipment. The real Demonology gearing question is whether the standard four-piece set can be worn while keeping the pet alive. Start with the damage set, use manual control, and add survival equipment only after logs prove that pet deaths remain the limiting factor. The Demonology Phase 3 BiS guide provides more hit swaps and progression alternatives.
Destruction Warlock Phase 3 PvE Guide
Destruction is the premier personal-damage Warlock specialization in a supported Phase 3 raid. Both main variants use Demonic Sacrifice and Shadow and Flame, then commit their filler to one school. Shadow Destruction sacrifices a Succubus and repeats Shadow Bolt, benefiting from raid Shadow support and Improved Shadow Bolt. Fire Destruction sacrifices an Imp, maintains Immolate, and repeats Incinerate, becoming especially attractive when a Fire Mage maintains Improved Scorch. The priority is easy to read, but perfect output still requires threat control, mana planning, resistance awareness, and minimal movement.
| Variant | Filler | Sacrifice | Choose It When | Avoid It When |
|---|---|---|---|---|
| Shadow Destruction | Shadow Bolt | Succubus for 15 percent increased Shadow damage | The raid supplies Shadow support or the target is unfavorable for Fire | Shadow resistance or missing debuff support makes Fire clearly stronger |
| Fire Destruction | Incinerate | Imp for 15 percent increased Fire damage | A Fire Mage reliably maintains Improved Scorch and the encounter permits Fire | Fire resistance, weak Immolate uptime, or missing Fire support removes the advantage |
Destruction Talents: 0/21/40 Demonic Sacrifice Build
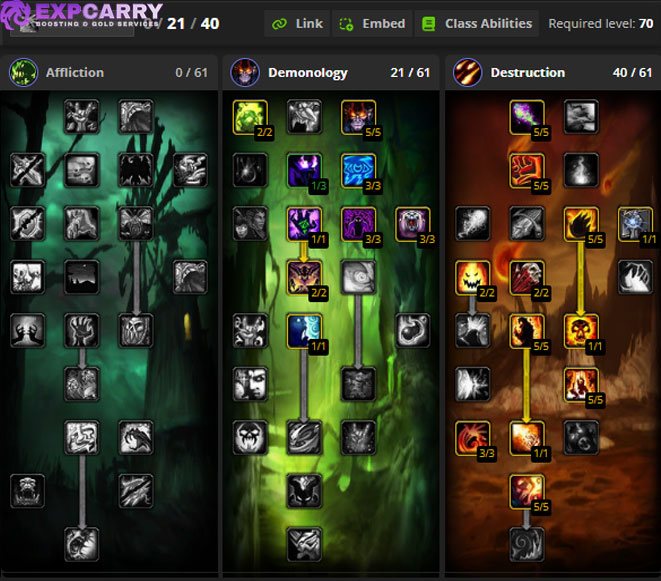
Recommended Phase 3 raid build: 0 points in Affliction, 21 in Demonology, and 40 in Destruction. The Demonology investment reaches Demonic Sacrifice; the Destruction tree supplies fast filler casts, critical-strike scaling, range, reduced threat, Ruin, and the Shadow and Flame spell-power coefficient bonus.
| 0/21/40 Version | Core Talents | Flexible Direction | Raid Use |
|---|---|---|---|
| Standard Shadow and Fire coverage | Improved Shadow Bolt, Bane, Devastation, Ruin, Improved Immolate, Emberstorm, Backlash, Shadow and Flame | Retains useful talents for both schools and a movement instant | Best default when encounters may force a school swap |
| Shadow-focused | Improved Shadow Bolt, Bane, Devastation, Ruin, Backlash, Shadow and Flame | Moves optional Fire points into efficiency or Nether Protection | Stable Shadow Bolt raiding and selected defensive progression use |
| Fire-focused | Bane, Devastation, Ruin, Improved Immolate, Emberstorm, Backlash, Shadow and Flame | Can trade Shadow-specific points for Fire efficiency and Conflagrate | Incinerate raiding with dependable Improved Scorch support |
| 20/0/41 Shadowfury and Nightfall | Nightfall, improved Corruption, and Shadowfury | Drops Demonic Sacrifice for an active Imp and an area stun | Dungeons and control-heavy content, not maximum raid boss damage |
Demonic Sacrifice is non-negotiable in the primary raid build. An Imp grants 15 percent Fire damage; a Succubus grants 15 percent Shadow damage. The effect lasts 30 minutes and ends if another demon is summoned, so verify it after death, resurrection, zoning, or any pet change. Destructive Reach is more than convenience because its threat reduction and range protect cast uptime. Shadowburn and Conflagrate are movement or finishing tools, not buttons to press every cooldown.
Choose Fire or Shadow from the raid, encounter, and complete gear set. A Fire Mage who maintains five Improved Scorch stacks can move Fire ahead. Shadow benefits from the raid's Shadow ecosystem and remains the safer fallback on Fire-resistant targets. A prepared Warlock carries school-appropriate gear and knows the alternate filler; changing only the spell without changing the sacrifice buff, talents, and debuff plan produces a misleading comparison.
Destruction Quick Rotation for Shadow, Fire, and AoE
Destruction's single-target sequence has three jobs: keep the assigned curse, maintain Immolate when the chosen variant gains enough value from it, and cast the correct filler without gaps. The apparent simplicity means every canceled cast, unnecessary instant, and late Life Tap is visible in the result.
| Step | Shadow Destruction | Fire Destruction | Decision Rule |
|---|---|---|---|
| Pre-pull | Sacrifice Succubus and confirm the Shadow buff | Sacrifice Imp and confirm the Fire buff | Summoning another demon cancels the damage effect |
| 1 | Apply the assigned curse | Apply the assigned curse | Raid assignment takes priority over Curse of Doom or Curse of Agony |
| 2 | Maintain Immolate when talented and proven to be a gain | Maintain Immolate at all times on a durable target | Incinerate gains additional damage while Immolate is present |
| 3 | Cast Shadow Bolt continuously | Cast Incinerate continuously | Stop only for mechanics, threat, mana planning, or an expiring required effect |
| Movement | Life Tap, Death Coil, or Shadowburn when appropriate | Life Tap, Death Coil, Shadowburn, or late-duration Conflagrate | Do not consume a healthy Immolate early merely to avoid planning movement |
Shadow Destruction normally omits Corruption because its untalented cast time and global cost lose to another Shadow Bolt in Phase 3 gear. Immolate can still be a gain when Improved Immolate and Emberstorm are present, but Shadow-heavy equipment or a short target can change the answer. Fire Destruction never treats Immolate as optional on a durable boss because Incinerate's bonus depends on it. Refresh only after the final periodic tick.
| Damage Window | Action | Reason |
|---|---|---|
| Bloodlust or Heroism | Enter with high mana, a stable curse, and enough stationary time | Life Tap inside the window replaces a hastened filler cast |
| On-use trinket | Align it with raid haste or an encounter vulnerability when a second use is not lost | Stacked multipliers and uninterrupted casts increase the value of the activation |
| Three or more enemies | Cycle Seed of Corruption across targets after tank control | Detonations outperform the single-target filler and scale strongly with pack size |
| Seeds cover every target | Continue as detonations clear or add safe Hellfire at close range | Rain of Fire is normally the lower-throughput option |
| Threat warning | Use Soulshatter before the next large critical strike can pull the boss | Destruction's burst and chained Seed damage can overtake an unprepared tank |
Improved Shadow Bolt is applied by Shadow Bolt critical strikes and supports allied Shadow damage, but do not use Shadowburn on cooldown merely to chase instant damage because it can consume valuable charges. Conflagrate also consumes Immolate, so save it for movement, an ending target, or a moment when the lost DoT no longer matters. Destruction optimization is mostly about protecting filler casts and eliminating empty globals.
Destruction Stats, Fire and Shadow Scaling, and Hit Cap
Destruction begins with the full 16 percent spell-hit target because neither Shadow Bolt nor Incinerate receives a raid hit talent. After cap, spell damage, haste, and critical strike all matter. Haste adds more filler casts, spell damage improves every successful cast, and critical strike powers Ruin while helping Shadow builds maintain Improved Shadow Bolt. Exact weights differ between Fire and Shadow and change with Tier 6, raid debuffs, and mana duration.
- Without external support, cap the chosen filler at 202 spell hit rating.
- Totem of Wrath lowers the equipment target to 164 rating; adding Inspiring Presence lowers it to 152.
- Spell hit above the active cap has zero damage value, so keep cap-adjustment pieces for party changes.
- Spell damage is the most stable post-cap stat because it benefits the filler, Immolate, damage-dealing curses, and Seed of Corruption.
- Haste is powerful for Shadow Bolt and Incinerate, but every additional cast accelerates mana consumption and threat.
- Critical strike gains value from Ruin; Shadow criticals also create Improved Shadow Bolt raid support.
- Fire and Shadow damage bonuses must be valued against the actual school used. A school-specific item can be excellent in one variant and dead budget in the other.
- Intellect delays Life Tap and supplies a small amount of critical strike; Spirit is not a normal damage target.
- Stamina improves safety and the Life Tap buffer but should not displace an offensive stat without an encounter reason.
Use a complete-set simulation for close haste, critical strike, and spell-damage choices. The same haste item can be excellent on a short supported kill and awkward on a longer fight where it forces another Life Tap. Likewise, a high-hit weapon may be best in one group and waste rating in another. Maintain separate Fire and Shadow assumptions rather than applying one universal stat weight to both.
Destruction Phase 3 Tier 6, Weapons, and BiS Gear
Four pieces of Malefic Raiment are the center of Destruction gearing because the set increases both possible filler spells by 6 percent. The two-piece self-healing is useful when Immolate ticks, but it is not the reason to preserve the set. The target below uses the Tier robe and off-set Hyjal legs. The alternative pairing of Vestments of the Sea-Witch with Leggings of the Malefic remains competitive for a player who already owns the chest.
| Slot | Destruction Phase 3 Target | Source | Destruction Use |
|---|---|---|---|
| Head | Hood of the Malefic | Archimonde, Hyjal Summit | Tier progress with a balanced hit-and-crit profile |
| Shoulders | Mantle of the Malefic | Mother Shahraz, Black Temple | Set bonus component with useful spell hit |
| Back | Shroud of the Highborne; realistic alternative: Cloak of the Illidari Council | Illidan Stormrage or Illidari Council, Black Temple | Haste has the theoretical edge, while the caster cloak is less contested and adds crit |
| Chest | Robe of the Malefic | Illidan Stormrage, Black Temple | Maintains four-piece while freeing the leg slot |
| Wrists | Bracers of Nimble Thought | Tailoring craft; bind on equip | Premium haste and spell damage for direct-cast gameplay |
| Hands | Gloves of the Malefic | Azgalor, Hyjal Summit | Convenient set slot that completes the filler bonus |
| Waist | Belt of Blasting; capped option: Waistwrap of Infinity | Tailoring craft or Supremus, Black Temple | Use the crafted hit until cap, then convert the slot into haste |
| Legs | Leggings of Channeled Elements | Hyjal Summit reward from Kaz'rogal | High spell damage in the optimal off-set configuration |
| Feet | Slippers of the Seacaller as the haste-footwear target | Black Temple reward from High Warlord Naj'entus | Strong direct-cast throughput from spell damage and haste |
| Neck | Translucent Spellthread Necklace; Fire-only capped choice: Hellfire-Encased Pendant; general capped choice: The Sun King's Talisman | Reliquary of Souls, Black Temple trash, or Kael'thas Sunstrider | The hit neck solves Destruction's larger cap, while the Fire pendant rewards a fully supported Incinerate set |
| Finger 1 | Ring of Ancient Knowledge | Black Temple trash | Large haste gain for either filler school |
| Finger 2 | Ring of Ancient Knowledge | Black Temple trash | The non-unique property permits the theoretical double-ring setup |
| Trinket 1 | The Skull of Gul'dan | Illidan Stormrage, Black Temple | The highest-priority long-term caster acquisition in this phase |
| Trinket 2 | Quagmirran's Eye or Icon of the Silver Crescent | Heroic Slave Pens or Badge of Justice vendor | Select a proc for passive play or an activation for planned raid haste |
| Staff | Zhar'doom, Greatstaff of the Devourer as the primary staff | Black Temple reward from Illidan Stormrage | Outstanding haste staff for both Shadow Bolt and Incinerate |
| One-Hand Alternative | Tempest of Chaos plus the matching off-hand Chronicle of Dark Secrets | Hyjal Summit rewards from Archimonde and Rage Winterchill | Close performance with extra hit control and independent slot upgrades |
| Ranged | Wand of the Forgotten Star | Tempest Keep reward from High Astromancer Solarian | Best broad damage wand when no additional hit is required |
Two copies of every contested caster item are not a realistic first-clear expectation. Tier 6 four-piece and a correct hit total matter before the final haste ring or Illidan staff. Build a progression set with alternatives, then reserve the rarest upgrades for combinations that preserve cap. The Destruction Phase 3 BiS guide covers Fire and Shadow swaps, and ExpCarry's Tier 6 token and set-piece guide maps armor slots to their bosses. Players organizing the relevant clear can also use the Black Temple progression service page for raid-specific planning.
Choosing Affliction, Demonology, or Destruction
The correct specialization is determined by the raid's missing function and the encounter the player can execute consistently. A theoretical ceiling does not compensate for an absent enhanced curse, a dead pet, an uncapped filler, or repeated movement errors. Use the following decision table before comparing damage meters.
| Raid Situation | Best Starting Choice | Reason |
|---|---|---|
| No Affliction Warlock provides Malediction | Affliction | The raid-wide caster gain and Shadow Embrace support normally outweigh one player's lost ceiling |
| The caster group is complete and needs maximum boss throughput | Destruction | Demonic Sacrifice plus Tier 6 produces the strongest direct Warlock damage package |
| Movement is frequent and a pet can attack safely | Demonology | The demon preserves damage while the player repositions |
| A Fire Mage guarantees Improved Scorch | Fire Destruction | Incinerate and Immolate receive the complete Fire-support package |
| The fight is Fire-resistant or the raid is built around Shadow damage | Shadow Destruction | Shadow Bolt avoids the resistance problem and contributes Improved Shadow Bolt |
| Pet hazards repeatedly cause deaths during progression | Affliction or Destruction | Both avoid depending on an attacking demon for the core damage plan |
| Dungeon control matters more than raid boss output | Affliction or Shadowfury Destruction | Multi-dotting, instant effects, and an area stun offer more flexible control |
Keep more than one equipment configuration if the raid regularly changes party placement. A hit-capped solo set, a Totem of Wrath set, and school-specific Destruction pieces prevent valuable rating from becoming dead budget. The same discipline applies to talents: select a build for an actual assignment, not only for a simulation profile that assumes different buffs or target uptime.
Final Verdict
Warlock is one of the most complete ranged PvE classes in TBC Anniversary Phase 3. Affliction earns a stable raid position through Malediction, Shadow Embrace, flexible periodic damage, and curse ownership. Demonology is a legitimate damage option for players who actively control, buff, and protect the pet rather than treating it as background automation. Destruction delivers the highest personal ceiling when spell hit, threat, mana, school support, and casting uptime are all solved. Across every specialization, the winning fundamentals are identical: assign curses before the pull, preserve the final tick of each maintained effect, use movement for safe Life Taps, respect threat, and build complete capped gear sets instead of equipping disconnected BiS rows. Four Tier 6 pieces are the central Phase 3 armor objective, but execution and roster fit decide which Warlock build turns that equipment into the most raid value.