
An Expert's Guide to Volcoross Boss Tactics & Strategies
Amirdrassil, the mystical realm introduced in Dragonflight's patch 10.2 for World of Warcraft, is home to nine formidable bosses, with Volcoross being one of the most challenging adversaries. Contrary to the playful notion of it gracing Chandler's Wildlife, Volcoross's presence in Amirdrassil is a genuine threat that players must reckon with. This guide is tailored to provide insights into conquering Volcoross across various difficulty levels, including LFR, normal (nhc), heroic (hc), and mythic. By delving into this guide, players can gain knowledge about the optimal setup, precise raid positioning, and specific roles for tanks, damage dealers (DD), and healers, ensuring they are adequately equipped for the encounter in Amirdrassil.
For those seeking an edge in their raiding experience, we also offer Amirdrassil Raid Boosting services. Our team of seasoned WoW experts is ready to assist you in navigating the challenges of Amirdrassil, ensuring a smoother and more rewarding raiding journey. Whether you're aiming to conquer Volcoross or any other boss in the raid, our boosting services are designed to elevate your gameplay and achieve your raiding goals.
Detailed Breakdown of Volcoross Battle Strategy
Engaging with Volcoross is no small feat. This formidable foe demands not only skill but also strategic planning and coordination from every member of the raid. The battle's intricacies lie in its mechanics and the need for a well-balanced team to counter the boss's relentless assaults. Here, we delve into the specifics of the recommended approach to ensure your team is well-prepared for the fiery confrontation ahead.
Fight Style: Single Target
Volcoross focuses its wrath on a single target at a time, demanding the full attention of the raid. This style requires precise coordination and quick reactions from players, as the boss's concentrated attacks can be devastating if not handled correctly. Players must be vigilant and always be on their toes, ready to adapt to the boss's single-target onslaught.
Recommended Setup: 2 Tanks / 4 Healers / 14 DPS
To tackle Volcoross effectively, a balanced team composition is crucial. The recommended setup includes:
- 2 Tanks: Essential for managing aggro and ensuring that the boss's attention is diverted away from more vulnerable raid members. The dual tank setup also allows for efficient swapping, especially when dealing with tank-specific mechanics or when one tank is overwhelmed.
- 4 Healers: Given the intensity of Volcoross's attacks, a team of four healers ensures that the raid remains in optimal health. They play a pivotal role in countering the boss's high-damage abilities and ensuring the team's survival.
- 14 DPS: Damage dealers are the backbone of the raid, responsible for whittling down Volcoross's health. With 14 DPS members, the raid can dish out consistent and high damage, ensuring that the boss is defeated within the time constraints.
Hero/Lust Usage: On Pull
Initiating the battle with Heroism or Bloodlust is a strategic move. Using these powerful buffs right at the start capitalizes on the raid's initial momentum, allowing players to deal significant damage before Volcoross unleashes its more challenging mechanics. This early advantage can be the difference between a successful raid and a wipe, especially when every second counts.
By understanding and implementing this strategy, players can approach the Volcoross battle with confidence, ensuring a higher chance of victory.
Volcoross Mechanics Overview
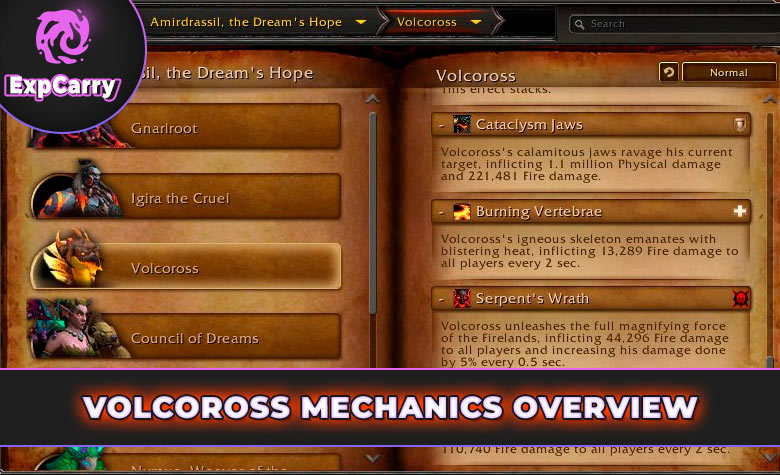
When facing Volcoross, understanding the mechanics is paramount. Each mechanic presents its own unique challenge, and a successful raid hinges on the team's ability to navigate these complexities. A mere overview might give you a glimpse of what to expect, but let's delve deeper into the intricacies of each mechanic. By grasping the nuances and intricacies, raid members can anticipate Volcoross's moves, strategize effectively, and respond with precision.
- Serpent's Fury: This unavoidable beam targets every player, dealing consistent damage over a short duration. The key is to ensure healers are prepared to counteract this damage, and players are aware of the impending damage to use personal defensives if necessary.
- Coiling Flames: A mechanic that demands spatial awareness. Players affected must ensure they don't harm their teammates with the damaging circle, and the raid should be ready to adjust their positioning to accommodate these circles.
- Flood of the Firelands: A test of the raid's coordination. Proper soaking is essential to prevent catastrophic raid-wide damage. Communication and pre-assigned soaking groups can make this mechanic manageable.
- Hellboil: A clear indication to stay mobile and avoid hazardous ground. Players must be vigilant and move out of the damaging magma quickly to avoid unnecessary damage.
- Volcanic Disgorge: Quick reflexes are the key. Players must be ready to dodge these high-damage swirls, ensuring they don't get caught off-guard.
- Scorchtail Crash: Awareness of one's surroundings is crucial. The shadow serves as a warning, and players must quickly move out of the indicated area to avoid lethal damage.
- Molten Venom & Cataclysm Jaws: These tank-specific mechanics require seamless coordination between the tanks. Proper swapping and communication can mitigate the increased damage and ensure the tanks remain alive.
- Serpent's Wrath (Enrage) & Combusting Rage (Soft Enrage): These mechanics serve as a timer, pushing the raid to defeat Volcoross quickly. The raid must be aware of the impending danger and increase their damage output to defeat the boss before these mechanics overwhelm them.
By mastering the mechanics, players equip themselves with the knowledge and tactics needed to face Volcoross head-on. It's not just about reacting to the boss's moves, but proactively positioning and strategizing to mitigate risks and maximize the raid's offensive capabilities.
Volcoross Killing Tactics

During PTR testing, Volcoross appeared to be significantly undertuned, giving an impression of being incomplete. The primary tactical challenge revolves around a singular mechanic, aside from the usual dodge and spread tactics. It's anticipated that refinements will be made to the boss's mechanics in upcoming updates.
The crux of the strategy lies in one pivotal move: dividing the raid into two evenly-sized groups. This division is essential for effectively handling the "Flood of the Firelands" mechanic, especially as the fight progresses and soaking requirements change locations.
Flood of the Firelands - Phase Breakdown:
- Initial Phase: When Volcoross reaches 100 energy, it dives, presenting two soak circles near the raid's position. Both Group 1 and Group 2 should promptly soak their respective circles, employing defensive abilities as needed. Following this, each group should relocate to their designated areas to avoid the magma-covered zones.
- Secondary Phase: As Volcoross hits 100 energy again, the soaking zones are now distanced from each other due to magma from the previous phase. Teams must be agile and move quickly to their new soak positions.
- Tertiary Phase: Though not observed during PTR testing, this phase is speculated to act as an enrage-triggering soak. Post this soak, the arena will be engulfed in magma, activating the Serpent's Wrath mechanic. At this juncture, the raid faces a dire situation: swiftly defeat Volcoross or face imminent defeat.
Additional Mechanics:
While the "Flood of the Firelands" is the central mechanic, players must also be wary of other abilities. Dodging is crucial, especially to avoid the lethal shadows from the "Scorchtail Crash." Healers, in particular, should be alert for the "Serpent's Fury" cast, as it inflicts substantial raid-wide damage and introduces additional challenges.
Though Volcoross might seem straightforward due to its limited mechanics, potential adjustments could intensify the challenge. If the boss's abilities are cast more frequently, combined with a reduced health pool and increased raid damage, this encounter could quickly become a stringent test of a team's DPS and healing capabilities. Proper preparation and adaptability will be key to success.
Review Conclusion
The guide offers a comprehensive breakdown of Volcoross's mechanics and strategies. It's well-structured, providing clear insights into each mechanic and the overall strategy. Players will benefit from this guide, especially if they're attempting Volcoross for the first time. However, it's essential to stay updated, as changes to the boss's tuning could alter the fight's dynamics.


