Shaman fills three distinct raid jobs in TBC Anniversary: Enhancement supports a physical party while fighting in melee, Elemental amplifies a caster party from range, and Restoration delivers exceptional group healing. Every specialization brings totems and Bloodlust or Heroism, but each uses those tools for a different roster slot. Phase 3 opens Hyjal Summit and Black Temple, introduces the first five Tier 6 armor slots, and adds a large group of haste-focused upgrades. Blizzard confirms the raid release in its official Phase 3 announcement. This class hub covers the builds, abilities, rotations, stat thresholds, weapon choices, set bonuses, and current Phase 3 gear targets for all three Shaman PvE specializations.
Shaman PvE Specializations at a Glance
A raid does not choose a Shaman only for personal damage or healing. Totems affect the Shaman's five-player party rather than the entire raid, so the assigned group determines much of the specialization's value. Enhancement belongs beside melee and Hunters, Elemental belongs with spellcasters, and Restoration can support either party while covering raid damage. Bloodlust for Horde and Heroism for Alliance are also party effects in TBC, which makes group construction part of Shaman gameplay.
| Specialization | Primary PvE Role | Major Contribution | Main Limitation |
|---|---|---|---|
| Enhancement | Melee support DPS | Unleashed Rage, improved physical totems, Windfury Totem, and strong party burst | Totem twisting, weapon timing, and melee mechanics create a demanding priority system |
| Elemental | Ranged caster support DPS | Totem of Wrath, Wrath of Air Totem, reliable ranged damage, and efficient off-healing | Movement interrupts most damage, while aggressive Chain Lightning use can strain mana |
| Restoration | Raid and group healing | Chain Heal, Earth Shield, Mana Tide Totem, flexible party totems, and Bloodlust or Heroism | Most healing is hard-cast, and haste-heavy play can consume mana very quickly |
Enhancement and Elemental should be evaluated by total party output, not an isolated damage meter. Restoration has similarly high roster value because it combines efficient multi-target healing with party utility that no other healer can duplicate. The current ExpCarry Phase 3 DPS ranking and Phase 3 healer ranking provide broader class context, while the Black Temple raid composition guide shows why party placement matters. Players mapping a complete gearing route can also use the WoW TBC progression hub alongside the specialization plans below.
Enhancement Shaman Phase 3 PvE Guide
Enhancement is a melee support specialization whose party buffs are often worth more than the gap between its personal damage and a pure DPS class. It strengthens Strength of Earth Totem and Windfury Totem, maintains Unleashed Rage through melee critical strikes, and can rotate Windfury Totem with Grace of Air Totem so the group benefits from both. Its weaknesses are equally clear: it must remain behind the target, manage two slow weapons, protect totem uptime, and fit shocks and Stormstrike into a global-cooldown-heavy support cycle.
Enhancement Talents, Builds, and Raid Role
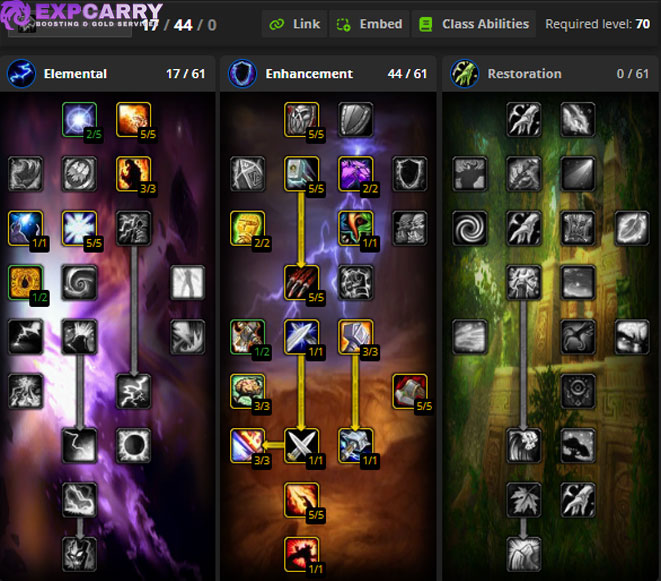
Every raid build reaches deep Enhancement for Dual Wield, Dual Wield Specialization, Stormstrike, Unleashed Rage, and Shamanistic Rage. Thundering Strikes and Flurry establish the critical-strike engine, while Enhancing Totems, Improved Weapon Totems, Spirit Weapons, Elemental Weapons, Mental Quickness, and Weapon Mastery provide the damage and support core. Shamanistic Focus sharply reduces the mana cost of the next shock after a melee critical strike. These talents leave enough points for either a Restoration or Elemental subspec rather than creating one mandatory 61-point template.
The Restoration-leaning 0/45/16 framework is the dependable raid default. Totemic Focus reduces the cost of repeated totem casts, Totemic Mastery increases friendly totem range to 30 yards, and Nature's Guidance adds 3 percent hit to both melee attacks and spells. This version is especially valuable on long encounters and in any physical party where the Shaman is expected to twist continuously. Flexible points can support Improved Reincarnation, Improved Ghost Wolf, or Improved Lightning Shield without changing the build's central purpose.
The 16/45/0 Elemental alternative trades that efficiency, range, and 3 percent hit for stronger shocks, improved fire totems, and a shorter shock cooldown through Reverberation. It can raise personal damage and makes the priority cycle line up more comfortably, particularly on short fights or encounters with useful area damage. It also needs an additional 3 percent melee hit from gear to cap special attacks. Both routes are viable; select them according to fight length, party assignment, and how much totem twisting the raid expects. The current Enhancement talent guide illustrates both point frameworks.
Enhancement normally joins a physical group with Warriors, Rogues, Hunters, or a Feral Druid. Unleashed Rage grants nearby party members 10 percent of their melee attack power after the Shaman lands a melee critical strike. Strength of Earth Totem and Grace of Air Totem improve primary physical stats, while Windfury Totem gives melee weapons extra-attack potential. The best raid contribution comes from maintaining these effects without allowing support globals to erase too much personal damage.
Enhancement Rotation, Totem Twisting, and Abilities
Before the pull, apply Windfury Weapon to both weapons, activate Water Shield, and place the assigned earth, water, and fire totems. Strength of Earth Totem is the standard earth choice for a physical party, Mana Spring Totem is a common water default, and Searing Totem provides efficient single-target fire damage. Tremor Totem, Poison Cleansing Totem, Disease Cleansing Totem, Grounding Totem, and resistance totems replace the damage setup when an encounter mechanic demands them. Utility has priority over a small personal gain.
Totem twisting works because the party's Windfury Totem weapon buff remains for roughly 10 seconds after the air totem is removed. Cast Windfury Totem to apply that buff, then replace it with Grace of Air Totem. Recast Windfury before its temporary weapon buff expires and return to Grace of Air immediately afterward. Windfury uptime is the first priority; losing a short portion of Grace of Air is better than allowing the party's Windfury effect to fall. Track the weapon buff itself rather than relying only on the totem model or a fixed mental count.
For single-target damage, use Stormstrike on cooldown, maintain Flame Shock, and cast Earth Shock when Flame Shock has enough duration remaining. Shamanistic Focus makes shocks substantially cheaper after melee critical strikes. Keep Searing Totem active when no encounter-specific fire totem is required, and use Fire Nova Totem when the target will remain in range until it detonates. Shamanistic Rage is both a mana recovery tool and a 30 percent damage-reduction cooldown; activate it while attacking so its 15-second window can generate mana, but reserve it for a dangerous mechanic when survival is more important than perfect resource timing.
On multiple targets, Fire Nova Totem and Magma Totem gain priority, followed by Stormstrike and shocks on a target that will live long enough to justify them. Fire Elemental Totem can add major burst, but it replaces the active fire totem and should be timed for a stable target window. Movement, target swaps, and required utility will regularly interrupt a theoretical sequence, so Enhancement is best treated as a priority system rather than a repeating rotation. The Enhancement rotation reference expands on cooldown and totem decisions.
Weapon setup is part of the rotation. Use two slow one-handed weapons, ideally with equal speeds in the 2.6 to 2.8 range, and keep their swings synchronized whenever possible. Slow weapons improve Stormstrike and Windfury Weapon results, while matched timing helps Flurry charges cover more attacks. Windfury Weapon has an internal proc cooldown, so a random fast off-hand is not automatically an upgrade just because it has slightly more listed damage per second. Evaluate speed, racial weapon skill, and both weapon slots as one package.
Enhancement Stat Priority and PvE Caps
Enhancement uses melee and spell combat tables at the same time. Auto-attacks, Stormstrike, and Windfury Weapon care about melee hit and expertise, while shocks use spell hit. This is why a single hit percentage cannot describe the complete specialization. Expertise and the special-attack hit threshold stabilize the most important melee actions first; additional hit continues to improve dual-wield auto-attacks after specials stop missing.
- Expertise is the first cap to track. A level 73 raid boss has a 6.5 percent dodge chance from behind, removed by 26 expertise, which requires about 103 expertise rating before racial weapon skill is considered.
- Against a level 73 boss, the melee special-attack threshold is 9 percent hit. Dual Wield Specialization supplies 6 percent, and Nature's Guidance supplies the remaining 3 percent in the Restoration subspec.
- The Elemental subspec has only the 6 percent from Dual Wield Specialization, so it needs 3 percent melee hit from gear to cap Stormstrike and other special attacks.
- Dual-wield white attacks have a much higher 28 percent hit threshold. Hit remains useful after the special cap, but reaching that full value should not require replacing superior Strength, haste, expertise, or weapon upgrades.
- Shocks follow the spell table and need 16 percent effective spell hit to remove resistible misses against a boss. Enhancement should not sacrifice strong melee gear to reach that separate cap.
- Strength is the main uncapped attribute because each point gives 2 attack power. Attack power also improves spell damage and healing through Mental Quickness.
- Haste, critical strike rating, Agility, raw attack power, and armor penetration all add damage after essential caps. Their exact order changes with gear, buffs, race, and encounter uptime.
- There is no Enhancement defensive cap. Stamina and resistance are encounter requirements rather than general damage priorities.
Attack from behind whenever mechanics permit; doing so removes boss parries from the equation and leaves only dodge for expertise to solve. Orc Axe Specialization reduces the expertise requirement while axes are equipped, so Orc players should not copy a non-Orc rating target without adjusting for weapon type. Once specials are capped, use a simulator or equivalency-point sheet for close upgrades because haste, hit above the soft cap, critical strike, Strength, and weapon damage interact with Flurry and Windfury. The Enhancement stat guide provides the current level 70 conversions.
Enhancement Phase 3 Equipment, Weapons, Tier Bonuses, and BiS
Enhancement Phase 3 gearing is unusual because the first Tier 6 pieces do not automatically form the best damage set. Equipping two pieces of Skyshatter Harness lowers shock mana costs by 10 percent. At four pieces, Stormstrike grants 70 attack power for 12 seconds. Both effects are usable, but neither is strong enough to justify weak slots on its own. The four-piece bonus from Cataclysm Harness adds 5 percent haste to Flurry and can remain competitive until several Phase 3 off-set pieces are ready together. Do not break the older four-piece bonus for one isolated sidegrade.
| Slot | Enhancement Phase 3 Target | Source | Gear Planning Note |
|---|---|---|---|
| Head | Cursed Vision of Sargeras | Illidan Stormrage, Black Temple | Exceptional physical stats make this the premier off-set head |
| Shoulders | Shoulders of Lightning Reflexes | Leatherworking | Crafted haste option that supports the off-set configuration |
| Back | Shadowmoon Destroyer's Drape | Teron Gorefiend, Black Temple | Strong hit, critical strike rating, and attack power |
| Chest | Midnight Chestguard | Archimonde, Hyjal Summit | High-quality physical damage chest when leaving Tier 5 |
| Wrists | Bindings of Lightning Reflexes | Leatherworking | Crafted haste and attack-power target |
| Hands | Fists of Mukoa | High Warlord Naj'entus, Black Temple | Expertise makes this slot especially valuable before the cap |
| Waist | Belt of One-Hundred Deaths | Lady Vashj, Serpentshrine Cavern | A retained earlier-raid item with outstanding expertise and physical stats |
| Legs | Bow-stitched Leggings | Azgalor, Hyjal Summit | Haste-heavy leather legs for the full off-set build |
| Feet | Softstep Boots of Tracking | Teron Gorefiend, Black Temple | Expertise and attack power help complete melee caps efficiently |
| Neck | Choker of Endless Nightmares | Supremus, Black Temple | Compact hit, critical strike, and attack-power package |
| Rings | Stormrage Signet Ring paired with the Band of the Eternal Champion | Illidan Stormrage and Scale of the Sands reputation | Powerful raid drop paired with the physical DPS reputation ring |
| Trinkets | Dragonspine Trophy and Madness of the Betrayer | Gruul and Illidari Council | Haste remains exceptional; use Madness expertise without overcapping |
| Weapons, non-Orc | Two Syphons of the Nathrezim | Supremus, Black Temple | Matched 2.8-speed weapons produce a clean synchronized setup |
| Weapons, Orc | Two Vengeful Gladiator's Cleavers | Arena Season 3 | Axe Specialization makes the matched axe pair especially efficient |
| Relic | Totem of the Astral Winds | Pandemonius, Heroic Mana-Tombs | Directly improves Windfury Weapon attack power |
This table is a destination set, not a rigid loot order. Expertise pieces lose part of their value after 26 expertise, and weapon racial bonuses can change the best combination. Older items remain listed because a Phase 3 BiS set is defined by what performs best during Phase 3, not only by where each item drops. Compare the complete package with the current Enhancement Phase 3 BiS guide and the ExpCarry Phase 3 class BiS index. When loot is contested, prioritize both weapons, expertise correction, and upgrades that let the full Tier 5 transition happen without losing set value.
Elemental Shaman Phase 3 PvE Guide
Elemental is a ranged support DPS built around fast Lightning Bolt casts, scheduled Chain Lightning use, and a caster totem package. Totem of Wrath supplies 3 percent spell hit and 3 percent spell critical chance to the party, while Wrath of Air Totem adds spell damage and healing in TBC. The specialization reaches its hit threshold with very little gear and can direct the remaining item budget into haste and spell damage. Its major constraints are movement, threat during large critical chains, and mana consumption when Chain Lightning is used too aggressively.
Elemental Talents, Builds, and Raid Role
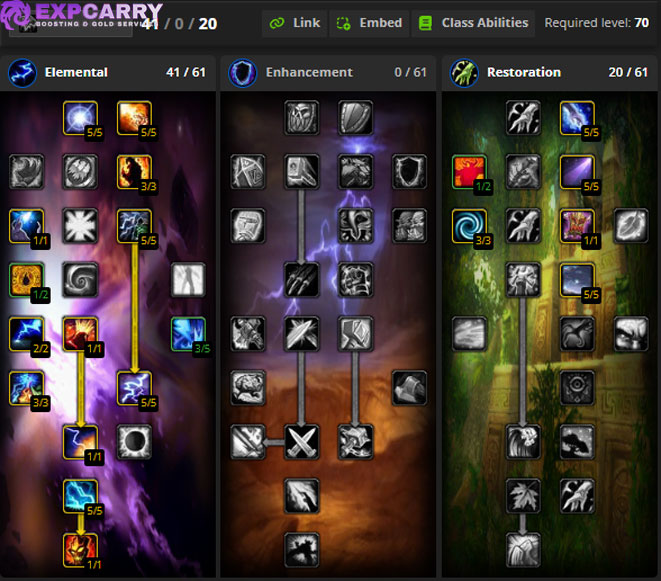
For raids, start from a 41/0/20 framework. The Elemental tree supplies Concussion, Convection, Call of Thunder, Elemental Focus, Elemental Fury, Lightning Mastery, Elemental Mastery, Lightning Overload, Elemental Precision, Unrelenting Storm, and Totem of Wrath. The Restoration points reach Totemic Mastery, Nature's Guidance, and Tidal Mastery. Together, those talents deliver hit, critical strike chance, mana support, 30-yard friendly totem range, and the full lightning toolkit.
A few points remain assignment-dependent even though the 41/0/20 backbone is strict. Storm Reach improves positioning, Unrelenting Storm converts Intellect into mana regeneration, and Elemental Warding reduces incoming Fire, Frost, and Nature damage. Call of Flame and Improved Fire Totems are more offensive choices for useful area damage. Tidal Focus can be exchanged for faster Healing Wave casts if the raid expects frequent emergency off-healing. Do not remove Totem of Wrath, Lightning Overload, Tidal Mastery, or the hit talents that define the build.
Elemental normally sits with Warlocks, Mages, or another caster that benefits from spell hit and critical chance. Maintain Totem of Wrath, Mana Spring Totem, Wrath of Air Totem, and the assigned earth totem unless a mechanic demands Tremor Totem, Grounding Totem, a cleansing totem, or resistance support. Totem of Wrath occupies the fire slot, so Fire Elemental Totem and damaging fire totems remove its party bonus while active. Make that trade only when the raid's damage plan benefits more from the temporary summon or area damage than from continuous caster support. The Elemental talent guide shows the recommended framework and defensive swaps.
Elemental Rotation, Mana Control, and Abilities
Activate Water Shield and establish the four assigned totems before settling into the casting position. Open with Chain Lightning when threat is secure, then cast Lightning Bolt until Chain Lightning is ready. With normal cast speed, the basic cycle is Chain Lightning followed by roughly three Lightning Bolts. High haste and Bloodlust or Heroism can change the number of fillers, so react to the actual cooldown instead of forcing a memorized count. Do not open with Elemental Mastery before the tank has established threat.
Elemental Mastery makes the next offensive spell free and guarantees a critical strike. Chain Lightning is normally the highest-value target because it costs more mana and can strike several enemies. Elemental Focus activates Clearcasting after a spell critical strike, reducing the mana cost of the next two damage spells; use expensive Chain Lightning casts during those charges when the encounter permits. Lightning Overload can create additional Lightning Bolt or Chain Lightning casts without extra mana, which is a major reason spell damage and haste scale well.
Mana determines whether Chain Lightning belongs in every cooldown window. On short fights, use it whenever it can hit a valuable target without causing threat trouble. On long progression encounters, a Lightning Bolt-only sequence may produce more total damage by avoiding an early empty mana bar. A middle approach uses Chain Lightning during Clearcasting, Elemental Mastery, multi-target windows, and planned burst. Mana Spring Totem, Water Shield, Shadow Priest support, and consumable planning all change how aggressive the cycle can be.
Flame Shock is primarily a movement cast or a choice for a target that will live through its duration. Earth Shock can finish an enemy when a Lightning Bolt would land too late, but moving into shock range should not create a positioning failure. For area damage, use Chain Lightning, Fire Nova Totem or Magma Totem when sacrificing Totem of Wrath is approved, and Lightning Bolt as filler. Re-place totems only when the party moves outside their radius; unnecessary recasts cost mana and global cooldowns. The Elemental rotation guide gives more detail on cooldown and mana patterns.
Elemental Stat Priority and PvE Caps
Spell hit is mandatory until the boss threshold and sharply weaker afterward. A level 73 raid boss leaves a 16 percent resistible spell-miss requirement. Elemental reaches most of it through talents and its own fire totem, allowing Phase 3 gear to focus on haste and spell damage far sooner than most casters.
- Elemental Precision supplies 6 percent spell hit, Nature's Guidance adds 3 percent, and Totem of Wrath contributes 3 percent to the party. The remaining 4 percent requires about 51 spell hit rating.
- A Draenei caster party gains another 1 percent hit from Inspiring Presence, reducing the usual gear requirement to 3 percent, or about 38 spell hit rating.
- Spell hit beyond the effective 16 percent boss threshold provides no damage and should be replaced where practical.
- Spell haste is the leading uncapped throughput stat once hit is solved. At level 70, about 15.77 haste rating provides 1 percent spell haste.
- Spell damage strengthens Lightning Bolt, Chain Lightning, shocks, fire totems, and Lightning Overload copies.
- Spell critical strike rating supports both damage and Elemental Focus. About 22.08 spell critical strike rating gives 1 percent critical chance at level 70.
- Intellect gives 15 mana per point, contributes spell critical chance, and creates additional mana regeneration through Unrelenting Storm.
- Mana per 5 seconds helps long fights, while Spirit has little raid value because Elemental normally casts continuously.
- Spell penetration is generally a PvP stat, and Elemental has no expertise or general defensive cap.
Haste shortens Lightning Bolt and Chain Lightning but also increases mana spent per minute. It can reduce the global cooldown toward its 1-second floor, although that is not a realistic permanent Phase 3 cap outside temporary effects. Keep a sustainable set for long progression fights and a more aggressive haste set for short kills. The Elemental stat reference covers the rating conversions and scaling rules.
Elemental Phase 3 Equipment, Weapons, Tier Bonuses, and BiS
The Skyshatter Regalia is a central Phase 3 objective. With one active totem from each element, two pieces provide three effects at once: 15 mana per 5 seconds, as much as 45 spell damage, and 35 spell critical strike rating. The four-piece bonus increases Lightning Bolt damage by 5 percent. Because the standard raid setup already maintains all four elements, the condition is natural to satisfy. Build four pieces early, commonly head, shoulders, chest, and hands, then use a stronger off-set leg slot.
| Slot | Elemental Phase 3 Target | Source | Gear Planning Note |
|---|---|---|---|
| Head | Skyshatter Headguard | Archimonde, Hyjal Summit | Tier 6 piece used toward the four-piece Lightning Bolt bonus |
| Shoulders | Skyshatter Mantle | Mother Shahraz, Black Temple | Efficient tier slot with haste and spell damage |
| Back | Cloak of the Illidari Council | Illidari Council, Black Temple | High spell damage and haste without unnecessary hit |
| Chest | Skyshatter Breastplate | Illidan Stormrage, Black Temple | Tier 6 chest and a stable four-piece component |
| Wrists | Bracers of Nimble Thought | Crafted through Tailoring | Excellent caster throughput from a haste-focused crafted slot |
| Hands | Skyshatter Gauntlets | Hyjal Summit: Azgalor | Used to finish the recommended four-piece arrangement |
| Waist | Flashfire Girdle | Shade of Akama, Black Temple | Haste and spell damage align with the post-hit priority |
| Legs | Leggings of Channeled Elements | Hyjal Summit: Kaz'rogal | Strong off-set legs once four Tier 6 pieces are secured elsewhere |
| Feet | Slippers of the Seacaller | High Warlord Naj'entus, Black Temple | Haste-focused cloth is valid because damage stats matter more than armor |
| Neck | The Sun King's Talisman | Kael'thas Sunstrider, Tempest Keep | Retained for strong spell damage and critical strike rating |
| Rings | Two Rings of Ancient Knowledge | Trash enemies inside Black Temple | The ring is not unique, allowing a high-haste pair |
| Trinkets | The Skull of Gul'dan and The Lightning Capacitor | Illidan Stormrage and Terestian Illhoof | Use Skull for its haste effect even when part of its hit is wasted |
| Two-handed weapon | Zhar'doom, Greatstaff of the Devourer | Final Black Temple boss: Illidan Stormrage | Maximum offensive staff option, but heavily contested |
| One-hand and shield | The Maelstrom's Fury and Antonidas's Aegis of Rapt Concentration | High Warlord Naj'entus and Archimonde | Practical alternative with strong stats and additional armor |
| Relic | Totem of Ancestral Guidance | Teron Gorefiend, Black Temple | Raises both Lightning Bolt and Chain Lightning damage |
Stop valuing hit once the 16 percent effective threshold is reached. Several visually attractive caster pieces carry rating that this specialization cannot use, so the best set often includes cloth and retains earlier raid items. A staff gives maximum offense, while a one-hand and shield combination can be close in throughput and substantially safer against physical damage. Confirm the current configuration with the Elemental Phase 3 BiS guide. When socketing these upgrades, the ExpCarry Phase 3 epic gem guide helps separate immediate upgrades from scarce-gem priorities.
Explore services related to this guide, selected from our WoW TBC Anniversary catalog.
View All WoW TBC Anniversary Services


Restoration Shaman Phase 3 PvE Guide
Restoration is the defining group healer of TBC raids. Chain Heal converts clustered raid damage into efficient throughput, Earth Shield protects an assigned target, and Mana Tide Totem restores mana to the Shaman's party. Totems and Bloodlust or Heroism remain fully available while healing. Restoration is less comfortable during sustained movement and cannot cover every mistake with instant spells, so strong play depends on pre-positioning, beginning casts before damage lands, and choosing ranks that match the incoming pattern.
Restoration Talents, Builds, and Raid Role
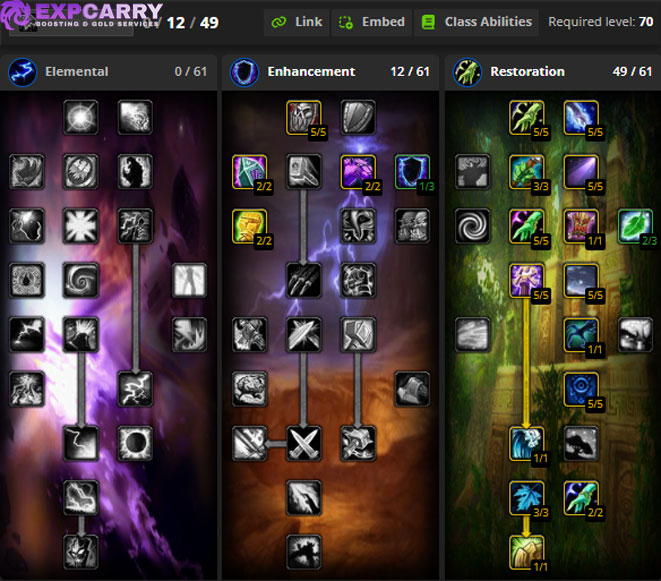
The default defensive raid framework is 8/0/53. Deep Restoration includes Tidal Focus, Improved Healing Wave, Healing Focus, Totemic Focus, Restorative Totems, Tidal Mastery, Healing Way, Nature's Swiftness, Purification, Mana Tide Totem, Nature's Blessing, Improved Chain Heal, and Earth Shield. The Elemental points reach Elemental Warding for protection against common magical raid damage. Healing Grace, Improved Reincarnation, and minor utility points can shift according to threat and progression needs.
A 0/12/49 Enhancing Totems build is useful when the raid lacks an Enhancement Shaman and assigns the healer to a physical party. It strengthens Strength of Earth Totem and Grace of Air Totem but gives up some defensive and healing flexibility, including points commonly used for Healing Way or Improved Reincarnation. It is a roster solution rather than a general throughput upgrade. If an Enhancement Shaman already supports that party, the 8/0/53 build is usually the more complete healing choice.
Restoration can heal tanks, but its signature assignment is repeated damage across nearby players. Earth Shield belongs on the active tank or another player receiving consistent hits. Chain Heal becomes more efficient when its jumps find injured targets, while Healing Wave covers predictable single-target damage. Mana Tide Totem and Bloodlust or Heroism affect only the current party, so the healing lead should decide the Shaman's group and cooldown timings before the pull. The Restoration talent guide displays both raid frameworks.
Restoration Healing Priority, Totems, and Cooldowns
There is no fixed healing rotation. Maintain Water Shield on yourself and Earth Shield on the assigned target, then begin the heal that will resolve the next expected damage event. Chain Heal is the default when its initial target and subsequent jumps can all produce useful healing. Maximum rank answers heavy raid damage, while lower ranks conserve mana during sustained but manageable pressure. Avoid casting it into an isolated player when a direct heal would be faster or more efficient.
Healing Wave is the efficient single-target tool. Lower ranks can build or maintain Healing Way and support steady tank healing, while maximum rank answers a larger deficit. Cancel a long cast if the target becomes safe, but do not delay until Lesser Healing Wave is the only spell fast enough. Lesser Healing Wave is the emergency option for a target that cannot survive a longer cast; repeated use trades mana efficiency for speed. Nature's Swiftness combined with a high-rank Healing Wave is the primary instant rescue button.
Mana Tide Totem pulses every 3 seconds for 12 seconds and restores 6 percent of total mana per pulse, for up to 24 percent if all four pulses complete. Drop it early enough that the party receives the entire channel and can benefit from the restored mana before the encounter ends. The totem can be destroyed, moved out of range, or replaced by another water totem, so position and protect its window. Bloodlust or Heroism should follow the raid plan rather than the healer's personal preference; pre-cast or stabilize the raid before the accelerated phase begins.
Totem selection depends on group assignment. A caster or healer party usually wants Mana Spring Totem in the water slot and Wrath of Air Totem in the air slot, while a physical party values Windfury Totem or Grace of Air Totem and Strength of Earth Totem. Tremor Totem, Grounding Totem, Poison Cleansing Totem, Disease Cleansing Totem, and resistance totems take priority when they answer a dangerous mechanic. Re-place totems after meaningful movement, not after every small adjustment. The Restoration healing reference expands on rank selection and cooldown use.
Restoration Stat Priority and PvE Caps
Restoration has no hit, expertise, or defense requirement for healing. Gearing instead balances useful healing per cast against mana available for the full encounter. Phase 3 offers large amounts of spell haste, but haste only helps when the faster heal is needed and the Shaman can pay for the increased cast rate. Carrying both a regeneration set and a throughput set is more practical than forcing one universal weight onto every boss.
- Raw bonus healing supplies dependable throughput to Chain Heal, Healing Wave, Lesser Healing Wave, Earth Shield, and the rest of the healing kit.
- Mana per 5 seconds works continuously while casting and is the most dependable regeneration stat for long assignments.
- Each point of Intellect provides 15 mana and a minor contribution to spell critical chance. Nature's Blessing also converts 30 percent of total Intellect into spell damage and healing.
- Spell haste shortens all hard-cast heals. About 15.77 haste rating gives 1 percent spell haste at level 70, but faster casting also raises potential mana consumption.
- Spell critical strike rating raises direct-heal output and can activate Ancestral Healing, although it is less predictable than bonus healing.
- Spirit is weak for Restoration because the specialization lacks strong in-combat Spirit regeneration and spends most encounters inside the five-second rule.
- Healing spells cannot miss, so spell hit and expertise have no Restoration PvE cap.
- Restoration has no fixed defensive threshold. Equip additional Stamina or encounter resistance only when the damage pattern requires it.
A safe progression order is enough Stamina to survive, enough mana and mana per 5 seconds to complete the assignment, then bonus healing and sustainable haste. Haste has no realistic permanent Phase 3 cap, although the global cooldown cannot fall below 1 second. More throughput is not useful when it creates overhealing or an empty mana bar before the final damage phase. The Restoration stat guide explains the healing conversions and tradeoffs.
Restoration Phase 3 Equipment, Weapons, Tier Bonuses, and BiS
The Skyshatter Raiment is a high-priority Restoration objective. With two pieces equipped, Chain Heal costs 10 percent less mana; with four, the spell heals for 5 percent more. Both bonuses improve the specialization's most important raid spell, making four pieces valuable for almost every assignment. Head, shoulders, chest, and legs form a strong set layout while an exceptional haste item occupies the hands slot. The ExpCarry Tier 6 token guide maps each armor token to its boss and eligible classes.
| Slot | Restoration Phase 3 Target | Source | Gear Planning Note |
|---|---|---|---|
| Head | Skyshatter Helmet | Archimonde, Hyjal Summit | Tier 6 head with healing and mana per 5 seconds |
| Shoulders | Skyshatter Shoulderpads | Mother Shahraz, Black Temple | Efficient slot toward the four-piece Chain Heal bonuses |
| Back | Shroud of the Highborne | Final Black Temple boss: Illidan Stormrage | Combines high healing with haste for heavy raid damage |
| Chest | Skyshatter Chestguard | Illidan Stormrage, Black Temple | Tier 6 anchor with strong regeneration |
| Wrists | Living Earth Bindings | Leatherworking | Crafted mail bracers with a large amount of spell haste |
| Hands | Botanist's Gloves of Growth | Teron Gorefiend, Black Temple | Exceptional haste and sockets justify wearing leather |
| Waist | Naturalist's Preserving Cinch | Supremus, Black Temple | Healing and haste support the Phase 3 throughput set |
| Legs | Skyshatter Leggings | Illidari Council, Black Temple | Completes the preferred four-piece Tier 6 arrangement |
| Feet | Boots of the Divine Light | Trash enemies in both Phase 3 raids | Strong healing, sockets, and survivability despite cloth armor |
| Neck | Nadina's Pendant of Purity | Black Temple: Mother Shahraz | Balanced healing, critical strike rating, and mana regeneration |
| Rings | Two Blessed Bands of Karabor | Trash enemies inside Black Temple | Not unique, allowing a powerful haste and regeneration pair |
| Trinkets | Memento of Tyrande for sustain plus Essence of the Martyr for controlled burst | Illidan Stormrage and a Shattrath badge vendor | Pairs sustained healing and mana value with an on-use throughput tool |
| Main hand | Crystal Spire of Karabor | Final Black Temple boss: Illidan Stormrage | Large healing value plus extra output on low-health targets |
| Shield | Bastion of Light | Anetheron, Hyjal Summit | Healing stats and shield armor make it a practical off-hand |
| Relic | Totem of Healing Rains | Maiden of Virtue, Karazhan | Remains the direct Chain Heal throughput relic |
The four-piece Tier 6 bonus is the first gearing objective, but the correct off-set items depend on mana comfort. A full haste configuration is excellent during dense raid damage and weaker when it forces expensive casts into overhealing. Keep regeneration alternatives for long progression encounters, and do not reject leather or cloth simply because Shaman can wear mail. For weapons, a healing main hand with a shield is normally preferred because it preserves strong healing stats while adding substantial armor. Review the finished setup against the Restoration Phase 3 BiS guide. The encounter mix described in the ExpCarry Hyjal raid composition guide also explains why Chain Heal coverage and party utility stay valuable throughout Phase 3.
Final Verdict
Shaman is one of the most roster-defining classes in TBC Anniversary because all three PvE specializations combine a complete role with party-exclusive support. Enhancement is the choice for players who want melee combat, weapon optimization, and active totem twisting. Elemental offers a more direct ranged damage loop while solving much of a caster party's hit and critical-strike support. Restoration provides the strongest repeated group healing profile and retains the full totem, mana, and haste toolkit. The best specialization is therefore the one that matches the raid's party structure and the player's preferred responsibility, not simply the option with the highest isolated meter result. In Phase 3, successful Shaman play comes from treating talents, totems, cooldowns, caps, and gear as parts of the same assignment.