
This World of Warcraft Midnight The Blinding Vale guide is built around the current Mythic+ Enemy Forces total of 686, not the older 655-point routing data that still appears in some shared maps. Blizzard raised the requirement and changed the final area, while Mythic Dungeon Tools later corrected several pull groupings on September 4. The safest baseline for most groups is a left-first Blinding Vale Mythic+ route: clear toward Lightblossom Trinity, cross to Ikuzz the Light Hunter, fly down after both opening bosses to Lightwarden Ruia, then finish the last trash section and Potatoad Matriarch before Ziekket. The route below focuses on verified force values, stable pulls, priority interrupts, and a defensive plan rather than pretending an outdated imported route still lands on the correct percentage.
The Blinding Vale is part of the current Midnight Season 2 Mythic+ rotation. It has two opening wings that can be completed in either order, followed by Ruia and Ziekket. Left-first is recommended here because it gives a predictable opening, lets eligible groups use the Light-Starved Blossom, and keeps the route easy to communicate in a PUG. A coordinated team can reverse the first two bosses without changing the underlying Enemy Forces math.
The Blinding Vale Mythic+ Route After the September 4 MDT Fix
The important routing change is not a new secret skip. It is the mapping itself. Mythic Dungeon Tools 6.2.13 corrected Lightfeather Petalwing and Sporeblight Belcher pull groupings and removed an extra Radiant Spellsower from The Blinding Vale. The current release history can be checked on the official Mythic Dungeon Tools releases page. Any route created before those corrections should be reopened in a current MDT version before it is trusted for exact pack composition.
- Start left toward Lightblossom Trinity. Use controlled pulls while the group establishes its interrupt rotation. Paladins and Priests can activate the Light-Starved Blossom, and Herbalists can do so with at least 25 skill in Midnight Herbalism, granting Flourishing Stride. Do not turn the opening into a chain pull if Radiant Spellsowers, Grovekeepers, or Belchers will overlap without stops and healing cooldowns.
- Kill Lightblossom Trinity, then cross to the Ikuzz wing. The two opening bosses can be reversed, but this order is simpler for a default route. Keep a current force tracker visible instead of aiming for a legacy percentage copied from a pre-fix image.
- Kill Ikuzz and use the nearby bird to fly to Ruia's area. After both opening encounters are complete, the route moves into the Lightwarden section. This is where the run becomes more punishing for defensive planning because several dangerous enemies carry Lightwarden's Blight, dealing group damage and leaving hazardous ground when they die.
- Clear through Ruia with major trash cooldowns assigned in advance. Luminous Thornmaws, Overgrown Hydras, and other high-value enemies are efficient for count, but their mechanics make blind double pulls risky. Treat them as planned force blocks rather than free percentage.
- After Ruia, budget a full cooldown cycle for the Potatoad Matriarch section. The Matriarch is worth 60 of 686 Enemy Forces by itself, or 8.75 percent. Toxic Spew and Toadspawn eggs can punish a group that arrives with no healing cooldowns or poison removal, and the eggs now finish hatching even if the Matriarch dies.
- Enter Ziekket with the count finished or with an explicitly planned remaining pack. The baseline route does not require stealth skips, death skips, or an old MDT percentage checkpoint. If the tracker is short, use the verified values below to choose the smallest safe correction instead of pulling an arbitrary extra group.
Players learning the dungeon in a specific key can use a configured Mythic+ run for The Blinding Vale while following the same route logic in Self-Play. The useful lesson is the count structure: know which enemies are worth 1 percent, which lieutenants are worth more than 3 percent, and how much of the final total comes from the Matriarch.
Blinding Vale Enemy Forces: Current 686-Point Count
Blinding Vale Enemy Forces should now be calculated against 686. Blizzard officially increased the requirement from 655 to 686, adjusted the last area, removed a Radiant Spellsower before Ziekket, and increased Potatoad Matriarch from 30 to 60 forces. Those changes are recorded in Blizzard's current Midnight hotfix log. The percentages below are calculated directly from the current 686-point denominator and the current MDT enemy values.
| Enemy | Enemy Forces | Percent of 686 | Route value |
|---|---|---|---|
| Lightgorged Lasher | 7 | 1.02% | Common 1 percent correction; break Lightbloom Pollination quickly because the shield lets it heal nearby enemies |
| Lasher | 1 | 0.15% | Tiny count; useful only as part of a normal pack |
| Underbrush Stalker | 6 | 0.87% | Low count with a dangerous random-target bleed |
| Virid Grovekeeper | 20 | 2.92% | Efficient count, but tank and group damage make it a real cooldown pull |
| Sporeblight Belcher | 25 | 3.64% | High-value count with heavy group damage |
| Radiant Spellsower | 7 | 1.02% | Good count only if Light Bolt Volley is reliably interrupted |
| Lightfeather Petalwing | 7 | 1.02% | Current grouping matters after the September 4 MDT correction |
| Thorny Saptor | 5 | 0.73% | Small correction with a dangerous frontal channel |
| Spineshield Beetle | 1 | 0.15% | Very small count and poor as a deliberate detour |
| Leafy Grovecrawler | 7 | 1.02% | Flexible 1 percent unit if the surrounding pack is already on route |
| Overgrown Hydra | 25 | 3.64% | Excellent count density, but Lightmaw Beams punish overlapping players |
| Luminous Thornmaw | 22 | 3.21% | Strong count with tank bleed and frontal pressure |
| Potatoad Matriarch | 60 | 8.75% | Major late-route anchor and one of the biggest single force gains |
This table is more reliable than memorizing an old screenshot that says a certain doorway should be 54 or 73 percent. A fixed cumulative number only remains correct if every mapped group still contains the same enemies. The September 4 correction changed exactly that kind of grouping. Use the current pack layout in MDT, but use these force values as the arithmetic check. If the run is short by roughly 3.6 percent, for example, one current-mapped Hydra or Belcher is the right size of correction; if it is short by only about 1 percent, adding a 25-point lieutenant is obvious overcount.
Percentage-Aware Route Checkpoints Without Legacy Overcount
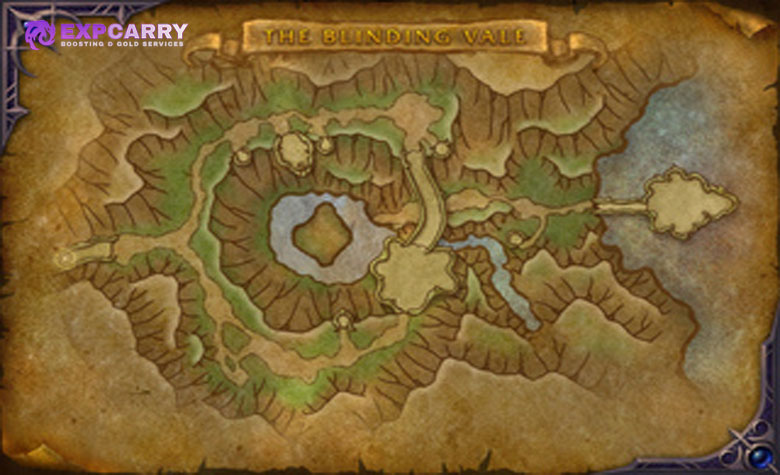
A current Blinding Vale Mythic+ route should use percentage checkpoints as decisions, not as decoration. The safest method is to verify the live counter at each transition and compare the remaining requirement with the enemies still on the planned path. This avoids the common failure where a group reaches Ziekket at 98 to 99 percent because it followed a route whose pull groups were changed after the route was published.
| Route stage | What to verify | Enemy Forces decision | Cooldown checkpoint |
|---|---|---|---|
| Left opening to Trinity | Current Petalwing, Spellsower, Belcher, and Lasher groupings | Take the natural left path; do not add a detour only to match a pre-September percentage | Keep one stop chain for Spellsower casts and one defensive answer for Stalker or Grovekeeper pressure |
| Cross to Ikuzz | Current tracker after the first boss wing | Use 7-point enemies as roughly 1.02% adjustments only when they are already efficient to reach | Do not spend every personal immediately before Ikuzz if the next trash pull is controlled |
| Ruia approach | High-value 20, 22, and 25-point enemies | Grovekeeper is 2.92%, Thornmaw 3.21%, Hydra or Belcher 3.64% | Rotate tank mitigation and healer cooldowns rather than stacking two dangerous lieutenants with no plan |
| Final area after Ruia | Matriarch and current last-area spawns | Potatoad Matriarch contributes exactly 8.75%; count her before adding optional correction trash | Have a group healing cooldown and poison dispel plan for Toxic Spew, and do not rely on killing the Matriarch to stop active eggs |
| Before Ziekket | 100% Enemy Forces or a deliberately reserved pack | Use the smallest safe verified force unit that covers the deficit; avoid a large overpull for a 1% shortage | Arrive with personals and healer resources for Ziekket's continuous group damage |
The advantage of this method is that it survives small route edits. If another MDT mapping correction moves an enemy between two neighboring groups, the group may change but a 25-point Hydra is still worth 3.64 percent under the 686 denominator unless Blizzard changes the force value itself. For repeated keys, a Mythic+ bundle can also be used for multiple Self-Play completions, which makes it easier to compare how the same defensive and count plan behaves at different key levels without changing the core route every run.
Explore services related to this guide, selected from our World of Warcraft catalog.
View All World of Warcraft Services


Defensive Cooldown Plan for Dangerous Trash
The Blinding Vale is not a dungeon where defensive planning should begin at the bosses. Several trash enemies combine random-target damage, unavoidable pulses, tank pressure, or mechanics that become much worse when two dangerous mobs are active together. The goal is not to press every defensive on cooldown. Assign a response to the pulls that can actually kill the group, then make sure those tools are available again for the next boss.
| Enemy or pull | Main danger | Defensive plan |
|---|---|---|
| Underbrush Stalker | Thornblade on a random player | Targeted player uses a personal if already low or if another mechanic overlaps; heal the bleed quickly and use a bleed removal when available |
| Virid Grovekeeper | Earthrupture Strike on the tank and Uproot group damage with knockback | Tank plans active mitigation or a short defensive for the strike; group avoids being knocked into other mechanics and does not stack another major pulse without a healer cooldown |
| Sporeblight Belcher | Spouting Floret group pulses plus Belch Spores ground effects | Use a healer cooldown when the Belcher overlaps another high-damage enemy; personals are better used before the pulse sequence than after health has already collapsed |
| Overgrown Hydra | Lightmaw Beams on three players | Spread beam lines away from allies and use personals if another unavoidable hit is due; do not combine multiple Hydras unless the group has a planned immunity or healing rotation |
| Luminous Thornmaw | Grievous Gash on the tank and Solar Breath toward a player | Tank uses mitigation for the hit and is healed back to full to clear the stacking bleed; the group leaves room for the frontal so movement does not force players through other hazards |
| Potatoad Matriarch | Toxic Spew group poison, Tongue Toss on the tank, and Toadspawn eggs | Pre-assign poison dispels, use a group healing cooldown for Toxic Spew, and kill eggs promptly; eggs now finish hatching even if the Matriarch is already dead |
Interrupts reduce the amount of defensive power the group needs. Light Bolt Volley from Radiant Spellsower and Disorienting Screech from Lightfeather Petalwing are priority stops. Radiant Spellsowers can also attempt Call The Grove at low health to awaken nearby Dormant Lashers, so stop or crowd-control that cast. Seed Shot from Leafy Grovecrawler is a useful secondary interrupt when the main dangerous casts are covered. On a large pull, decide who owns the first and second critical kick before combat starts instead of letting all players interrupt the same cast and leave the next one free.
Lightblossom Trinity Boss Mechanics and Defensive Timing
Lightblossom Trinity is a coordination encounter disguised as a three-target boss. Meittik, Lekshi, and Kezkitt share all damage taken, so target selection matters less than controlling the garden mechanics. Keep Kezkitt's Light Bolt interrupted. Thornblade must be moved away from the group, and on Mythic+ Lekshi immediately follows it with Fan Of Thorns, making the ambush target a mandatory spread point. Bedrock Slam is the tank buster and also triggers Bedrock Surge on Mythic+, creating sustained group damage.
The tank should have mitigation ready for Bedrock Slam and position the trio so the Fertile Loam locations leave usable room. Lightsower Dash travels between Fertile Loam patches and plants Lightblossoms, so stay out of its path. When Lightblossom Beam begins, players must step into the active Lightblossoms and stand in the beams to suppress their growth. Missing a soak allows Light-Gorged stacks to build, increasing the damage of the following Lightbloom Overgrowth.
For cooldowns, do not spend the healer's strongest group button on ordinary chip damage at the pull. Bedrock Surge is a predictable Mythic+ healing window, while a missed Beam soak can turn Lightbloom Overgrowth into the larger emergency. A player targeted by Thornblade should use a personal if the bleed and Fan Of Thorns overlap with the garden sequence, especially on higher keys.
Ikuzz the Light Hunter Boss Mechanics and Root Plan
Ikuzz is mostly about controlling space before the 50 percent transition makes every mistake more expensive. Thorncaller Roar creates repeated group damage. On Mythic+, Verdant Stomp knocks the party back and, after 4 seconds, Bloodthorn Roots emerge at players' locations, so stack the root locations when practical and move or use root-removal utility before they become a problem. Freedom-style effects are particularly valuable because Bloodthorn Roots immobilize players until removed or destroyed.
Bloodthirsty Gaze fixates a player who must kite Ikuzz instead of trying to tank the chase. While fixating, Crushing Footfalls destroy Bloodthorn Roots within 7 yards, so the chase can be routed through existing roots to clear space. If Ikuzz reaches the target, Incise deals heavy damage and leaves them stunned afterward. Once Lightcrazed Frenzy begins at 50 percent, save the healer's next major throughput tool for Roar plus root or movement pressure rather than spending it immediately at the phase change with everyone healthy.
Personal defensives are best assigned to players who are trapped, fixated, or caught in a Roar overlap. Keep enough clean floor space to place the delayed roots from Verdant Stomp without boxing in the group. Current hotfixes also prevent Bloodthorn Roots from being neutralized by disorient effects, so use actual root removal, dispels where available, or damage to the roots instead of relying on a disorient.
Lightwarden Ruia Boss Mechanics and the 40 Percent Burn
Lightwarden Ruia changes form as health falls, so the defensive plan should change with him. From the pull to 70 percent, Warden's Wrath is the priority interrupt during Moonkin Form. Lightfire marks players and creates dangerous beams when it expires, while Lightfall adds repeated impact zones. Spread Lightfire targets enough that their expiration beams do not overlap the group, but stay close enough for efficient healing.
From 70 to 40 percent, Ruia enters Bear Form. Mangling Claws doubles the danger of his melee attacks, increasing tank pressure, while Grievous Thrash applies a stacking bleed that is removed only when each afflicted player is healed to full. Pulverizing Strikes locks cones onto several players; spread the cone directions and avoid crossing through teammates, because being hit again while Pulverized makes the follow-up damage much worse.
Below 40 percent, Spirits of the Vale rapidly reuses Lightfire, Lightfall, Pulverizing Strikes, and Grievous Thrash every 8 seconds. This is the correct place for the strongest remaining group defensive and healer cooldowns. Entering the phase with no resources is more dangerous than losing a little damage earlier in the fight. If Bloodlust or another major offensive cooldown is available, the execute is also a strong place to shorten this repeated overlap cycle.
Ziekket Boss Mechanics: Adds, Beam and Orb Soaks
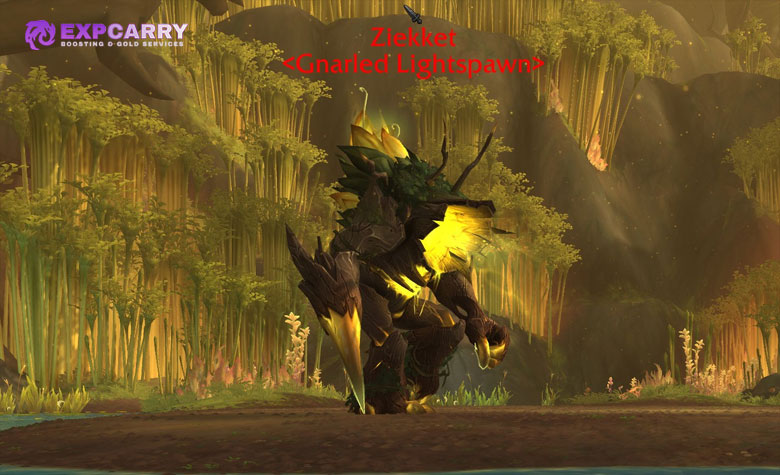
Ziekket combines constant group damage with add control and a positioning puzzle. Oozing Xylem keeps pressure on the healer for the entire encounter, while Awaken the Lightbloom sprouts Lightspawn Lashers and reawakens any that are already Dormant. Lightspore Shot is a priority interrupt while the adds are active. At 1 percent health, a Lightspawn Lasher becomes Dormant and immune to player effects; it is not permanently removed until Concentrated Lightbeam hits it.
Place Ziekket and the Dormant Lashers so Concentrated Lightbeam can cross the adds without cutting through the whole party. A Dormant Lasher hit by the beam is liquefied into Lightsap, which leaves damaging, slowing ground, so use the edge of the arena when possible. Lightbloom's Essence orbs must be intercepted before they reach Ziekket: soaking an orb grants Lightbloom's Might, increasing the player's damage and healing by 10 percent but applying a stacking Holy damage-over-time effect. If an orb reaches Ziekket, it triggers Fluorescent Outburst and grants a stacking Fluorescent Shield that also increases his damage by 10 percent.
Thornspike is the tank's major personal checkpoint because it hits hard, knocks the target back, and leaves a bleed. The tank should face and position with the knockback in mind instead of discovering the landing point after the hit. Healers should save a throughput cooldown for a cycle where Oozing Xylem overlaps adds and orb soaks, while the group should distribute orb soaks so one player does not accumulate more Lightbloom's Might damage than their defensive and healer support can cover.
Interrupt, Dispel and Utility Assignments
Before the key starts, assign the abilities that cannot be allowed through. The Blinding Vale boss mechanics become significantly easier when the group does not waste every interrupt on low-value casts. A simple assignment also lets the tank pull with more confidence because the dangerous enemy can be positioned without waiting to see who reacts first.
- Radiant Spellsower: Light Bolt Volley is the first trash interrupt priority. Spare interrupts can be used on Light Bolt, and Call The Grove should be stopped or crowd-controlled at low health so nearby Dormant Lashers are not awakened.
- Lightfeather Petalwing: Disorienting Screech should be interrupted. This is especially important after the current MDT regrouping because old pull assignments may no longer match the pack shown on a pre-fix route.
- Leafy Grovecrawler: Seed Shot is a secondary random-target cast. Stop it when critical interrupts are already covered.
- Lightblossom Trinity: assign a player to Kezkitt's Light Bolt instead of relying on reaction kicks.
- Ikuzz: bring freedom, dispel, or other root-removal utility when possible for Bloodthorn Roots. Do not rely on disorient effects after the current hotfix.
- Lightwarden Ruia: Warden's Wrath is the boss interrupt priority during Moonkin Form.
- Potatoad Matriarch: poison dispels reduce Toxic Spew pressure and should be assigned before the pull; active eggs still finish hatching after the Matriarch dies.
- Ziekket: reserve interrupts for Lightspore Shot while Lightspawn Lashers are active, then use Concentrated Lightbeam to remove them once they become Dormant.
If the group is still learning all eight current dungeons, the WoW Dungeon and Mythic+ Guides hub keeps route and boss preparation separate by dungeon. For players who need coordinated help across different key levels, the broader WoW Mythic+ dungeon service covers the current Season 2 pool without changing the mechanical priorities described here.
FAQ
The most common Blinding Vale questions are currently about the corrected Enemy Forces total, which opening wing to take, and whether older MDT routes can still be trusted. These answers use the current 686-point count and the post-September 4 mapping baseline.
How much Enemy Forces does The Blinding Vale require?
The current requirement is 686. The older 655 total is outdated. Blizzard increased the requirement, and current MDT data also uses 686.
How much percentage does Potatoad Matriarch give?
Potatoad Matriarch is worth 60 Enemy Forces. With a 686-point requirement, that is 8.75 percent of the full bar.
Should a Blinding Vale Mythic+ route go left or right first?
Both opening wings are valid, but this guide recommends left first for a stable PUG route and access to the Light-Starved Blossom. Paladins and Priests can activate it directly; Herbalists need at least 25 skill in Midnight Herbalism.
Can I still use a Blinding Vale MDT route made before September 4?
Do not trust its exact pull groups without reopening it in a current MDT version. Version 6.2.13 corrected Petalwing and Belcher groupings and removed an extra Radiant Spellsower, so an older map can produce the wrong count or pack assumptions.
What are the most important Blinding Vale interrupts?
Light Bolt Volley from Radiant Spellsower, Disorienting Screech from Lightfeather Petalwing, Warden's Wrath from Ruia, and Lightspore Shot during Ziekket are priority assignments. Kezkitt's Light Bolt on Trinity should also have a reliable kick, and Call The Grove from a low-health Radiant Spellsower should be stopped before it awakens Dormant Lashers.
Where should the group save defensive cooldowns?
Plan major group healing for dangerous Belcher or Matriarch trash, Trinity's Bedrock Surge or a failed Beam soak, Ikuzz below 50 percent, Ruia below 40 percent, and Ziekket add plus orb overlaps. Tanks should reserve mitigation for Grovekeeper strikes, Thornmaw bleeds, Trinity's Bedrock Slam, Ruia's Bear Form, and Ziekket's Thornspike.
Conclusion
The current World of Warcraft Midnight The Blinding Vale Mythic+ route should be built around 686 Enemy Forces and post-September 4 MDT pull groupings. A left-first sequence through Lightblossom Trinity, Ikuzz, Ruia, and Ziekket is a reliable default because it keeps the run easy to communicate and does not depend on a mandatory skip. The key routing rule is to stop using 655-based screenshots: track the current counter, remember that common 7-point enemies are about 1.02 percent, the 20 to 25-point lieutenants are roughly 2.92 to 3.64 percent, and Potatoad Matriarch alone is 8.75 percent.
For execution, pair those force values with a cooldown schedule. Cover Spellsower and Petalwing interrupts, protect random targets from Stalker and Hydra damage, reserve healing for Belcher and Matriarch pressure, then arrive at the bosses with specific defensive windows in mind. Trinity rewards correct flower soaks and spacing for Fan Of Thorns, Ikuzz rewards controlled delayed root placement, Ruia demands full-health recovery from Grievous Thrash and resources for the sub-40-percent cycle, and Ziekket requires Dormant add disposal with Concentrated Lightbeam plus disciplined orb soaks. That combination of current count data and planned defensives is more durable than copying a route image whose underlying MDT mapping has already changed.