
Arc Raiders is still the hottest extraction shooter on the planet, peaking 300–480k concurrent on Steam weekends (482k all-time peak) and instant queues everywhere. If you’re tired of short YouTube clips and scattered Reddit threads, this is the single, clean guide that actually gets you from zero to legendary extracts without the usual wall-of-bullets chaos.
Where to Actually Loot (And Why Some Maps Are 5x Better)
There are five maps at the moment, but you’ll spend 90% of your time on just two if you want to progress fast.
Stella Montis is the undisputed king right now. The new indoor train stations and business centers are absolutely stuffed with weapon crates, tech modules, and blueprint spawns. A single good north spawn lets you hit Business Center → Train Station vaults → south extract in under 25 minutes and walk out with 10-15 blue/purple items plus modules almost every time. The verticality also makes it easier to rat or fight your way out compared to open maps. If you only learn one map for loot, make it Stella.
Blue Gate is the perfect runner-up, especially for blueprints and early-to-mid game gear. The underground parking garage and checkpoint areas are blueprint heaven, and the layout funnels players into predictable paths - meaning you can third-party or avoid fights depending on your mood.
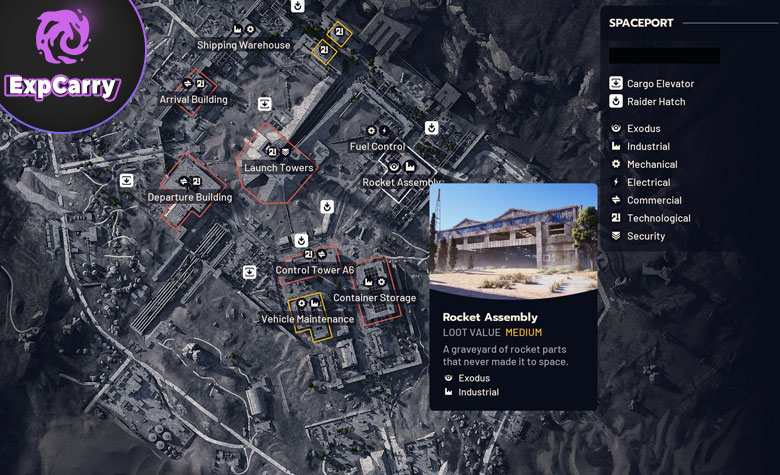
Buried City still holds up for safe, consistent weapon crate loops around Plaza Rosa, while Spaceport and Dam Battlegrounds are mostly early-game or organic farms (lemons, mushrooms, basic mats). Skip them once you unlock the big three unless you need something specific.
Beginner-Friendly Maps & How to Not Die in Your First 20 Raids
Start on Dam Battlegrounds. It has quiet edges, forgiving extracts, and enough cover to learn how ARC patrols work without getting instantly sniped or camped. Treat your first 15-20 raids like pure scouting missions: land on the edge, loot the outskirts, extract the moment you have anything decent. Greed kills more new players than bullets.
Once you’re comfortable, move to Buried City - tons of cover, short rotations, perfect for practising slides and vaults. Only touch Stella Montis when you can reliably extract alive from Dam/Buried with a half-full bag.
Craft Ingredients & Hideout Upgrades - Where to Farm What
Your hideout tables need two main things: modules (Tech & Industrial) and organics.
- Tech Modules → Stella Montis Business Center or Blue Gate underground (4-8 per good run)
- Industrial Modules → Buried City factory districts around Plaza Rosa
- Power Rods / ARC Circuitry → Elite robot drops (use lure grenades on Spaceport Launch Tower)
- Organics (lemons, mushrooms) → Spaceport trees or any Lush Bloom event baskets
A simple 20-minute Stella run usually covers both module types. Scrap all junk for coins and buy whatever you’re short on from vendors - it’s faster than hunting specific spawns.
Fastest Way to Level 75 (Real Routes That Work)
Kills, searches, and contract completion give the bulk of XP.
The single best method right now is ARC kill loops in hidden bunkers (Spaceport variant) or boss rooms. A coordinated trio can clear 10-15 elite robots in one raid for up to 15-20k XP plus parts. Solo players stick to contract stacking on Dam Battlegrounds - finish dailies/weeklies while farming patrols for around 40-50k per hour.
Minute-based XP and search bonuses from the last patch made long, safe raids surprisingly efficient too.
Expeditions - The Soft Wipe System Explained Simply
Expeditions are the optional prestige/soft wipe. You commit resources (modules, organics, etc.) over the season and when the cycle ends (first one closes December 14, finalization until Dec 20), your current raider “leaves on expedition” and you start fresh with permanent account-wide bonuses: +20% XP gain, extra starting mats, exclusive cosmetics, etc.
It’s completely voluntary. Hardcore players skip it and keep stacking forever; most use it to reset the grind and stay competitive after hitting the current cap. Start contributing early - the requirements only go up.
Talent Trees - Full Breakdown, Best Builds & Progression Route
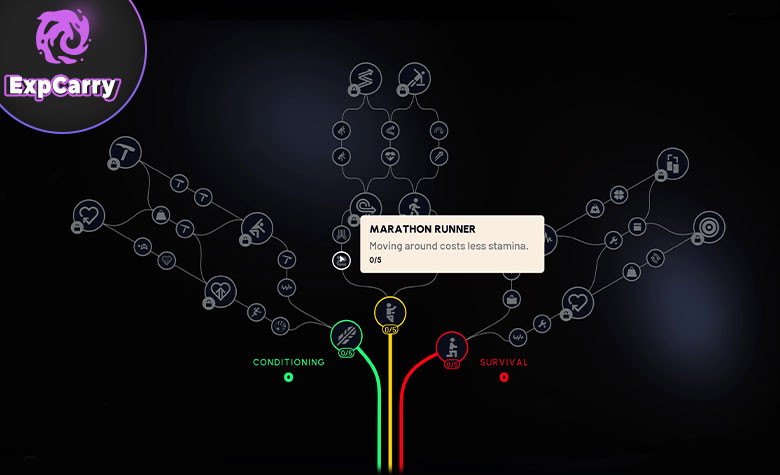
The skill tree is your long-term power fantasy, with 75 points to spend across three interconnected branches: Mobility (yellow - movement & evasion), Conditioning (green - combat endurance & breaching), and Survival (red - looting, crafting & stealth). Each has 15 skills, many multi-point (up to 5/5), with branching prerequisites that force smart planning - no full resets except via Expeditions. Points come from leveling (max lvl 75), so every raid counts.
Quick Tree Overviews & Key Skills
-
Mobility: All about outrunning death. Max stamina, cheaper/further rolls, vaults, climbs, and slides let you reposition like a ghost.
Standouts:- Marathon Runner (5/5) - Less stamina drain while moving/running (essential early).
- Youthful Lungs (5/5) - +Max stamina pool.
- Effortless Roll (5/5) - Rolls cost way less stamina.
- Carry The Momentum (1/1) - Free sprint burst after roll.
- Heroic Leap (5/5) - Longer/faster dodge rolls.
- Nimble Climber/Slip And Slide (5/5 each) - Faster vaults/slides.
- Calming Stroll (1/1) - Stamina regen while walking (quiet flanking godsend).
-
Conditioning: Tank fights, breach faster/quieter, survive downed. Great for squads or aggressive pushes.
Standouts:- Used To The Weight (5/5) - Shields barely slow you.
- Proficient Pryer/Gentle Pressure (5/5 each) - Breach doors/crates 2-3x faster, less noise.
- Downed But Determined/Turtle Crawl (5/5 each) - Longer downed survival, less dmg.
- Fight Or Flight (5/5) - Stamina burst when hurt.
- Loaded Arms/A Little Extra (1/1 each) - Weapons lighter, bonus resources from breaches.
-
Survival: Loot king - faster/quieter scavenging, in-raid crafting, more carry weight. Core for any build.
Standouts:- Broad Shoulders (5/5) - +Carry weight (no overencumber penalty).
- Looter's Instincts/Silent Scavenger (5/5 each) - Loot reveals faster, less noise.
- In-Round Crafting/Traveling Tinkerer (1/1 each) - Craft meds/grenades mid-raid.
- Security Breach (1/1) - Open high-value lockers (endgame must).
- Looter's Luck (1/1) - Chance for double loot reveals.
- Agile Croucher/Revitalizing Squat (5/5 each) - Crouch speed/stamina regen.
Best Overall Progression Route (Levels 1-75 - Balanced Solo/Squad)
This path hits 100% survival in early raids, scales to endgame looting/PvP, and leaves room for respec via Expedition. Prioritize Mobility first (stamina = life), Survival second (loot/craft), Conditioning last (breach/downed). Total: ~30 Mobility, 25 Survival, 20 Conditioning.
Early Game (1-20: Survive & Move)
Rush stamina/evasion - you're fragile.
- 1-10: Marathon Runner 5/5 + Youthful Lungs 5/5 (Mobility) - Run forever, no more sprint exhaustion.
- 11-15: In-Round Crafting 1/1 + Looter's Instincts 1-3/5 (Survival) - Craft meds/grenades, loot faster.
- 16-20: Effortless Roll 3/5 + Carry The Momentum 1/1 (Mobility) - Spam rolls to escape.
Mid Game (21-45: Loot Efficiently)
Deep Survival for hauls, add breach.
- 21-30: Broad Shoulders 5/5 + Silent Scavenger 5/5 (Survival) - Carry more, quiet looting.
- 31-35: Proficient Pryer 3/5 + Gentle Pressure 3/5 (Conditioning) - Breach crates 2x faster/quieter.
- 36-45: Looter's Luck 1/1 + Traveling Tinkerer 1/1 + Security Breach path prereqs (Survival) - Double loot chance, advanced crafting, locker access.
End Game (46-75: Dominate Fights & Extract)
Polish Mobility/Conditioning.
- 46-55: Heroic Leap 5/5 + Slip And Slide 5/5 (Mobility) - God-tier mobility.
- 56-65: Downed But Determined 5/5 + Used To The Weight 5/5 (Conditioning) - Squad revives, shields fluid.
- 66-75: Fill gaps - max Effortless Roll, Fight Or Flight, Revitalizing Squat.
Why This Route Wins: Early Mobility prevents 80% deaths (stamina > aim). Mid Survival turns raids profitable (craft/weight = riches). Late Conditioning seals PvP/revives. Adapt: Solo - skip Downed skills (+5 Mobility); Squad - +Conditioning downed; Looter - max Survival early; PvP Fragger - Conditioning/Mobility 50/50.
Respec? Cheap early, pricey late - plan with this or Expedition wipe.
Final Thoughts
Arc Raiders is in its golden window right now - populations massive, queues instant, and the Cold Snap update coming mid-December will add a whole winter biome with new mechanics and another loot explosion. Master Stella Montis for gear, Dam for fundamentals, kill robots like your life depends on it for XP, and decide soon whether you’ll commit to the first Expedition cycle. Follow this flow and you’ll go from naked drops to consistent legendary extracts faster than 99% of the playerbase. The surface is brutal, but with the right routes and builds it’s also insanely rewarding. Jump in while the servers are packed and the meta is fresh.


