Blood Death Knight Guide for WoW Midnight Season 1 - Builds, Rotation, and Tips

Blood Death Knight guide - updated for WoW Midnight Season 1. This guide follows the reference structure and focuses on current PvE setups for raids, Mythic+, and Delves, plus PvP tactics for Solo Shuffle, 2v2, 3v3, and RBG. We cover talents, rotation priorities, stats, gear, and practical tips to improve Blood Death Knight performance in Midnight Season 1. Blood remains a reactive tank built around Bone Shield, Death Strike, and disciplined cooldown timing, with San'layn and Deathbringer now serving different roles instead of one simply replacing the other.
PvE Guide for Blood Death Knight in WoW Midnight Season 1
Blood Death Knight in Midnight Season 1 remains a durable tank spec centered on rune management, reactive self-healing, and heavy control utility. Your core survival tools are still Bone Shield, Death Strike, Dancing Rune Weapon, Vampiric Blood, Icebound Fortitude, and Anti-Magic Shell, but the current season changed hero talent recommendations, tier bonuses, and gearing logic. San'layn is the stronger offensive recommendation in most PvE content, while Deathbringer remains a valid alternative that trades some output for a smoother and more forgiving profile in Mythic+. Blood still rewards clean resource flow and proactive defensive timing, and it still punishes late Death Strikes and sloppy cooldown overlap.
Blood Death Knight Raid Guide in Midnight Season 1
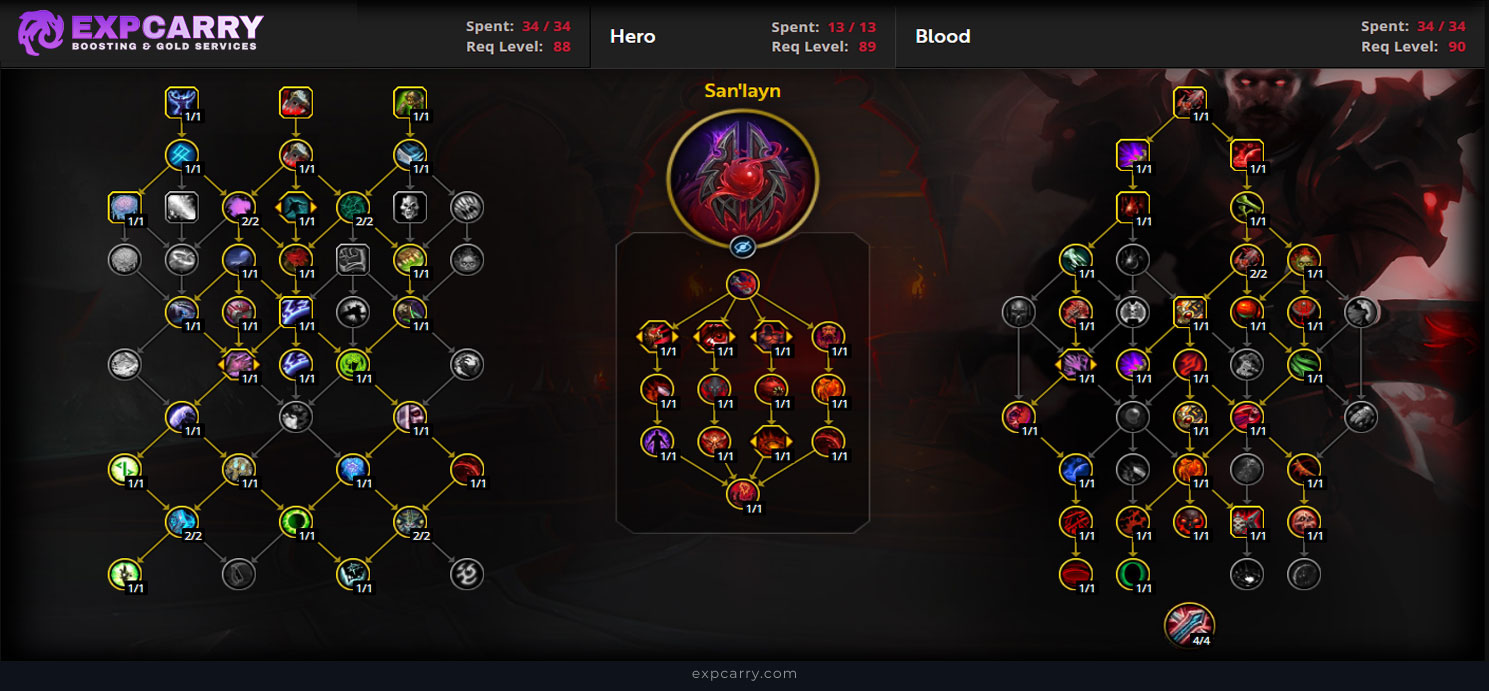
In raids, Blood Death Knight plays around stable Bone Shield uptime, smart Death Strike timing after meaningful damage, and proactive use of major cooldowns before dangerous mechanics land. San'layn is the recommended raid hero tree because it remains ahead offensively in current Season 1 tuning and scales well into sustained boss encounters. Blood still handles long tanking sequences, predictable busters, and magic-heavy moments well, but it does not hide weak resource management. Your job is to enter dangerous windows prepared, not to improvise after your health has already dropped.
Best Talents for Blood Death Knight Raids
Use a San'layn raid build as the main recommendation. The current version focuses on Death Strike efficiency, Bone Shield stability, core Blood durability tools, and San'layn's added offensive pressure through its vampiric cycle. Deathbringer remains playable in raid if you strongly prefer its pacing, but the current recommendation still points to San'layn for single target and general offensive value. Keep class-tree utility such as Anti-Magic Zone, Death's Echo, Grip of the Dead, Control Undead, or Asphyxiate flexible based on encounter needs.
Best Stats for Blood Death Knight Raids
- Item Level
- Haste for San'layn, or Crit/Versatility/Mastery for Deathbringer
- The remaining secondaries based on hero talent and gear
Strength remains your primary stat, and item level is still the first thing you should value on armor pieces. The old fixed Season 3 stat list is no longer the right way to frame Blood. San'layn prefers Haste much more strongly, while Deathbringer leans more naturally into Crit, Versatility, and Mastery. In practice, all secondaries are close enough that major item level upgrades usually win outside of rings, trinkets, and very specific crafted pieces. Static stat orders are worse than useless if they ignore the hero tree you are actually playing.
Best Consumables, Enchants, and Gems for Blood Death Knight Raids
- Potion: Potion of Recklessness is the default recommendation, with Light's Potential as a secondary option and Potion of Zealotry only worth checking for pure single target damage.
- Food: Harandar Celebration is the main feast recommendation, while Blooming Feast is a usable secondary-stat alternative.
- Flask: San'layn usually wants Flask of the Shattered Sun or Flask of the Blood Knights, while Deathbringer usually wants Flask of the Shattered Sun or Flask of Thalassian Resistance.
- Weapon Oil: Thalassian Phoenix Oil is the default temporary weapon augment.
- Weapon Rune: Rune of Sanguination is the standard choice for San'layn and for most Deathbringer setups, while Rune of the Fallen Crusader becomes more competitive for Deathbringer at higher target counts.
- Augment Rune: Void-Touched Augment Rune is the current raid standard.
Enchants
- Head: Empowered Blessing of Speed.
- Shoulders: Akil'zon's Swiftness.
- Chest: Mark of the Worldsoul.
- Legs: Blood Knight's Armor Kit.
- Rings: Nature's Fury for San'layn, or Silvermoon's Tenacity for Deathbringer as the clean default.
Gems
- Unique socket: Indecipherable Eversong Diamond.
- Other sockets: Flawless Quick Garnet for San'layn, or Flawless Masterful Garnet for Deathbringer, then fine-tune through sims if needed.
Best Gear for Blood Death Knight Raids
Your current tier set is Relentless Rider's Lament, not the old Hollow Sentinel set. The 2-piece increases Blood Boil damage by 8 percent and causes it to generate 3 Runic Power, while the 4-piece increases Death Strike damage by 8 percent and gives it a 10 percent chance to grant a Blood Boil charge. Because of that, Blood Boil management matters more than the old article suggests, and you should avoid sitting too high on charges. Prioritize high item level tank gear first, then tune your setup around your hero talent and the content you are actually doing.
Rotation and Ability Priority for Blood Death Knight Raids
Your raid rotation focuses on maintaining Bone Shield, keeping rune flow smooth, using Death Strike after relevant incoming damage, and matching major defensives to boss mechanics instead of panic-pressing them after the hit lands. Blood is still simple on paper and far less forgiving in real encounters than people like to pretend.
Single Target
- Maintain Bone Shield and do not let it drop during dangerous mechanics.
- Use Death Strike after meaningful damage instead of spending Runic Power randomly.
- Use Heart Strike to build Runic Power and keep rune flow smooth.
- Cast Blood Boil frequently and do not waste extra value from the current tier set.
- Use Dancing Rune Weapon proactively for parry, threat, and resource stability.
- Use Vampiric Blood, Icebound Fortitude, and Anti-Magic Shell before tank busters or dangerous magic windows.
AoE Rotation
- Use Blood Boil for snap threat and Blood Plague coverage.
- Drop Death and Decay so Heart Strike can cleave efficiently.
- Use Bonestorm if talented on pulls that actually live long enough to justify it.
- Use Gorefiend's Grasp and Death Grip to cluster enemies only when the pull benefits from it.
- Spend Runic Power on Death Strike after spikes, not before them.
Opener
- Pre-pull: enter with Bone Shield ready if possible.
- On pull: Dancing Rune Weapon, Blood Boil, Heart Strike, then Death Strike reactively after the first real hit.
- Use your first major defensive before the first dangerous mechanic, not after testing whether your healer enjoys pain.
Blood Death Knight Mythic Plus Guide in Midnight Season 1
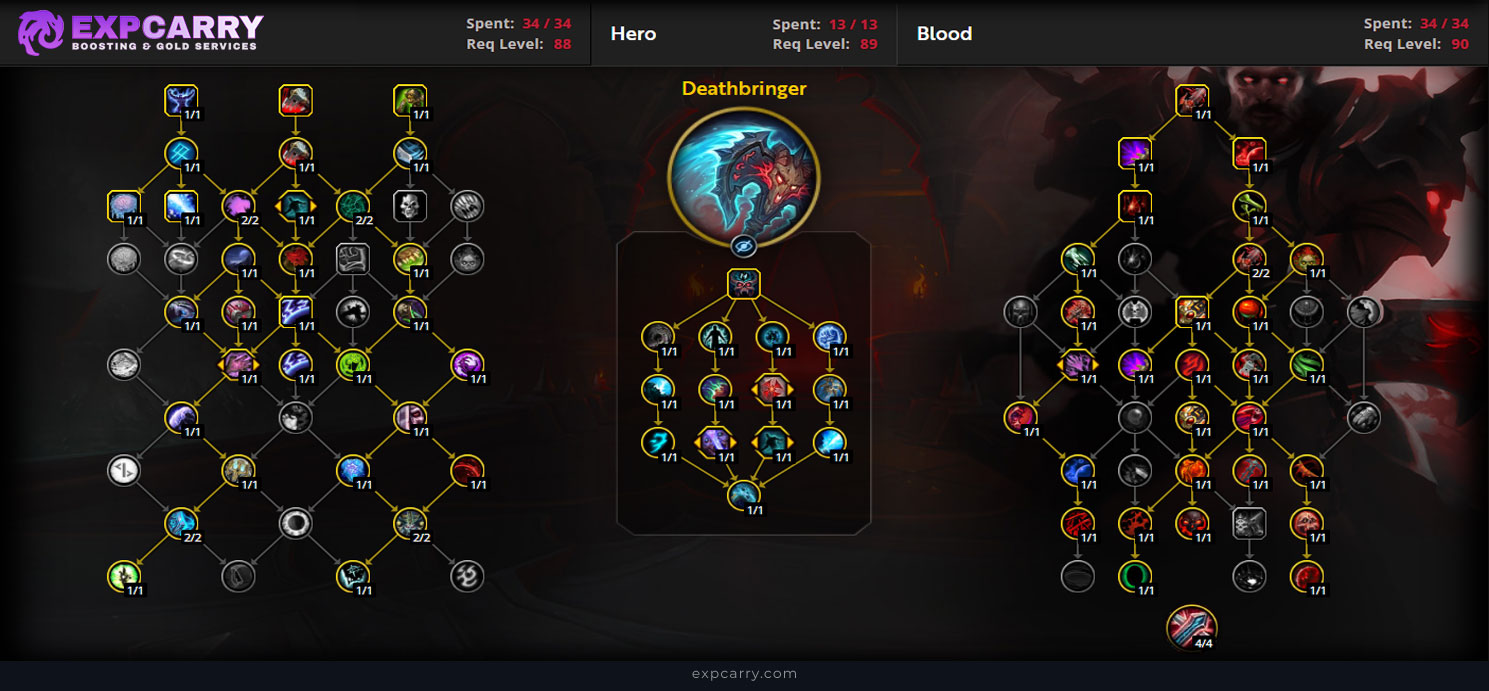
In Mythic+, Blood Death Knight still stands out through self-healing, pull control, and utility, but the hero talent recommendation changes here. Deathbringer is the recommended Mythic+ hero tree because it keeps a smoother and tankier overall profile, while San'layn remains stronger offensively and still perfectly playable if you want to push damage harder. Blood still excels at shaping pulls through grips, Gorefiend's Grasp, Anti-Magic tools, and stubborn self-sustain, but it depends heavily on route planning and clean cooldown usage.
Best Talents for Blood Death Knight Mythic Plus
Use a Deathbringer Mythic+ build as the default recommendation. It retains its strengths in general tankiness, approachability, and consistency, which is exactly what you want in keys where the tank is constantly forced to absorb mistakes, chaos, and avoidable group nonsense. San'layn remains viable in Mythic+, especially if you want more damage and are confident in your control of its maintenance windows. Keep utility tools such as Gorefiend's Grasp, Grip of the Dead, Asphyxiate, Control Undead, and Anti-Magic Zone flexible by dungeon.
Best Stats for Blood Death Knight Mythic Plus
- Item Level
- Haste for San'layn, or Crit/Versatility/Mastery for Deathbringer
- The remaining secondaries based on build and current gear
The same split still applies in Mythic+. San'layn values Haste much more strongly, while Deathbringer gets more out of Crit, Versatility, and Mastery. The real takeaway is still item level first, then tuning rings, gems, and crafted pieces around the hero tree you are actually using. The old Season 3 Versatility-first template is too blunt for the current spec.
Best Consumables, Enchants, and Gems for Blood Death Knight Mythic Plus
- Potion: Potion of Recklessness is your default, with Light's Potential as the next option.
- Food: Harandar Celebration is the main feast recommendation, with Blooming Feast as an acceptable secondary-stat option.
- Flask: San'layn generally leans toward Flask of the Shattered Sun or Flask of the Blood Knights, while Deathbringer generally leans toward Flask of the Shattered Sun or Flask of Thalassian Resistance.
- Weapon Oil: Thalassian Phoenix Oil.
- Weapon Rune: Rune of Sanguination is the clean default for San'layn and for most Deathbringer setups, while Rune of the Fallen Crusader gains value for Deathbringer in heavier multi-target situations.
- Enchants and gems largely mirror raid, with Nature's Fury and Flawless Quick Garnet favored for San'layn, and Silvermoon's Tenacity plus Flawless Masterful Garnet favored for Deathbringer.
Rotation and Ability Priority for Blood Death Knight Mythic Plus
In dungeons, your job is to establish threat immediately, cluster packs cleanly, and avoid entering dangerous pulls without either Runic Power or a defensive plan. Blood rewards players who prepare the pull before it starts and punishes anyone who just walks in and hopes Death Strike will solve everything.
Single Target
- Maintain Bone Shield and Blood Plague.
- Use Death Strike after real spikes, not as filler.
- Keep Heart Strike and Blood Boil moving to avoid wasted runes and dead globals.
- Match Dancing Rune Weapon and your major defensives to actual boss danger.
AoE Rotation
- Open with Blood Boil and Death and Decay for snap threat and cleave.
- Use Gorefiend's Grasp and Death Grip to group enemies for your party when it actually helps.
- Use Bonestorm if talented on packs that live long enough to reward it.
- Rotate Death Strike, Vampiric Blood, and your other defensives around the pull's real damage pattern.
Opener
- Start with Bone Shield ready if possible.
- Open with Blood Boil, Heart Strike, and Dancing Rune Weapon on meaningful pulls.
- Do not dump your entire defensive kit into the first random pull unless the route specifically demands it.
Affix notes: On Tyrannical weeks, preserve more defensive value for bosses and mini-bosses. On Fortified weeks, line your strongest tools up with the trash pulls that can actually wipe the key.
Blood Death Knight Delves Guide in Midnight Season 1
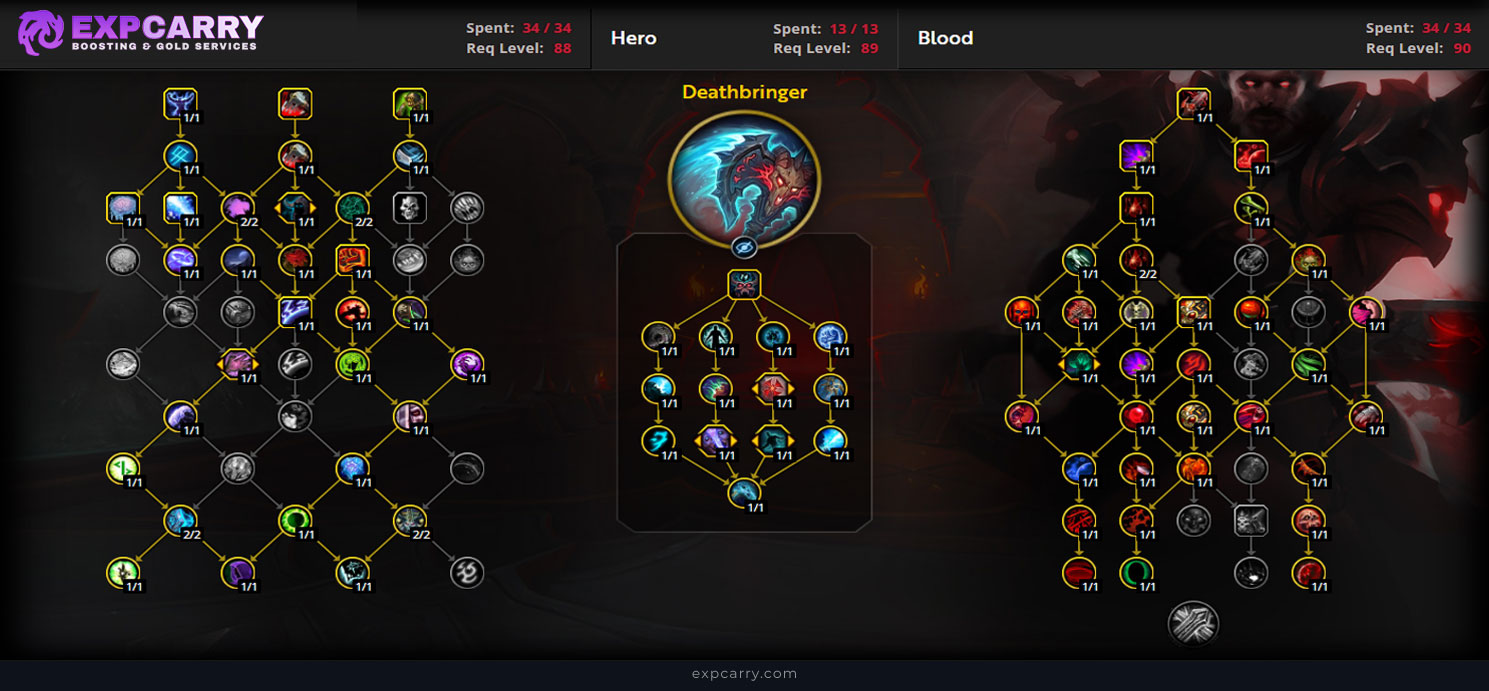
In Delves, Blood Death Knight remains one of the safer solo tanks because it combines control, self-healing, and stable cooldown layering. San'layn is still strong if you want the better offensive profile, while Deathbringer stays appealing if you prefer a smoother and more forgiving setup. Delves reward the version of Blood that respects pacing, controls pull size, and never mistakes self-healing for invulnerability.
Best Talents for Blood Death Knight Delves
Use a survivability-focused build that still keeps your core Blood throughput intact. Bone Shield uptime, Death Strike value, anti-magic tools, and practical crowd control matter much more than chasing decorative damage. San'layn is a strong general recommendation if you want faster kills, while Deathbringer stays viable if you prefer its rhythm and extra comfort.

Best Stats for Blood Death Knight Delves
- Item Level
- Haste for San'layn, or Crit/Versatility/Mastery for Deathbringer
- The remaining secondaries based on build, comfort, and current gear
Delves still reward comfort, but the same core stat logic from PvE remains the best starting point. San'layn prefers Haste much more strongly, while Deathbringer naturally leans into Crit, Versatility, and Mastery. If you want extra stability for solo clears, biasing a little more toward Versatility is reasonable, but item level still comes first on most armor pieces.
Best Consumables, Enchants, and Gems for Blood Death Knight Delves
- Potion: Potion of Recklessness as the default option, with Light's Potential as a fallback if needed.
- Food: Harandar Celebration or Blooming Feast.
- Flask: Use the same flask logic as PvE - Flask of the Shattered Sun or Flask of the Blood Knights for San'layn, and Flask of the Shattered Sun or Flask of Thalassian Resistance for Deathbringer.
- Weapon Oil: Thalassian Phoenix Oil.
- Weapon Rune: Rune of Sanguination is the safest default, with Rune of the Fallen Crusader still reasonable for some Deathbringer setups.
- Gems and enchants can follow your PvE setup, with Flawless Quick Garnet and Nature's Fury fitting San'layn better, and Flawless Masterful Garnet plus Silvermoon's Tenacity fitting Deathbringer better.
Rotation and Ability Priority for Blood Death Knight Delves
In Delves, use a control-first approach. Pull what you can actually stabilize, keep Bone Shield active, and use Death Strike after meaningful hits. If you are using cooldowns only after the fight has already turned bad, the problem is not the spec.
Single Target
- Maintain Bone Shield, Blood Plague, and stable rune flow.
- Use Death Strike reactively after elite swings.
- Use major defensives on dangerous elites or boss mechanics instead of hoarding them forever.
AoE Rotation
- Use Blood Boil for control and snap threat.
- Use Death and Decay plus Heart Strike cleave when packs justify it.
- Cluster with Death Grip and Gorefiend's Grasp only when doing so will not make the pull stupid.
Opener
- Begin with Bone Shield ready, then open cleanly with Blood Boil and Heart Strike.
- Use Dancing Rune Weapon or Vampiric Blood early on rough pulls if the room is actually dangerous.
Best PvP Guide for Blood Death Knight in WoW Midnight Season 1
In rated PvP, Blood Death Knight remains a niche pick rather than a mainstream ladder spec. Its value comes from being hard to move, hard to ignore, and irritating enough to disrupt positioning, peel for teammates, and control objectives with grips, slows, Anti-Magic Zone, and repeated defensive trading. Treat Blood PvP as an objective and disruption role, not as a normal meta arena damage dealer.
Blood Death Knight Solo Shuffle Guide
In Solo Shuffle, Blood functions more as a disruptive frontline than a true kill threat. Use grips, slows, stuns, and survivability to make enemy setups awkward while staying alive through focused pressure. It can work, but it is still a niche ladder choice and should not be presented like a standard arena spec.
Best Talents for Blood Death Knight Solo Shuffle
Build around control, disruption, and staying power. PvP talent choices should prioritize utility and defensive value over fantasy burst setups. Blood remains niche here, so adapt per lobby instead of pretending there is one perfect universal package.

Best Stats for Blood Death Knight Solo Shuffle
- Versatility
- Mastery
- Haste
- Critical Strike
Best Consumables, Enchants, and Gems for Blood Death Knight Solo Shuffle
Prioritize PvP gearing around Versatility first, with Mastery and Haste following depending on your comfort and team setup. Use defensive enchants and durable gem choices that support survival, uptime, and control rather than pretending Blood suddenly turns into a burst spec.
Blood Death Knight 2v2 Guide
In 2v2, Blood works as a control-heavy partner that can drag games out, peel aggressively, and punish positioning errors with Grip, stun chains, and Anti-Magic tools. The role is attrition and space control, not clean scripted burst, and the spec remains off-meta compared to standard arena picks.
Best Talents for Blood Death Knight 2v2
Use a durable control setup with utility-focused PvP talents and keep your build centered on disruption rather than damage fantasies. Blood is niche here as well, so matchups matter more than a copy-paste line.

Best Stats for Blood Death Knight 2v2
- Versatility
- Mastery
- Haste
- Critical Strike
Blood Death Knight 3v3 Guide
In 3v3, Blood is mostly about disruption, peels, and forcing awkward movement rather than conventional kill pressure. Help your team by breaking setup windows, dragging enemies into bad positions, and surviving long enough to create space. That role can be annoying and useful, but it is still niche compared to established arena choices.
Best Talents for Blood Death Knight 3v3
Use a utility-heavy setup with strong control tools, survivability, and flexible anti-caster support. Blood remains a niche specialization here, so composition and matchup matter more than static ladder mythology.

Best Stats for Blood Death Knight 3v3
- Versatility
- Mastery
- Haste
- Critical Strike
Blood Death Knight RBG Guide
In RBGs, Blood Death Knight is more useful than it is in arena because the spec's toolkit fits objective defense, choke control, and peeling much better than small-map kill races. Gorefiend's Grasp, Death Grip, Anti-Magic Zone, and stubborn survivability all matter more on battleground maps than in standard arena pressure trades.
Best Talents for Blood Death Knight RBG
Use a group-oriented, control-focused build that supports objective play, team protection, and front-line disruption. Blood is at its most relevant here when it is making space miserable for the other team instead of trying to imitate a real damage spec.
Best Stats for Blood Death Knight RBG
- Versatility
- Mastery
- Haste
- Critical Strike
Conclusion
Blood Death Knight in WoW Midnight Season 1 is not a spec you should still describe with old Season 3 lists. The current tier set is Relentless Rider's Lament, the stat logic now changes meaningfully between San'layn and Deathbringer, and current recommendations split by content instead of pretending one setup covers everything. San'layn is the stronger offensive PvE recommendation overall, while Deathbringer remains the default Mythic+ recommendation because of its steadier and tankier profile.
In raids, Blood remains a durable reactive tank with strong anti-magic tools and reliable self-sustain. In Mythic+, it still excels at pull control and route shaping. In Delves, it is one of the safer solo tanks when played with discipline. In PvP, it remains niche and performs better in objective-heavy formats than in standard arena damage races. Play it with clean resource timing and it feels extremely stable. Play it lazily and it collapses into a very expensive lesson.
Related Product

Voidspire Mythic Boost - Full 6/6 Raid Carry in WoW Midnight Get your Voidspire Mythic boost and de..
539.00€

Voidspire Heroic Boost — Full 6/6 Raid Carry | WoW Midnight Season 1 Buy the Voidspire Heroic boo..
58.49€