
Blood Death Knight guide - updated for WoW Midnight Season 2. This article is part of our World of Warcraft coverage for players following the current Patch 12.1 PvE and PvP environment. It keeps the original structure while covering raids, Mythic+, Delves, Solo Shuffle, 2v2, 3v3, and RBG. For players focused on Mythic Dungeons, Blood Death Knight remains a resource-driven tank whose survival depends on preparing Bone Shield, generating Runic Power efficiently, and timing Death Strike around actual incoming damage. The guide explains the current talent imports, hero talent differences, stat priorities, Season 2 gear, consumables, rotations, and practical defensive planning without treating San'layn and Deathbringer as interchangeable builds.
PvE Guide for Blood Death Knight in WoW Midnight Season 2
Blood Death Knight in Midnight Season 2 remains a reactive tank built around converting Runes into Runic Power and spending that resource on well-timed Death Strikes. Bone Shield, Dancing Rune Weapon, Vampiric Blood, Icebound Fortitude, and Anti-Magic Shell form the defensive core, while Death Grip, Gorefiend's Grasp, Anti-Magic Zone, and a combat resurrection provide valuable group utility. Patch 12.1 improved several direct attacks and defensive talents, including damage reduction from Bloodshot and Perseverance of the Ebon Blade. Bonestorm, Tombstone, Rune Tap, Soul Reaper, and Blood Tap are no longer part of the current Blood toolkit. San'layn offers the stronger profile when additional targets remain active, while Deathbringer is easier to operate and retains clear defensive advantages, especially in Mythic+.
Blood Death Knight Raid Guide in Midnight Season 2
In The Venomous Abyss and The Tidebound Grotto, Blood Death Knight should enter each tanking window with Bone Shield established, enough Runic Power reserved for Death Strike, and a defensive cooldown assigned to the next dangerous mechanic. Wowhead lists San'layn as the first Raid (Best) setup. It is close to Deathbringer on a purely single-target encounter but moves ahead when persistent adds are present during Dancing Rune Weapon. Blood can answer predictable physical hits, magic damage, and forced movement, but it remains vulnerable when resources are exhausted before the damage arrives.
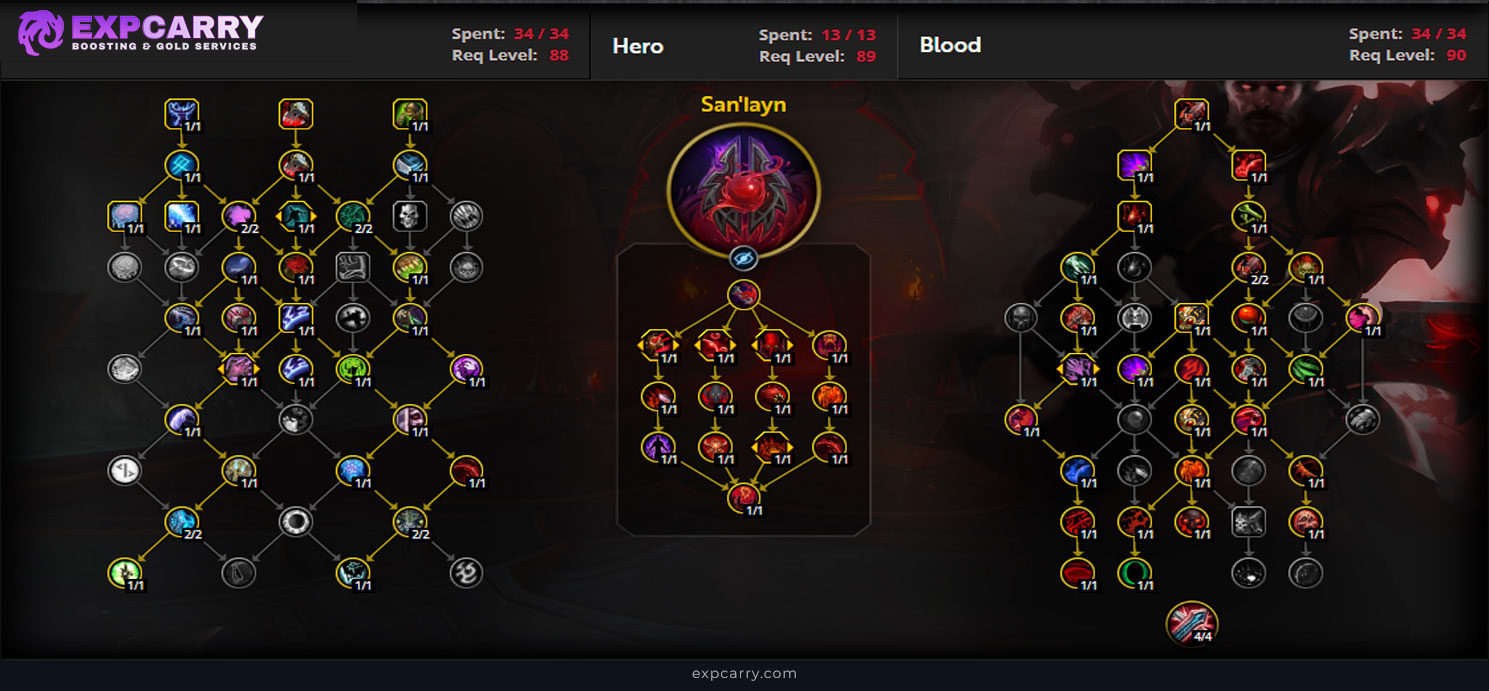
Best Talents for Blood Death Knight Raids
Use the first San'layn Raid (Best) build from Wowhead as the main import. San'layn concentrates much of its output around Dancing Rune Weapon, where it builds Essence of the Blood Queen and gains access to repeated Vampiric Strikes. Outside that window, Death Strike procs help preserve the buff until the next cycle, so wasting Runic Power or delaying Dancing Rune Weapon can reduce both damage and rotational stability. Deathbringer remains a simpler raid alternative, while class-tree utility such as Anti-Magic Zone, Death's Echo, Grip of the Dead, Control Undead, and Asphyxiate can be adjusted for individual encounters.
Best Stats for Blood Death Knight Raids
- Item Level and Strength
- Haste for San'layn or Critical Strike for Deathbringer
- The remaining secondaries based on hero talent and current gear
Strength and item level remain the main priorities on plate armor because Strength increases attack power, armor, and parry. San'layn then favors Haste because it improves Rune regeneration, shortens the global cooldown, and increases the number of actions available during Dancing Rune Weapon. Deathbringer instead starts with Critical Strike, followed by Mastery and Versatility, because Reaper's Mark and most of its added effects do not gain the same value from Haste. Use simulations for rings, trinkets, crafted items, and close sidegrades rather than forcing one secondary-stat order onto both hero trees.
Best Consumables, Enchants, and Gems for Blood Death Knight Raids
- Potion: Use Potion of Recklessness for combat and carry Concentrated Silvermoon Health Potion for emergency healing.
- Food: Blooming Feast is the secondary-stat option, while Harandar Celebration provides primary Strength; simulate the choice for your gear.
- Flask: Use Flask of the Blood Knights or Flask of the Shattered Sun. Flask of Thalassian Resistance is a situational defensive option when a specific hit requires more damage reduction.
- Weapon Oil: Use Thalassian Phoenix Oil as the temporary weapon enhancement.
- Weapon Rune: Use Rune of Sanguination for San'layn and single-target Deathbringer. Rune of the Fallen Crusader becomes the Deathbringer option in very high-target AoE.
- Augment Rune: Use Void-Touched Augment Rune for progression and difficult encounters.
Enchants
- Head: Empowered Blessing of Speed.
- Shoulders: Akil'zon's Swiftness.
- Chest: Mark of the Worldsoul.
- Legs: Forest Hunter's Armor Kit; use Farstrider's Hunt on boots.
- Rings: Nature's Fury is the balanced recommendation, while Eyes of the Eagle is the pure-damage alternative.
Gems
- Unique socket: Use one Indecipherable Eversong Diamond.
- Other sockets: Flawless Deadly Peridot is the general San'layn-oriented option, while Flawless Masterful Garnet fits Deathbringer; verify close choices with your own simulation.
Best Gear for Blood Death Knight Raids
The Midnight Season 2 set is Baleful Grave-Knight's Lament. Each Death Strike grants a stack of Blood Debt that increases total Strength by 0.5 percent, up to 10 stacks. At 10 stacks, Marrowrend consumes Blood Debt and grants 10 percent Strength for 10 seconds; the 4-piece also supplies three Bone Shield charges and damages the primary target and nearby enemies when those stacks are consumed. Maze-roa, Warlord's Fury is the leading raid weapon, while Voracious Heart of Ula'tek and Zul'jin's Guillotine Technique are the main trinket targets. Prioritize item level and tier completion before chasing minor secondary-stat improvements.
Rotation and Ability Priority for Blood Death Knight Raids
The raid priority is not a fixed sequence. Every global depends on Bone Shield, current Runes, Runic Power, incoming damage, and the state of Dancing Rune Weapon. Keep at least enough Runic Power for emergency Death Strikes, avoid capping resources, and consume 10 Blood Debt stacks with Marrowrend so the Season 2 tier bonus is not delayed unnecessarily.
Single Target
- Use Death Strike when healing is required or when Runic Power rises above roughly 75.
- Maintain at least five Bone Shield charges and use Marrowrend to refresh them or consume 10 Blood Debt stacks.
- Place Death and Decay and remain inside it when its defensive and offensive bonuses are needed.
- Use Dancing Rune Weapon on cooldown and build San'layn's Essence of the Blood Queen during its active window.
- Use Blood Boil to apply Blood Plague, react to Boiling Point, and prevent charge waste.
- Use Vampiric Strike during Gift of the San'layn and Heart Strike as the regular Rune-spending filler.
AoE Rotation
- Use Blood Boil while gathering enemies to establish threat and spread Blood Plague.
- Place Death and Decay where the group will remain so your Rune spenders can cleave.
- Use Death Strike for healing or to prevent Runic Power from capping.
- Activate Dancing Rune Weapon early enough to gain its parry, duplicated abilities, and San'layn power window.
- Use Gorefiend's Grasp and Death Grip when tighter enemy positioning benefits the raid.
Opener
- Open with Death's Caress and place Death and Decay while the projectile travels.
- Activate Dancing Rune Weapon, then use Blood Boil, two Vampiric Strikes, and Death Strike before returning to the normal priority.
- Assign Vampiric Blood, Icebound Fortitude, Anti-Magic Shell, or another appropriate defensive before the first dangerous mechanic.
Blood Death Knight Mythic Plus Guide in Midnight Season 2
In Mythic+, Blood Death Knight combines reactive self-healing with exceptional enemy positioning tools, but the opening seconds of a pull remain dangerous if Bone Shield, Runic Power, and cooldowns are not prepared. The import below uses the first Mythic+ (Best) build displayed by Wowhead, which is Deathbringer. It sacrifices some of San'layn's sustained multi-target output for easier Bone Shield management, near-permanent damage reduction from its hero tree, stronger Blood Plague healing, and a predictable burst cycle based on Reaper's Mark and Exterminate.
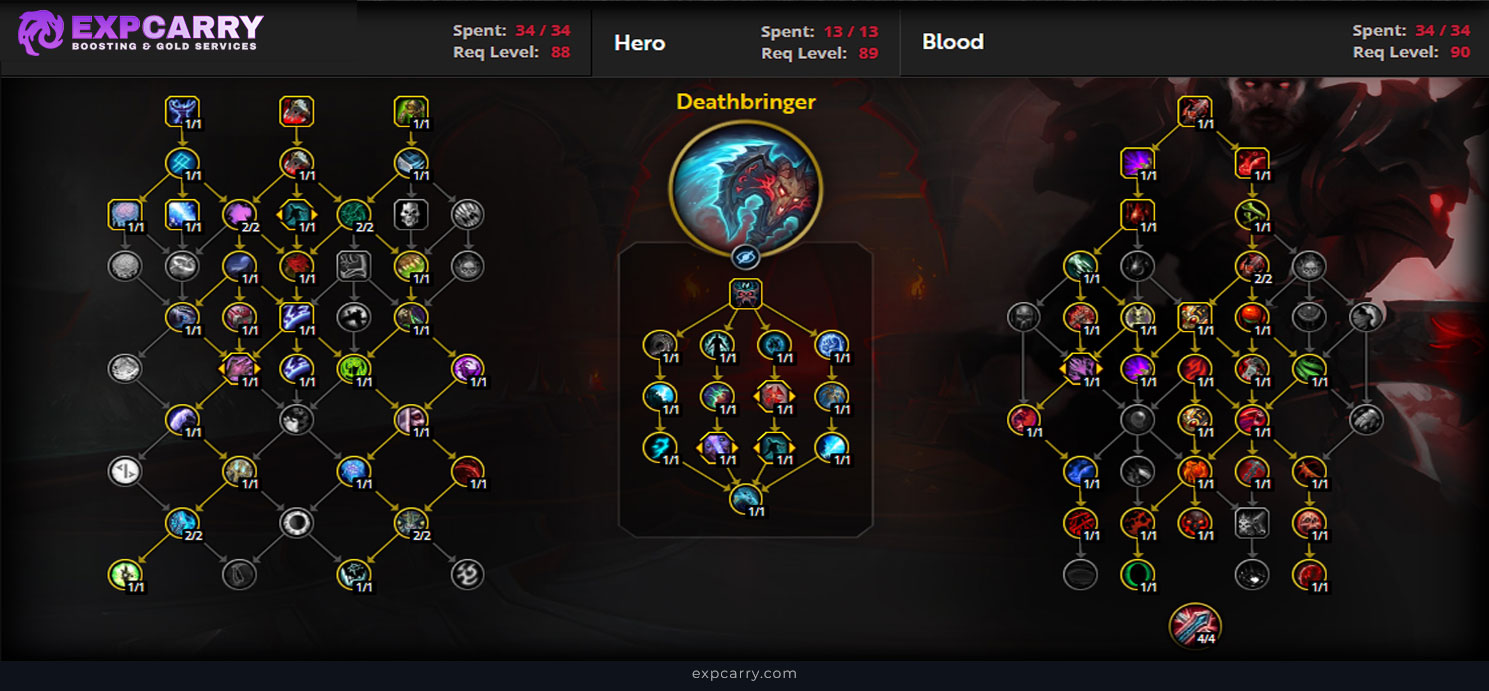
Best Talents for Blood Death Knight Mythic Plus
Use the first listed Deathbringer Mythic+ (Best) import from Wowhead. Reaper's Onslaught is the default capstone because Patch 12.1 strengthened Exterminate enough to make it the general recommendation. Deathbringer works well through the downtime and short combat cycles common in dungeons, and its passive Bone Shield support lowers the number of emergency Marrowrend casts. San'layn remains a higher-maintenance alternative for players who can manage Dancing Rune Weapon and Essence of the Blood Queen consistently. Adjust Gorefiend's Grasp, Grip of the Dead, Asphyxiate, Control Undead, and Anti-Magic Zone for each dungeon.
Best Stats for Blood Death Knight Mythic Plus
- Item Level and Strength
- Critical Strike
- Mastery and Versatility, then Haste
For the recommended Deathbringer build, prioritize item level and Strength, then Critical Strike, followed by Mastery and Versatility, with Haste last. Critical Strike supplies offensive value and converts into parry through Riposte, which is particularly useful when many dungeon attacks can be avoided. Mastery improves Blood Shield against physical damage but loses value when the absorb repeatedly reaches its cap, so it should not be stacked blindly. San'layn uses the separate Haste-first profile described in the raid section.
Best Consumables, Enchants, and Gems for Blood Death Knight Mythic Plus
- Potion: Use Potion of Recklessness and carry Concentrated Silvermoon Health Potion.
- Food: Use Blooming Feast for secondary stats or Harandar Celebration for Strength, then simulate the stronger option for your character.
- Flask: Use Flask of the Blood Knights or Flask of the Shattered Sun; reserve Flask of Thalassian Resistance for a specific defensive requirement.
- Weapon Oil: Use Thalassian Phoenix Oil.
- Weapon Rune: Use Rune of Sanguination for the standard Deathbringer setup, with Rune of the Fallen Crusader reserved for very high-target AoE.
- Enchants and gems: Follow the raid setup, using the Deathbringer-oriented Flawless Masterful Garnet where it provides the best value.
Rotation and Ability Priority for Blood Death Knight Mythic Plus
Dungeon gameplay begins before enemies reach you. Check Bone Shield, Runic Power, Blood Debt, Dancing Rune Weapon, and Reaper's Mark before committing to the next group. Establish threat while gathering, place Death and Decay where the pack will stop, and preserve enough resources to survive the first damage spike instead of spending everything on initial damage.
Single Target
- Maintain at least five Bone Shield charges and keep Blood Plague active.
- Use Death Strike when healing is required or Runic Power approaches its cap.
- Cast Reaper's Mark and Dancing Rune Weapon on cooldown without disrupting survival.
- Use Blood Boil for Boiling Point procs and Heart Strike as filler while preserving Runes for the next Reaper's Mark cycle.
AoE Rotation
- Use Blood Boil, Heart Strike, and Death Strike while gathering to build threat and resources.
- Place Death and Decay near the end of the gather, then apply Reaper's Mark before Dancing Rune Weapon.
- Use Gorefiend's Grasp and Death Grip to position enemies for interrupts, stops, and group damage.
- Rotate Death Strike, Vampiric Blood, Icebound Fortitude, and Anti-Magic Shell around the pull's actual damage pattern.
Opener
- Use Death's Caress, then place Death and Decay while the projectile is travelling.
- Apply Reaper's Mark before Dancing Rune Weapon, then use Blood Boil and Death Strike.
- Continue the normal priority while keeping at least one suitable defensive answer for the pull's next major damage event.
Key notes: Blood Debt has no duration, so a completed pull can end with 10 stacks banked for a Marrowrend detonation during the next gather. This is especially useful when travel creates downtime between packs, but survival still takes priority over carrying the bonus forward.
Explore services related to this guide, selected from our World of Warcraft catalog.
View All World of Warcraft Services


Blood Death Knight Delves Guide in Midnight Season 2
In Delves, Blood Death Knight can combine Death Strike healing, grips, anti-magic tools, and layered cooldowns without depending on a healer. Following the requested setup rule, this section uses the exact same Deathbringer import as Mythic+. The build offers predictable Bone Shield support and a straightforward Reaper's Mark cycle, which is useful when Delve objectives create pauses between fights. Self-healing remains reactive, so entering an elite pull without Runes, Runic Power, or a cooldown plan is still dangerous.
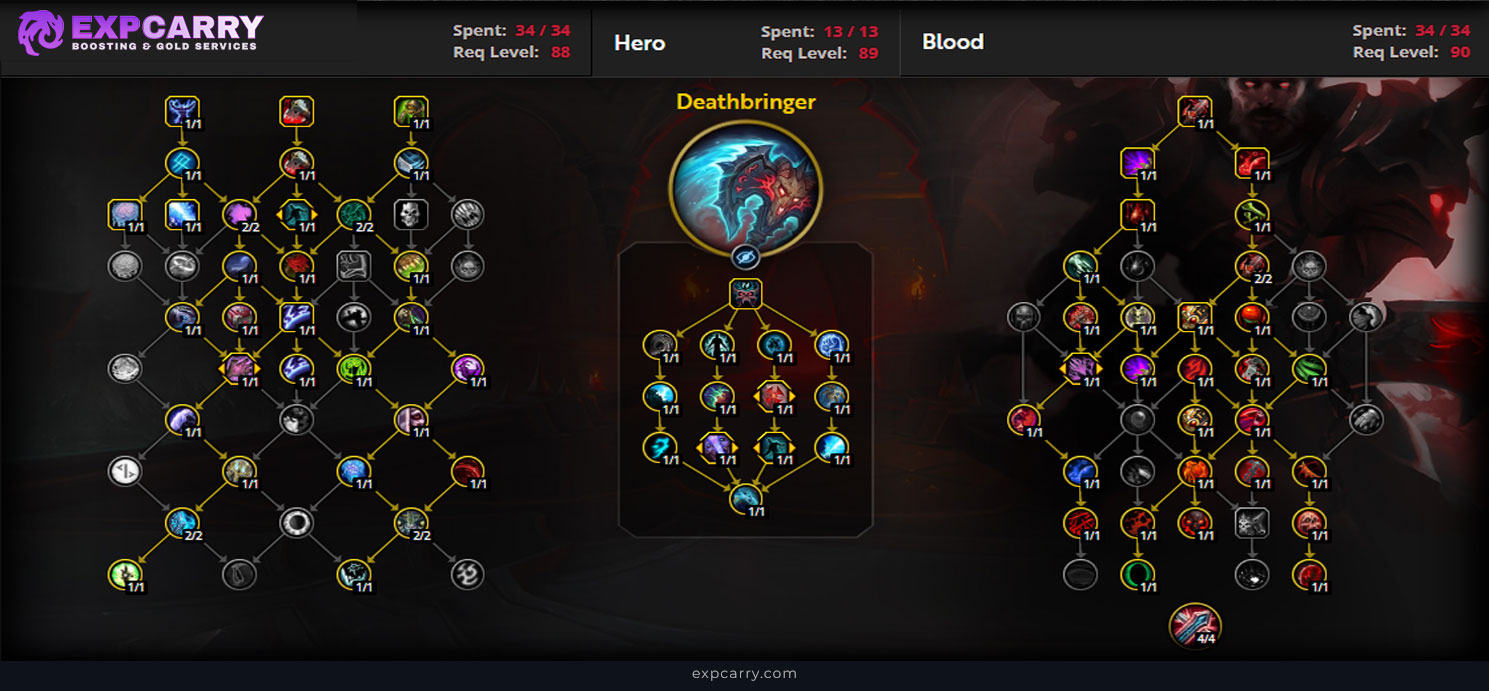
Best Talents for Blood Death Knight Delves
Use the same Deathbringer build shown in the Mythic+ section rather than the separate Delve preset. It retains the complete Bone Shield and Death Strike engine, Reaper's Onslaught, and enough control to manage elite enemies or multi-target rooms. Reaper's Mark provides regular burst, while Deathbringer's passive defenses and easier Bone Shield flow reduce the risk created by travel and objective downtime.
Best Stats for Blood Death Knight Delves
- Item Level and Strength
- Critical Strike
- Mastery and Versatility, then Haste
Because this section copies the Deathbringer Mythic+ build, use the same item-level-first profile: Strength, then Critical Strike, followed by Mastery and Versatility, with Haste last. Versatility offers broadly applicable damage reduction and healing, but it is not automatically stronger than a substantial item-level upgrade. Mastery helps against physical damage through Blood Shield, while Critical Strike adds parry through Riposte and improves damage.
Best Consumables, Enchants, and Gems for Blood Death Knight Delves
- Potion: Use Potion of Recklessness and keep Concentrated Silvermoon Health Potion available for emergencies.
- Food: Use Blooming Feast or Harandar Celebration, depending on which option is stronger for your gear.
- Flask: Use Flask of the Blood Knights or Flask of the Shattered Sun; Flask of Thalassian Resistance is situational.
- Weapon Oil: Use Thalassian Phoenix Oil.
- Weapon Rune: Use Rune of Sanguination for the copied Deathbringer setup, with Rune of the Fallen Crusader limited to very high-target AoE.
- Gems and enchants: Follow the Deathbringer PvE setup, including Indecipherable Eversong Diamond and Flawless Masterful Garnet where appropriate.
Rotation and Ability Priority for Blood Death Knight Delves
Use a control-first Delve priority. Build or refresh Bone Shield before elite pressure, keep enough Runic Power for Death Strike, and use Reaper's Mark and Dancing Rune Weapon early enough to gain their full value. Grips can separate a dangerous caster, combine enemies for AoE, or interrupt movement, but they should not turn a stable pull into an unmanageable one.
Single Target
- Maintain at least five Bone Shield charges, keep Blood Plague active, and avoid exhausting every Rune.
- Use Death Strike after meaningful elite damage or before Runic Power caps.
- Apply Reaper's Mark and use Dancing Rune Weapon, Vampiric Blood, or another appropriate defensive before dangerous mechanics.
AoE Rotation
- Use Blood Boil while gathering enemies to establish threat and Blood Plague.
- Place Death and Decay where you intend to fight, then use Heart Strike and Death Strike as resources allow.
- Use Death Grip and Gorefiend's Grasp only when the resulting enemy position remains safe.
Opener
- Start with Bone Shield prepared, cast Death's Caress, and place Death and Decay before engaging fully.
- Apply Reaper's Mark, activate Dancing Rune Weapon, then use Blood Boil and Death Strike before continuing the normal priority.
Best PvP Guide for Blood Death Knight in WoW Midnight Season 2
In rated PvP, Blood Death Knight remains a niche pick rather than a mainstream ladder spec. Its value comes from being hard to move, hard to ignore, and irritating enough to disrupt positioning, peel for teammates, and control objectives with grips, slows, Anti-Magic Zone, and repeated defensive trading. Treat Blood PvP as an objective and disruption role, not as a normal meta arena damage dealer.
Blood Death Knight Solo Shuffle Guide
In Solo Shuffle, Blood functions more as a disruptive frontline than a true kill threat. Use grips, slows, stuns, and survivability to make enemy setups awkward while staying alive through focused pressure. It can work, but it is still a niche ladder choice and should not be presented like a standard arena spec.
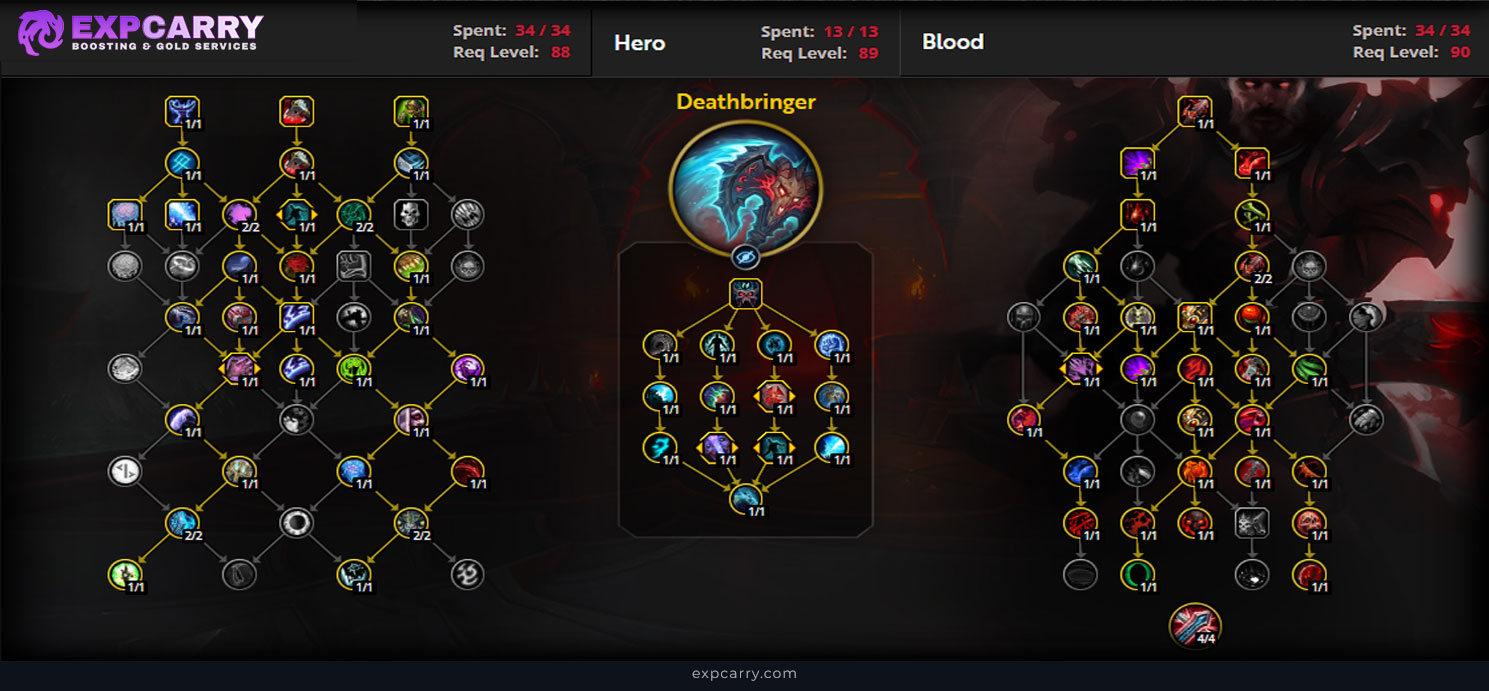
Best Talents for Blood Death Knight Solo Shuffle
Build around control, disruption, and staying power. PvP talent choices should prioritize utility and defensive value over fantasy burst setups. Blood remains niche here, so adapt per lobby instead of pretending there is one perfect universal package.
Best Stats for Blood Death Knight Solo Shuffle
- Versatility
- Mastery
- Haste
- Critical Strike
Best Consumables, Enchants, and Gems for Blood Death Knight Solo Shuffle
Prioritize PvP gearing around Versatility first, with Mastery and Haste following depending on your comfort and team setup. Use defensive enchants and durable gem choices that support survival, uptime, and control rather than pretending Blood suddenly turns into a burst spec.
Blood Death Knight 2v2 Guide
In 2v2, Blood works as a control-heavy partner that can drag games out, peel aggressively, and punish positioning errors with Grip, stun chains, and Anti-Magic tools. The role is attrition and space control, not clean scripted burst, and the spec remains off-meta compared to standard arena picks.
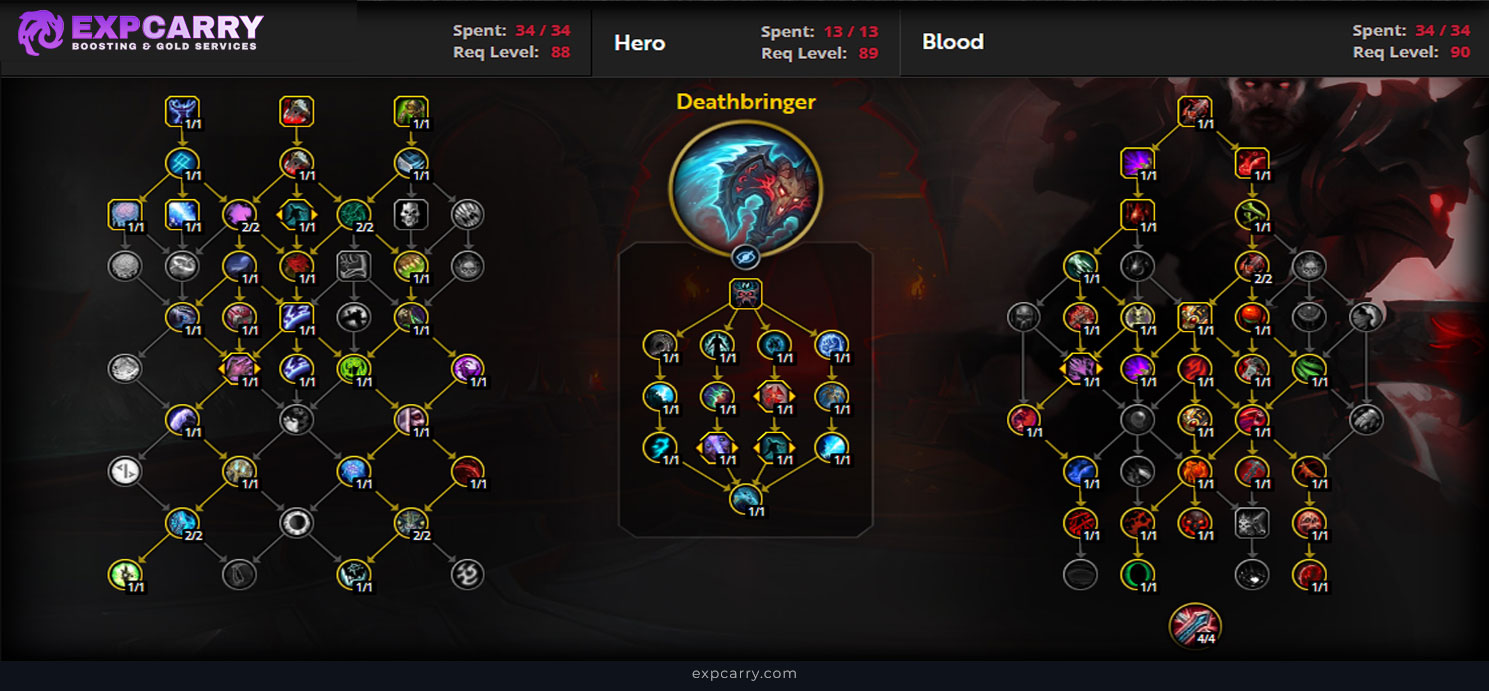
Best Talents for Blood Death Knight 2v2
Use a durable control setup with utility-focused PvP talents and keep your build centered on disruption rather than damage fantasies. Blood is niche here as well, so matchups matter more than a copy-paste line.
Best Stats for Blood Death Knight 2v2
- Versatility
- Mastery
- Haste
- Critical Strike
Blood Death Knight 3v3 Guide
In 3v3, Blood is mostly about disruption, peels, and forcing awkward movement rather than conventional kill pressure. Help your team by breaking setup windows, dragging enemies into bad positions, and surviving long enough to create space. That role can be annoying and useful, but it is still niche compared to established arena choices.
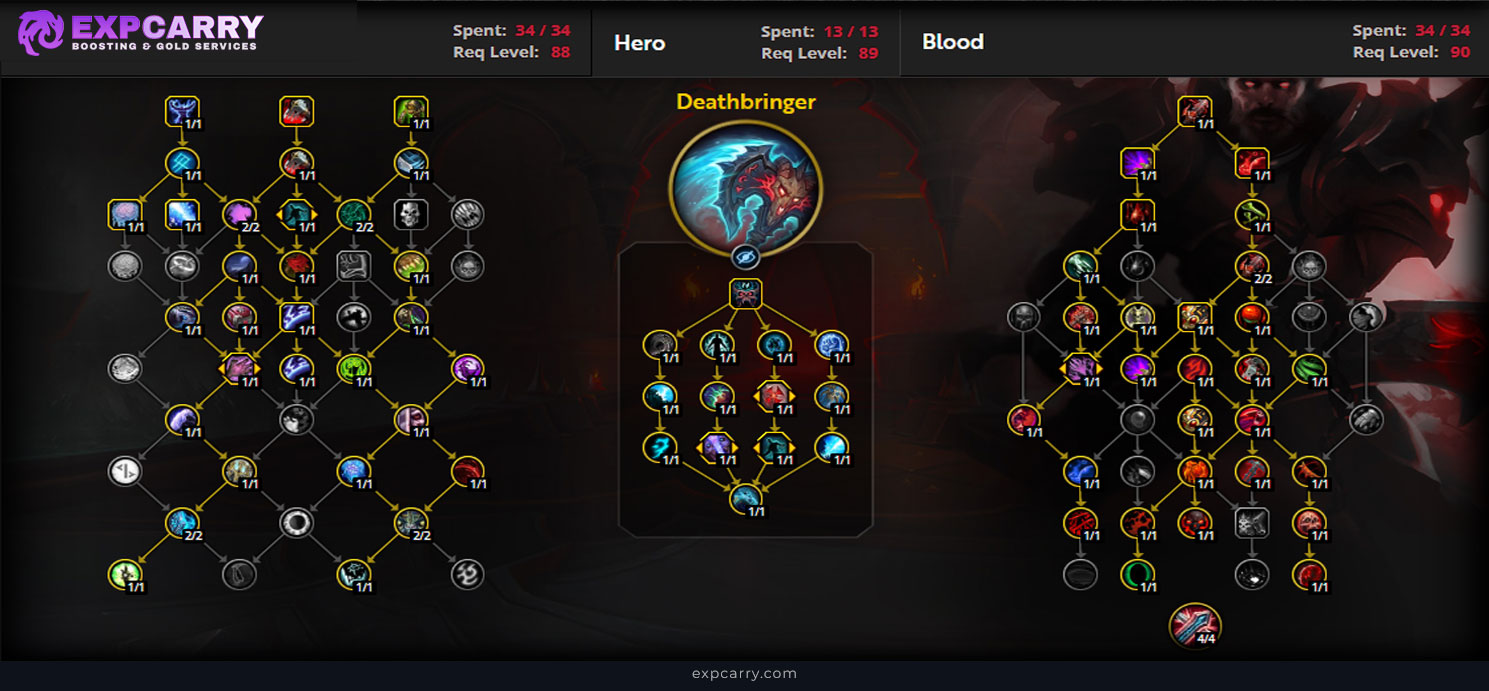
Best Talents for Blood Death Knight 3v3
Use a utility-heavy setup with strong control tools, survivability, and flexible anti-caster support. Blood remains a niche specialization here, so composition and matchup matter more than static ladder mythology.
Best Stats for Blood Death Knight 3v3
- Versatility
- Mastery
- Haste
- Critical Strike
Blood Death Knight RBG Guide
In RBGs, Blood Death Knight is more useful than it is in arena because the spec's toolkit fits objective defense, choke control, and peeling much better than small-map kill races. Gorefiend's Grasp, Death Grip, Anti-Magic Zone, and stubborn survivability all matter more on battleground maps than in standard arena pressure trades.
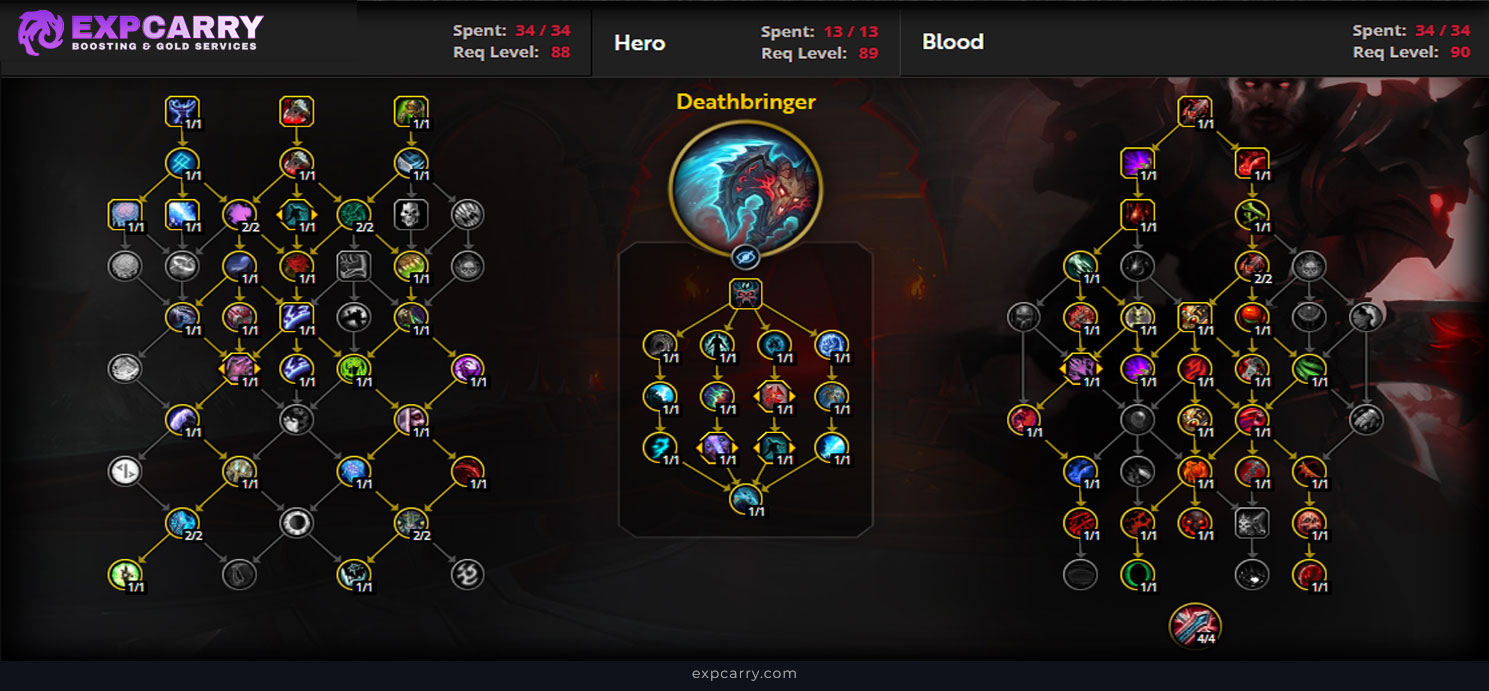
Best Talents for Blood Death Knight RBG
Use a group-oriented, control-focused build that supports objective play, team protection, and front-line disruption. Blood is at its most relevant here when it is making space miserable for the other team instead of trying to imitate a real damage spec.
Best Stats for Blood Death Knight RBG
- Versatility
- Mastery
- Haste
- Critical Strike
Conclusion
Blood Death Knight in WoW Midnight Season 2 uses Baleful Grave-Knight's Lament, separate stat profiles for San'layn and Deathbringer, and different recommended imports by content. San'layn is the first Raid (Best) build because its Dancing Rune Weapon window becomes especially valuable when additional targets remain active. Deathbringer is the first displayed Mythic+ (Best) build and provides a simpler Reaper's Mark cycle, easier Bone Shield management, and reliable defensive benefits.
In raids, Blood combines reactive healing with powerful answers to predictable physical and magical damage. In Mythic+, grips and self-sustain help control the shape and pace of pulls, while Delves reward the same careful preparation without requiring constant external healing. PvP remains a niche use of the specialization, with its control and objective utility generally more relevant than conventional arena damage. Across every format, the central rule is the same: prepare Bone Shield and Runic Power before danger, then spend Death Strike and defensive cooldowns according to the damage pattern rather than after resources have already failed.