Unholy Death Knight guide - updated for WoW Midnight Season 2. This in-depth guide covers PvE setups for raids, Mythic+, and Delves, together with PvP builds for Solo Shuffle, 2v2, 3v3, and RBG. It explains current talents, priority-based rotations, stats, gear, consumables, and practical choices for Season 2. Unholy remains a two-handed melee DPS specialization built around diseases, undead minions, Lesser Ghoul management, and carefully prepared cooldown windows, while Rider of the Apocalypse and San'layn provide different damage rhythms for different encounters.
PvE Guide for Unholy Death Knight in WoW Midnight Season 2
Unholy enters Midnight Season 2 as a burst-oriented disease and pet specialization rather than a fixed-sequence melee class. Runes, Runic Power, Sudden Doom procs, and Lesser Ghoul stacks determine what should be pressed next, so clean resource management matters more than memorizing a rigid loop. Patch 12.1 also changes several major interactions: Army of the Dead lasts 30 seconds and makes active ghouls trigger Death Order or Epidemic Order instead of allowing additional ghouls to be summoned throughout its duration, Soul Reaper now consumes up to three Lesser Ghoul stacks, and Lord of the Dead has stronger relevance alongside the new tier set. Unholy still brings Anti-Magic Zone, Death Grip, Raise Ally, strong burst, and valuable stacked AoE, but poor cooldown planning or targets dying before the setup completes can sharply reduce its output.
Unholy Death Knight Raid Guide in Midnight Season 2
Raid encounters reward Unholy when its pet package and disease pressure can be prepared for predictable boss or add phases. The specialization can deliver heavy single-target burst and convert nearby targets into useful cleave, but its largest gains come from cycling cooldowns instead of holding them without a clear reason. Plan Army of the Dead, Dark Transformation, Putrefy, trinkets, and potion usage around reliable uptime, while keeping defensive and grip utility available for encounter mechanics.
Best Talents for Unholy Death Knight Raids
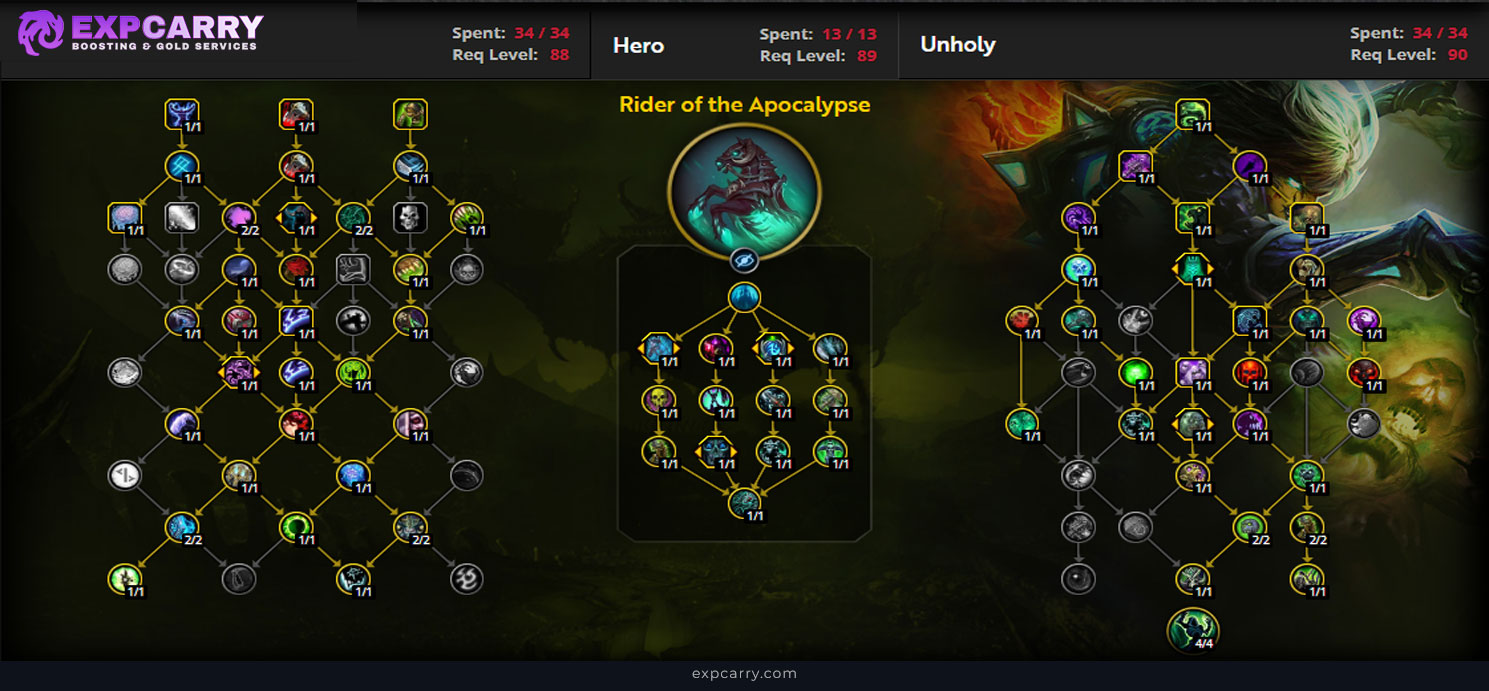
The import below uses Wowhead's current Rider of the Apocalypse Single Target build marked as the recommended raid option. Rider works around 90-second-oriented windows and requires less preparation than San'layn, which makes this setup direct and dependable for progression. San'layn can still be competitive when a boss favors its shorter 45-second cycle, so hero talents are not universally locked for every encounter. Adjust utility points for Anti-Magic Zone, movement, or add control without disturbing the main damage package.
Best Stats for Unholy Death Knight Raids
- Strength
- Critical Strike
- Mastery
- Haste
- Versatility
Strength and weapon damage make higher-item-level upgrades especially valuable. As a broad Season 2 gearing rule, Critical Strike and Mastery are the leading secondary stats, Haste follows, and Versatility is normally last for PvE damage. Their exact order can shift with your hero tree, trinkets, and current distribution; Mastery may move ahead in some character profiles. Treat the list as a starting point and simulate close upgrades, gems, and enchants for the character that will actually equip them.
Best Consumables, Enchants, and Gems for Unholy Death Knight Raids
- Potion: Potion of Recklessness is the primary combat potion; Light's Potential is the lower-cost alternative. Carry Silvermoon Health Potion for recovery.
- Food: Use Silvermoon Parade as the feast option or Royal Roast as personal food.
- Flask: Use Flask of the Magisters when extra Mastery is needed to keep Mastery as your highest secondary rating; otherwise use Flask of the Shattered Sun.
- Weapon Rune: Rune of the Apocalypse is the recommended Runeforge for current PvE.
- Weapon Buff: Use Thalassian Phoenix Oil. Refulgent Whetstone is an alternative for swords and axes, while Refulgent Weightstone is the matching option for maces.
- Enchants: Use Empowered Blessing of Speed on the helm, Akil'zon's Swiftness on shoulders, Mark of the Worldsoul on the chest, Forest Hunter's Armor Kit on legs, Farstrider's Hunt on boots, and Eyes of the Eagle on rings.
- Gems: Start with Indecipherable Eversong Diamond, then use Flawless Masterful Garnet or Flawless Deadly Amethyst according to your simulated stat balance.
- Augment Rune: Use Void-Touched Augment Rune when the additional primary stat is worth the cost.
Best Gear for Unholy Death Knight Raids
Baleful Grave-Knight's Crucible is the Unholy Death Knight tier set for Midnight Season 2. Its 2-piece changes Magus of the Dead and Lord of the Dead so that they cast the stronger Necrotic Bolt and Withering Grasp in place of their normal bolts. The 4-piece raises the damage of both replacement spells by 130% against enemies below 35% health. These bonuses are passive and pet-focused, so they do not create a separate rotation or a tier-specific talent build. For raid gearing, Maze-roa, Warlord's Fury is the priority weapon from The Coiled Altar, while Voracious Heart of Ula'tek and Zul'jin's Guillotine Technique form the listed raid trinket pair for low-target encounters. Zul'jin's trinket loses value as target count rises, so AoE content can favor stat alternatives such as Gebbo's Bottomless Bag or Bellowstone. Secure the 4-piece, prioritize weapon item level, and simulate trinkets rather than assuming one pair wins in every fight.
Rotation and Ability Priority for Unholy Death Knight Raids
Unholy uses a priority system governed by cooldowns, resources, procs, and Lesser Ghoul stacks. Keep major abilities cycling when they will receive real uptime, spend Sudden Doom quickly, and avoid reaching a point where either Runes or Runic Power are wasted. Festering Strike creates the Lesser Ghoul stacks that Scourge Strike converts into summoned ghouls, while Dark Transformation and Putrefy anchor the normal priority. During Forbidden Knowledge, the spender and Putrefy priorities temporarily change.
Single Target
- Use Dark Transformation on cooldown unless a brief delay places the full effect into a clearly stronger phase.
- Cast Putrefy while Dark Transformation is active.
- Spend Sudden Doom immediately with Death Coil.
- Use Festering Strike when you have no Lesser Ghoul stacks.
- Use Scourge Strike when Lesser Ghoul stacks are available.
- Spend remaining Runic Power with Death Coil without overcapping.
- During Forbidden Knowledge, prioritize Putrefy, then Necrotic Coil, and use Festering Strike when Lesser Ghoul stacks are empty.
- Use Army of the Dead as the main cooldown and align its companion summons with the encounter and your selected talents.
AoE Rotation
- Use Dark Transformation on cooldown and cast Putrefy while it is active.
- Place Death and Decay only when enemies are expected to remain inside it.
- Spend Sudden Doom with Epidemic in multi-target situations.
- Use Festering Strike when no Lesser Ghoul stacks remain, then Scourge Strike while stacks are available.
- Use Epidemic as the regular Runic Power spender for AoE.
- During Forbidden Knowledge, prioritize Putrefy, Death and Decay, and Graveyard before rebuilding or spending Lesser Ghoul stacks.
Opener
- Use Army of the Dead according to the pull timer and the encounter plan when it is included in your build.
- Open with Outbreak to establish your disease package.
- Activate Dark Transformation.
- Use Potion of Recklessness and your on-use trinket inside the planned burst window.
- Cast Putrefy, follow with two Necrotic Coils during Forbidden Knowledge, and then cast Putrefy again.
- Continue with the normal Lesser Ghoul and Runic Power priority instead of restarting the opener.
- Reserve Anti-Magic Zone and Death Grip for assigned raid mechanics rather than spending them without purpose.
Unholy Death Knight Mythic Plus Guide in Midnight Season 2
Mythic+ suits Unholy's ability to build pressure across durable stacked pulls, but the result depends heavily on route and cooldown awareness. Packs must live long enough for diseases, Lesser Ghouls, and hero-talent windows to return value. The Season 2 dungeon setup below uses San'layn, whose shorter damage cycle can line up with frequent dangerous pulls, but it demands more preparation than Rider. Coordinate with the tank, begin setup before priority enemies are nearly dead, and keep Death Grip, Mind Freeze, Anti-Magic Zone, and combat resurrection ready for the moments that affect the key.
Best Talents for Unholy Death Knight Mythic Plus
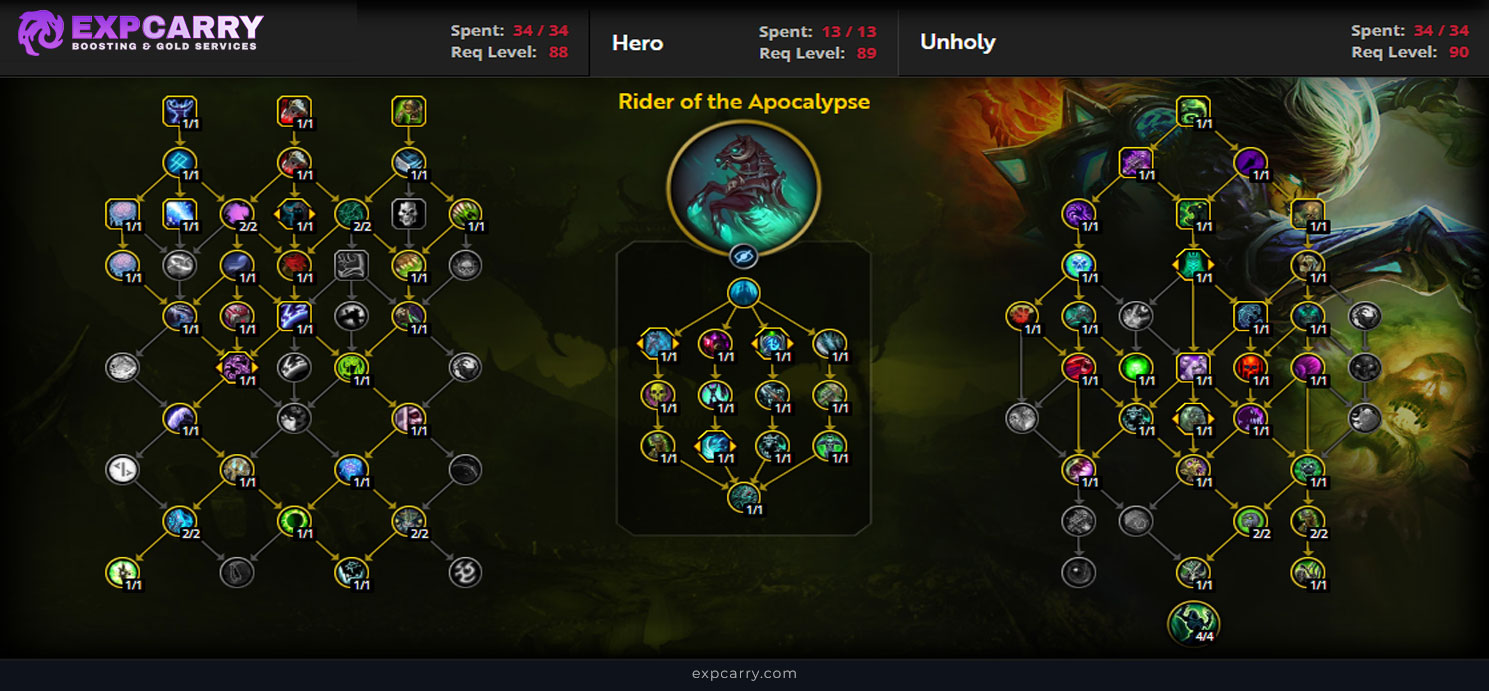
The import below is Wowhead's current San'layn Mythic+ and Delves build marked as the recommended option. Its defining plan is Blightfall: extend diseases during Gift of the San'layn, then consume the stored duration after the window for a large damage event. This 45-second-focused profile is powerful in organized keys but punishes missed setup or Runic Power overcapping. Rider of the Apocalypse remains a viable and easier alternative with more sustained minion-based AoE, yet the code shown here follows the requested first recommended Mythic+ build.
Best Stats for Unholy Death Knight Mythic Plus
- Strength
- Critical Strike
- Mastery
- Haste
- Versatility
Strength and item level remain the first gearing checks, followed by a close competition between Critical Strike and Mastery. The broad Season 2 order places Crit at least level with Mastery, then Haste, with Versatility last for damage; San'layn profiles can push Mastery ahead depending on the exact gear set. Dungeon trinkets, buffs, and socket distribution can change the result, so use this order to filter obvious choices and simulate close ones.
Best Consumables, Enchants, and Gems for Unholy Death Knight Mythic Plus
- Potion: Use Potion of Recklessness for important pulls and bosses, with Light's Potential as the budget alternative; keep Silvermoon Health Potion available.
- Food: Use Silvermoon Parade or Royal Roast.
- Flask: Use Flask of the Magisters if you need Mastery to be your highest secondary rating; otherwise choose Flask of the Shattered Sun.
- Weapon Rune: Use Rune of the Apocalypse.
- Weapon Buff: Use Thalassian Phoenix Oil, or the appropriate Refulgent Whetstone or Refulgent Weightstone for your weapon type.
- Enchants: Use Empowered Blessing of Speed, Akil'zon's Swiftness, Mark of the Worldsoul, Forest Hunter's Armor Kit, Farstrider's Hunt, and Eyes of the Eagle in their matching equipment slots.
- Gems: Equip Indecipherable Eversong Diamond, then balance Flawless Masterful Garnet and Flawless Deadly Amethyst according to a simulation.
- Augment Rune: Void-Touched Augment Rune is the Season 2 option for additional primary stat.
Rotation and Ability Priority for Unholy Death Knight Mythic Plus
Dungeon play still follows the core resource priority, with the added requirement of preparing San'layn windows before a pull is already ending. Keep Dark Transformation and Putrefy moving, spend Sudden Doom promptly, and use Death and Decay only when the group will remain in its area. During Gift of the San'layn, build Blightfall by extending diseases and avoid wasting resources needed to complete the window; consume the accumulated disease duration after the extension phase.
Single Target
- Use Dark Transformation on cooldown and cast Putrefy while it is active.
- Spend Sudden Doom with Death Coil as soon as possible.
- Use Festering Strike when Lesser Ghoul stacks are empty.
- Use Scourge Strike while Lesser Ghoul stacks are available.
- Spend excess Runic Power with Death Coil and avoid overcapping during San'layn buildup.
- During Forbidden Knowledge, prioritize Putrefy and Necrotic Coil before returning to the standard resource loop.
- Use Army of the Dead and trinkets on bosses or priority enemies that will survive the complete window.
AoE Rotation
- Establish diseases early enough for the pull to support the full San'layn and Blightfall sequence.
- Use Dark Transformation, then Putrefy while it remains active.
- Cast Death and Decay when enemies will stay inside the ground effect.
- Spend Sudden Doom with Epidemic and use Epidemic as the normal multi-target Runic Power spender.
- Build Lesser Ghoul stacks with Festering Strike when empty and spend them through Scourge Strike.
- During Forbidden Knowledge, move through Putrefy, Death and Decay, and Graveyard before the Lesser Ghoul priorities.
- Hold the largest summon window for a dangerous pull or boss, but do not delay it so long that an entire use is lost.
Opener
- Choose a pull that will live long enough before committing Army of the Dead, potion, and an on-use trinket.
- Open with Outbreak, then Dark Transformation.
- Use Potion of Recklessness and the on-use trinket during the committed damage window.
- Cast Putrefy, use two Necrotic Coils during Forbidden Knowledge, and cast Putrefy again.
- Build the San'layn disease extension before consuming Blightfall rather than triggering the payoff prematurely.
- Use Death Grip, Mind Freeze, and Anti-Magic Zone for route-specific control and survival.
Explore services related to this guide, selected from our World of Warcraft catalog.
View All World of Warcraft Services


Unholy Death Knight Delves Guide in Midnight Season 2
Delves reward Unholy's pet damage, control, self-healing, and ability to keep attacking while handling mechanics. The specialization is durable when Anti-Magic Shell, Death Strike, Death Grip, and its hero-tree sustain are used deliberately, but overpulling can still end a run before the disease and summon setup matures. Pace elites around available cooldowns, interrupt dangerous casts, and use line-of-sight or grips to control where enemies fight.
Best Talents for Unholy Death Knight Delves
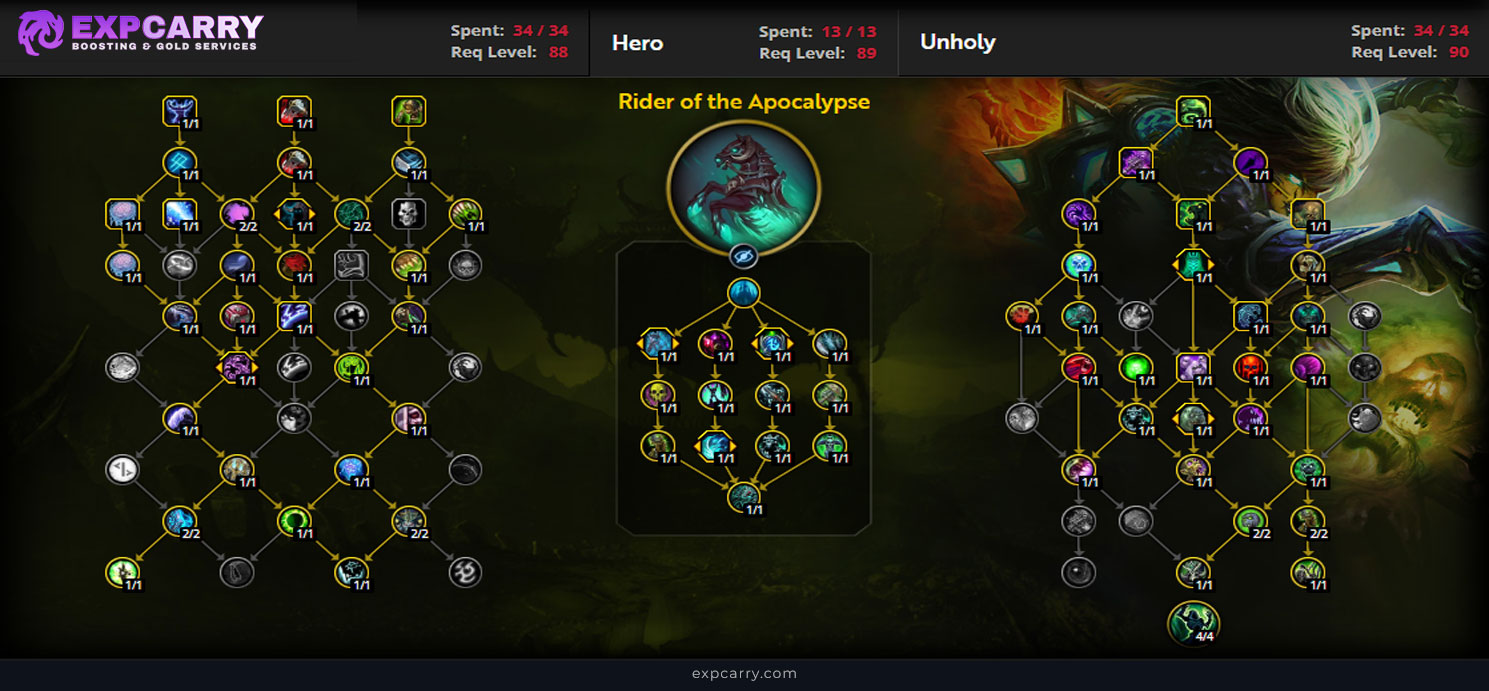
This guide intentionally reuses the exact recommended San'layn Mythic+ import code below, as requested. Wowhead lists Mythic+ and Delves together for this San'layn setup, so its Blightfall plan carries over cleanly: extend diseases during Gift of the San'layn and consume the stored duration afterward. San'layn also supplies useful self-healing for solo play. Move flexible utility points toward the defensive, interrupt, or control tools required by the specific Delve rather than changing the core damage build.
Best Stats for Unholy Death Knight Delves
- Strength
- Critical Strike
- Mastery
- Haste
- Versatility
Use the PvE damage order as the default: prioritize item level and Strength, then keep Critical Strike and Mastery near the top, followed by Haste and Versatility. San'layn or a particular gear set can make Mastery the stronger of the two leading secondaries. Versatility becomes more attractive only when survivability, rather than damage, is stopping progress, so do not force a defensive stat change unless it solves a real problem.
Best Consumables, Enchants, and Gems for Unholy Death Knight Delves
- Potion: Use Potion of Recklessness for damage and Silvermoon Health Potion when recovery is more important.
- Food: Use Silvermoon Parade or Royal Roast.
- Flask: Choose Flask of the Magisters when Mastery needs help remaining your highest rating; otherwise use Flask of the Shattered Sun.
- Weapon Rune: Use Rune of the Apocalypse.
- Weapon Buff: Use Thalassian Phoenix Oil or the correct Refulgent stone for the equipped weapon.
- Enchants and Gems: Mirror the current PvE setup with Indecipherable Eversong Diamond and simulated Mastery/Crit gems; change toward defense only when survival is the actual limiting factor.
- Augment Rune: Void-Touched Augment Rune is available for difficult bosses or high-value runs.
Rotation and Ability Priority for Unholy Death Knight Delves
- Apply diseases early to enemies that will survive long enough to justify the setup.
- Use Dark Transformation on cooldown and cast Putrefy while it is active.
- Spend Sudden Doom immediately with Death Coil, or Epidemic against several targets.
- Use Festering Strike when you have no Lesser Ghoul stacks and Scourge Strike while stacks are available.
- Place Death and Decay under stable multi-target pulls and spend Runic Power with Epidemic.
- Build disease duration during Gift of the San'layn before consuming Blightfall.
- Use Army of the Dead on elites or bosses that will survive its full value instead of minor enemies.
- Use Death Grip, Mind Freeze, Anti-Magic Shell, Death Strike, and other defensive tools before incoming damage becomes unrecoverable.
Best PvP Guide for Unholy Death Knight in WoW Midnight Season 2
Unholy Death Knight remains a pressure-oriented melee spec in PvP that wins through disease spread, pet uptime, anti-healing pressure, and relentless disruption. In Midnight, the spec no longer revolves around the old Festering Wounds gameplay loop that many players still associate with Unholy. In arena and battleground play, Unholy remains valuable because it combines strong sustained damage with repeated control through Grip, slows, interrupts, Anti-Magic Zone, and constant healer strain.
Unholy Death Knight Solo Shuffle Guide
Solo Shuffle rewards specs that can keep pressure rolling without becoming useless after the first failed go, and that remains one of Unholy's strengths. You are not playing for one dramatic kill window every round. You are trying to create constant discomfort through rot pressure, pet damage, Necrotic Wounds, and repeated disruption until the enemy team runs out of room to stabilize.
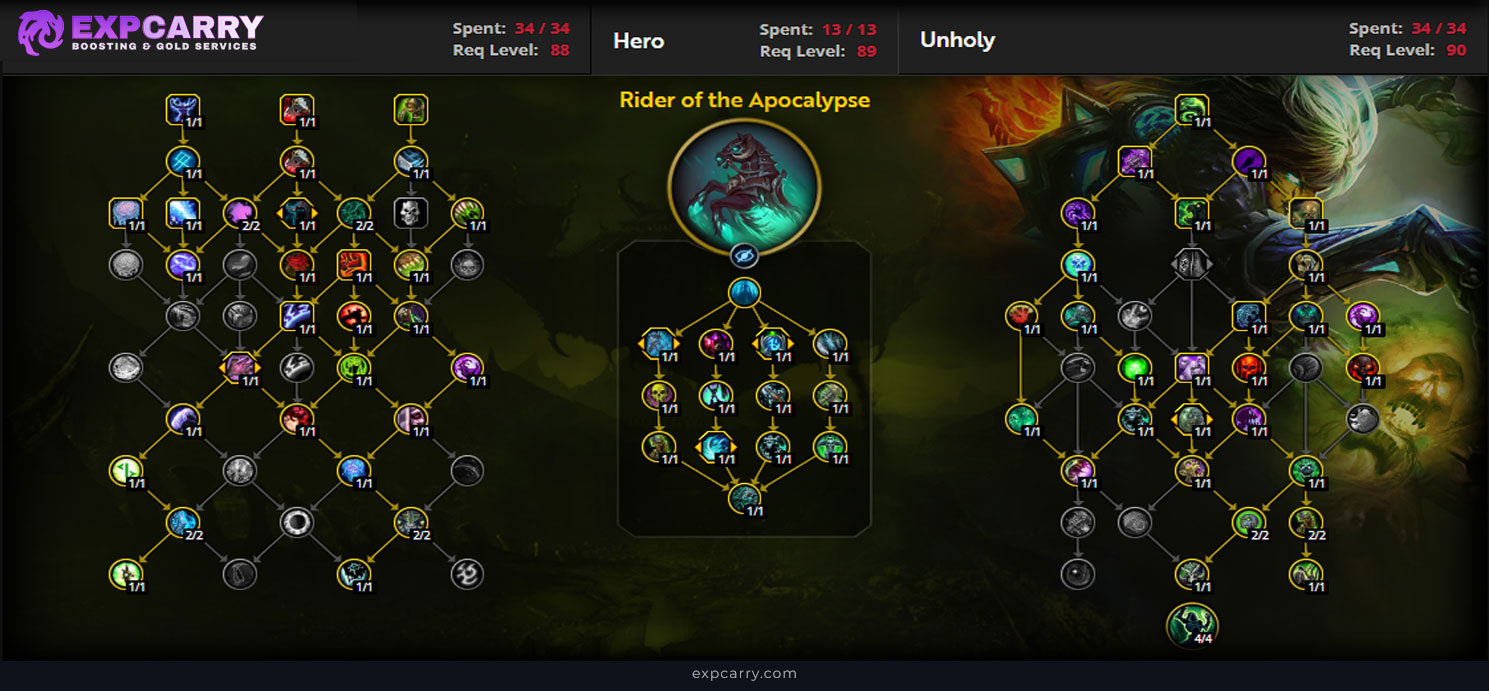
Best Talents for Unholy Death Knight Solo Shuffle
PvP talents like Necrotic Wounds, Raise Abomination, and Dark Simulacrum still fit the current Unholy Solo Shuffle identity well. This build plays through sustained rot pressure, anti-healing, and enough personal durability to survive trading rounds. It works best when you keep pressure rolling and do not waste Grip, Mind Freeze, or Strangulate on meaningless globals.
Best Stats for Unholy Death Knight Solo Shuffle
- Versatility
- Haste
- Mastery
- Critical Strike
Best Consumables, Enchants, and Gems for Unholy Death Knight Solo Shuffle
- Potion: Use PvP-legal offensive consumables where allowed.
- Weapon Rune: Rune of the Fallen Crusader.
- Rings: Favor Versatility enchants.
- Gems: Build around Versatility first, then Haste or Mastery depending on your current gear.
Macros and Addons
- Use focus macros for Death Grip, Mind Freeze, and Strangulate.
- Recommended addons: GladiatorlosSA, OmniBar, and Details.
Unholy Death Knight 2v2 Guide
2v2 still favors specs that can drag games into repeated dampening exchanges, and Unholy remains good at that. Its pressure is not flashy every second, but it is persistent, awkward to heal through, and backed by just enough control to make every trinket and defensive trade feel expensive.
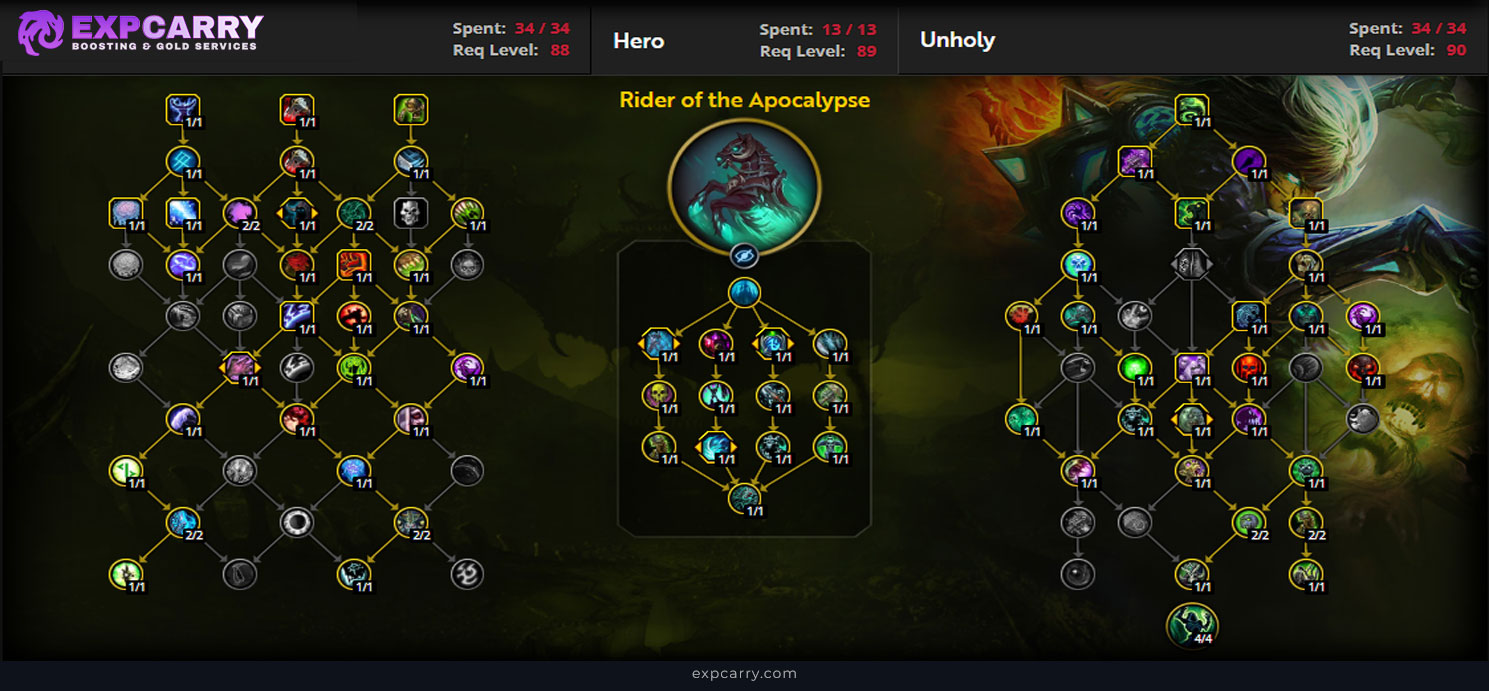
Best Talents for Unholy Death Knight 2v2
Necrotic Wounds, Raise Abomination, and Dark Simulacrum remain a solid 2v2 core because they support long-pressure games instead of one-dimensional go attempts. This setup works best with partners that can capitalize on repeated pressure and healer disruption rather than demanding a spec built around instant burst every 45 seconds.
Best Stats for Unholy Death Knight 2v2
- Versatility
- Haste
- Mastery
- Critical Strike
Best Consumables, Enchants, and Gems for Unholy Death Knight 2v2
- Potion: Use PvP-legal offensive consumables where allowed.
- Weapon Rune: Rune of the Fallen Crusader.
- Rings: Favor Versatility enchants.
- Gems: Build around Versatility first, then Haste or Mastery.
Macros and Addons
- Focus Death Grip and Mind Freeze macros remain essential.
- Recommended addons: GladiatorlosSA, OmniBar, and Details.
Unholy Death Knight 3v3 Guide
3v3 remains the format where coordinated Unholy pressure feels most complete. The spec thrives in rot and cleave comps that can turn sustained pressure into panic, then into bad defensive trades, then into a kill several globals later. That delayed pressure curve is exactly why the spec stays dangerous even when it is not deleting someone instantly.
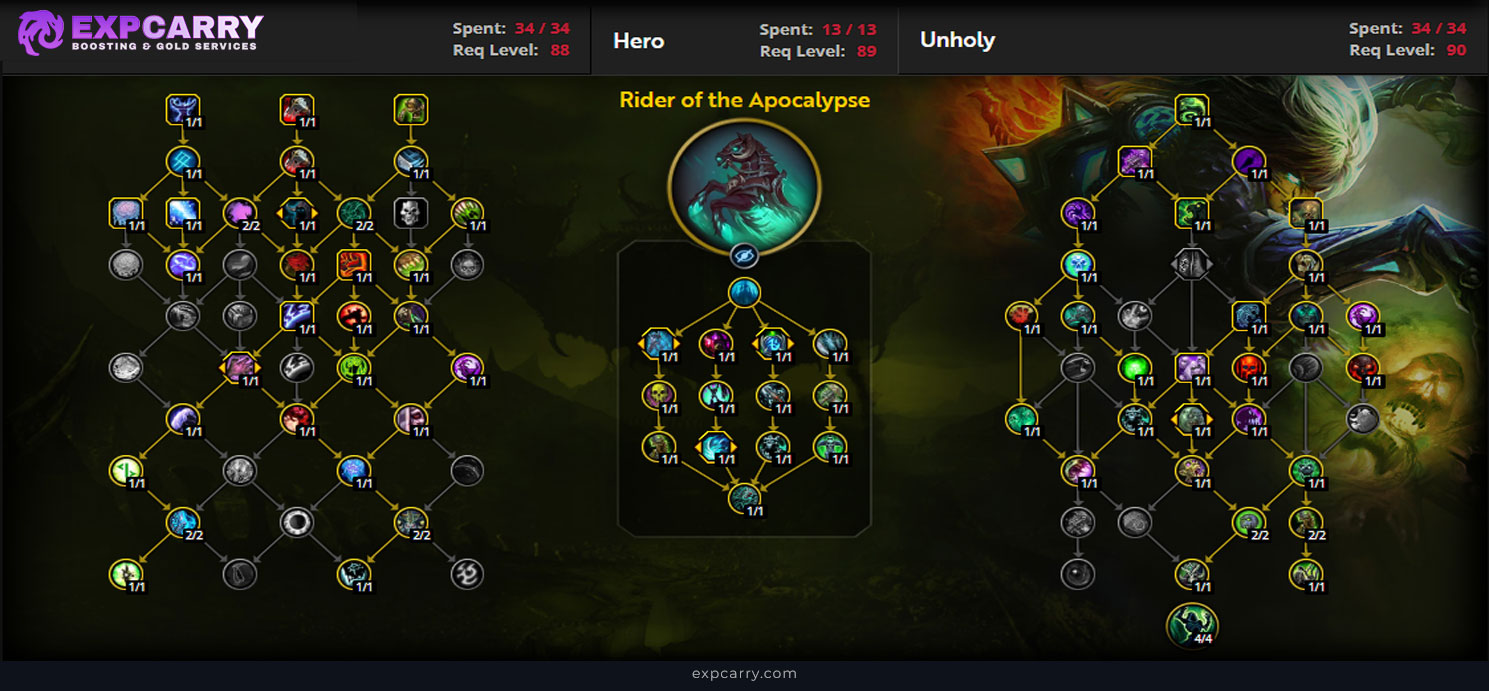
Best Talents for Unholy Death Knight 3v3
Necrotic Wounds, Raise Abomination, and Dark Simulacrum remain a strong 3v3 package because they support extended pressure and repeated healer disruption. This setup fits rot-based comps especially well, but the real key is not the talent names. It is whether you can maintain uptime, coordinate grips and kicks, and keep your pressure from collapsing between goes.
Best Stats for Unholy Death Knight 3v3
- Versatility
- Haste
- Mastery
- Critical Strike
Best Consumables, Enchants, and Gems for Unholy Death Knight 3v3
- Potion: Use PvP-legal offensive consumables where allowed.
- Weapon Rune: Rune of the Fallen Crusader.
- Rings: Favor Versatility enchants.
- Gems: Build around Versatility first, then Haste or Mastery.
Macros and Addons
- Use focus macros for Death Grip and Mind Freeze.
- Recommended addons: GladiatorlosSA, OmniBar, and Details for tracking pressure and cooldowns.
Unholy Death Knight RBG Guide
Rated Battlegrounds favor specs that can create area pressure, drag enemies into bad positions, and punish grouped fights, and Unholy still fits that mold perfectly. Disease spread, Anti-Magic Zone, and mass control through Grip give the spec a real place in battleground formats even when arena balance shifts around it.
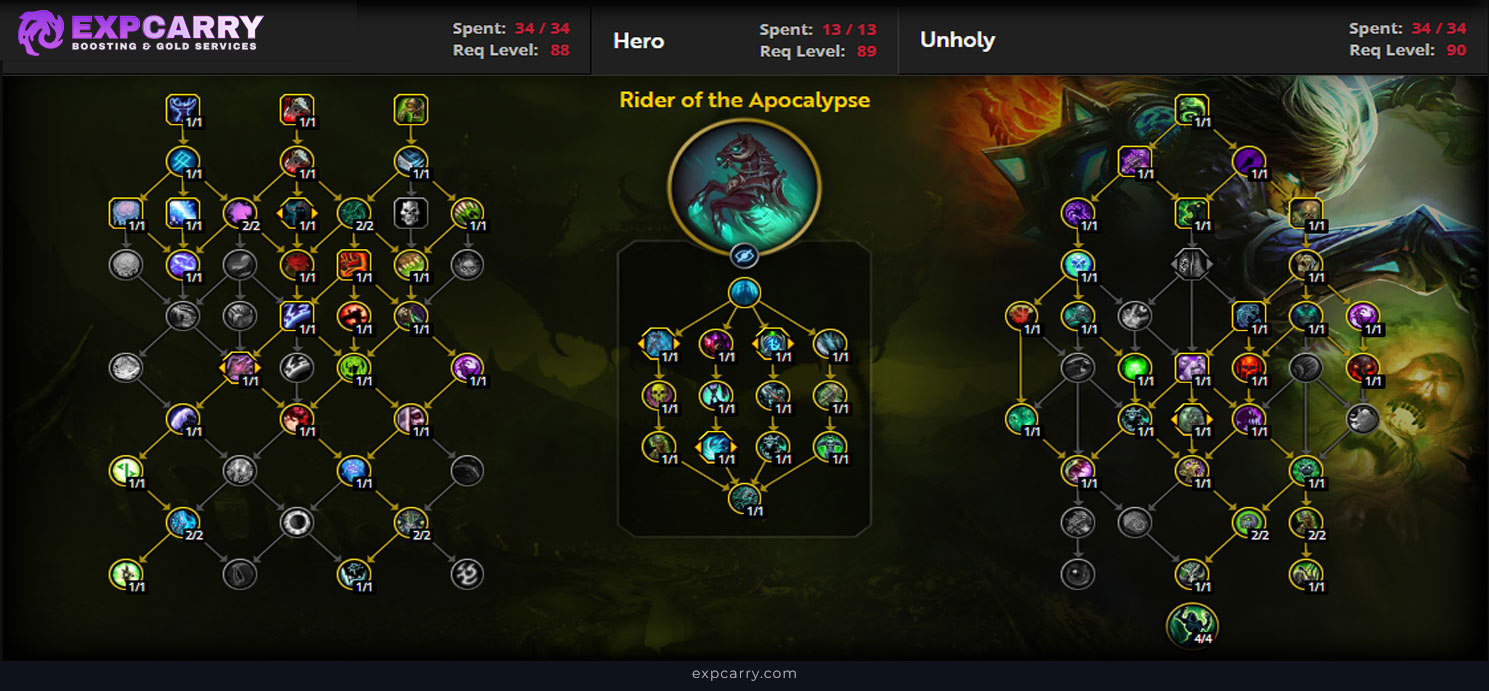
Best Talents for Unholy Death Knight RBG
Necrotic Wounds, Raise Abomination, and Dark Simulacrum remain a good RBG core because they support AoE pressure, rot value, and team utility. In battlegrounds, Unholy matters less because of one perfect duel and more because it constantly makes grouped fights harder for the enemy team to stabilize.
Best Stats for Unholy Death Knight RBG
- Versatility
- Haste
- Mastery
- Critical Strike
Best Consumables, Enchants, and Gems for Unholy Death Knight RBG
- Potion: Use PvP-legal offensive consumables where allowed.
- Weapon Rune: Rune of the Fallen Crusader.
- Rings: Favor Versatility enchants.
- Gems: Build around Versatility first, then Haste or Mastery.
Macros and Addons
- Use macros for Death Grip and Raise Ally for fast support plays.
- Recommended addons: GladiatorlosSA, OmniBar, Details, and BattlegroundEnemies.
Conclusion
Mastering Unholy Death Knight in WoW Midnight Season 2 means treating the specialization as a priority system built around cooldowns, Runic Power, Runes, Sudden Doom, and Lesser Ghoul stacks. Rider of the Apocalypse supplies the recommended raid import shown here, while the selected Mythic+ and duplicated Delves code uses San'layn and its Blightfall disease-extension cycle. Current PvE gearing starts with Strength and weapon item level, keeps Critical Strike and Mastery close, uses Rune of the Apocalypse, and builds around Baleful Grave-Knight's Crucible and its pet-focused bonuses.
In raids, prepare the pet package for predictable uptime. In Mythic+, choose pulls that live long enough to support the full setup. In Delves, use the same damage plan while spending defensive and control tools early enough to matter. PvP continues to reward sustained rot, anti-healing, and coordinated disruption. The common rule across every format is simple: manage resources cleanly, use cooldowns often enough to avoid losing casts, and only delay them when the next window is demonstrably better.