
Star Citizen 4.6 Engineering Basics Guide is a practical introduction to ship engineering as it exists in the Alpha 4.6 era. Engineering is not a single mini-game. It is a set of survival decisions built around the Resource Network: what stays powered, what gets isolated, what you repair first, and how you stop secondary hazards like fires from turning a manageable hit into a ship loss. If you only remember one idea, make it this: engineering is about keeping the ship controllable and the crew alive long enough to choose the outcome.
This guide is written for players who want a repeatable, low-panic workflow. It assumes you may be solo or in a small crew, and it focuses on what you can actually do under pressure: triage priorities, how to use terminals and physical access points, what fuses and relays are for in practice, how to approach component failures, and how to handle fire and ship environment hazards without guessing.
What engineering means in 4.6
In Star Citizen, engineering gameplay revolves around managing resources across ships through the Resource Network. In practical terms, this means ship systems are not just abstract bars. They are connected, they can degrade, and they can fail in ways that require you to isolate problems and restore minimal function. Engineering terminals and related interfaces exist so you can see what is happening and make changes that keep the ship operating, even if that means running a reduced configuration for a while.
Alpha 4.6 continues the engineering direction with iterative tuning rather than replacing it with a brand-new layer. The important takeaway is that engineering is worth learning now because it is part of how survival is intended to work: you do not always win by holding W and hoping shields carry you. You win by stabilizing the ship when the fight or accident pushes you past the simple "wait for regen" model.
The single priority order that prevents most ship losses
Engineering becomes manageable when you stop trying to fix everything. Use one priority order every time. Tier 1 is control and survival: propulsion, steering authority, and anything that keeps the crew alive. Tier 2 is disengagement and defense: shields and countermeasures, plus anything that helps you leave the engagement. Tier 3 is mission capability: weapons and comfort systems. When something breaks, protect Tier 1, then Tier 2, and cut Tier 3 first if you need to reduce load or stop a cascade.
This order works because it aligns with how ship losses actually happen. You rarely lose a ship because you had one less gun online. You lose it because you lost control, lost mobility, or let a secondary failure spread while you were trying to keep full combat output. The correct "engineer brain" is not "maximize." It is "stabilize."
Resource Network triage and terminals
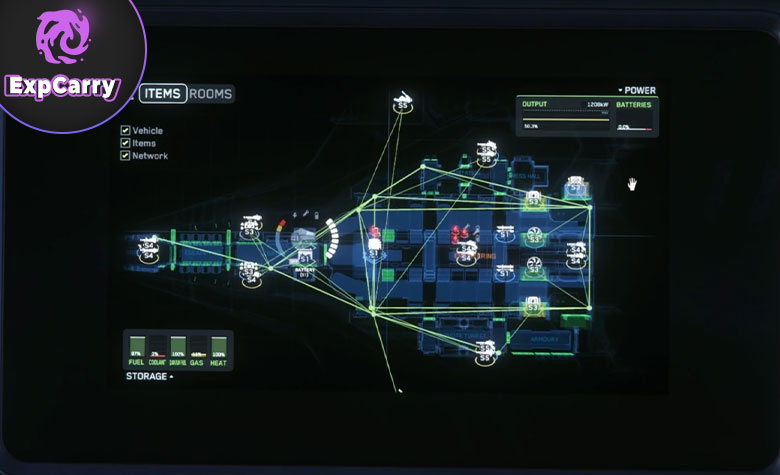
The Resource Network is where your triage decisions live. When the ship is healthy, you can ignore it. When the ship is damaged, the network becomes the difference between a controlled retreat and a dead ship. The correct early habit is to treat triage as a two-step loop: first you create time, then you restore minimum viable function. Time comes from breaking contact, changing angle, or otherwise reducing incoming damage. Minimum viable function means the ship can fly, can keep life support stable, and can execute an escape or landing plan.
Engineering terminals are not there so you can play spreadsheet mid-fight. They are there so you can quickly identify which systems are offline or degraded, cut non-critical load, and restore critical paths. If you are solo, the best use of a terminal is short, deliberate sessions: stabilize flight, check status, apply one change, return to flying. If you are crewed, your advantage is division of labor: one person flies, one person keeps the network stable and handles emergency actions.
A repeatable emergency flow that works under stress
When you hear alarms or see systems misbehaving, do not start with random toggles. Start with three questions: can I still steer, can I still thrust, and am I safe enough to keep fighting. If any answer is no, the correct move is to disengage and create time. Engineering without time is just panic with extra steps.
Once you have time, do one pass in a fixed order: identify what is offline, reduce load by cutting Tier 3, restore Tier 1 stability, then decide whether you rebuild capability or commit to escape. The mistake that kills ships is rebuilding weapons or comfort systems while mobility and cooling are still unstable. Do not pay for damage output with your ability to leave.
Fuses and relays: why they matter in real play
Fuses and relays exist to make rapid recovery and fault isolation possible. In practice, they are the tools you use when a system failure is not solved by waiting. The core idea is containment: you isolate a problem so it stops spreading through the network. The second idea is continuity: you keep a minimal configuration online so the ship stays controllable. If you try to keep everything powered while a subsystem is unstable, you often feed the cascade instead of stopping it.
Your goal with fuses and relays is not perfection. Your goal is "safe mode." Safe mode means you can steer, you can thrust, and you can survive long enough to land or leave. Once you are in safe mode, you can restore non-critical function in a controlled way instead of gambling the ship on a rushed full restore.
The most common mistake: restoring full combat too early
The classic failure pattern is bringing high-load systems back online before the ship is stable. Players see a weapon or shield dip and try to force it back to full, while propulsion or cooling is still on the edge. The ship overheats again or another system drops, and the crew loses the only window they had.
Use the rule: restore minimum viability first, then restore combat. If you cannot leave, you are already losing. If you can leave, you have the option to re-engage on your terms after stabilizing. Engineering is about keeping options, not about stubbornly keeping maximum output at all times.
Component failures, repair behavior, and what to fix first
Component damage turns engineering into urgency because it changes performance and can trigger secondary problems. Your fix order should follow survival value. Mobility and control come first because a moving ship can choose safety. Then you stabilize the network and cooling behavior so the ship stops producing new failures. Only then do you rebuild mission capability like weapons and optional subsystems.
Alpha 4.6 includes a specific tuning note for repair behavior: patch notes mention a 10% repair threshold when repairing ship items. The practical meaning is that repair interactions are constrained by thresholds rather than being a limitless "tap to fix everything" loop. Your best habit is to treat repair as a stabilizer, not as a full reset. You are trying to bring systems back above failure risk so the ship can survive the next minute, not rebuild a pristine ship while under threat.
Symptom-first diagnosis that prevents wasted time
If you are unsure what is actually limiting the ship, do not guess by chasing random components. Diagnose by symptom. If you have control loss, treat propulsion and steering-adjacent systems as the primary suspect. If you have sustained overheating, reduce load and stabilize cooling behavior before restoring optional systems. If you have repeated subsystem dropouts, focus on network stability and isolation instead of repeatedly forcing the same failing system back online.
This approach works because it aligns your actions with outcomes. Random component chasing feels active but often does not change the failure loop. Symptom-first diagnosis changes the loop and buys time, which is the only resource engineering really needs.
Fires and ship environment hazards: contain, extinguish, or isolate
Fires are dangerous because they are both damage and distraction. The correct response is not always "stand there and spray until it is gone." Sometimes the correct response is containment first, because chasing a fire while the ship is losing control is how you turn a small emergency into a crash. The basic logic is the same as everywhere else: stabilize control, then solve the hazard.
If the ship is stable and the fire is accessible, extinguish quickly and return to the network. If the ship is not stable, do not chase the fire. Fix mobility and control first, because uncontrolled motion ends everything. If the fire keeps returning, treat it as a symptom that the underlying system is still failing or overheating. Solve the cause, not only the symptom, or you will fight the same fire repeatedly until the ship runs out of time.
Practical prep in 4.6: tools and habits
Your best preparation is not a perfect build, it is a repeatable routine. Learn your ship's internal layout and where you can access critical systems quickly. Practice your triage flow until you can do it without thinking: protect control and life support, cut non-critical load, isolate failures, restore minimum viability, then decide whether to rebuild or leave. In real encounters, the crew that follows a simple routine beats the crew that panics while trying to optimize.
Alpha 4.6 also highlights convenience improvements that reduce friction around getting equipped, including Kel-To ship supply kiosks described as quick access points for engineering tools and essential provisions in major Stanton cities. That matters because it reduces the barrier to practicing engineering: you can restock what you need and run drills without wasting half a session navigating landing zones for basics.
Conclusion
Engineering basics in Star Citizen 4.6 are about keeping a damaged ship alive long enough to choose the outcome. The core is the Resource Network: you manage power and stability, you isolate faults with fuses and relays, you prioritize mobility and survival over maximum combat output, and you treat fires and repeated failures as problems to contain and then solve at the source. If you adopt one priority order and one triage flow, engineering stops feeling like chaos and becomes a repeatable checklist that saves ships.
Once you can consistently reach "safe mode" after a hit, you are already ahead. Safe mode is control, thrust, and survival. Everything else is optional until the ship is stable. That mindset is the difference between losing ships to cascades and turning damage into an escape, a landing, or a win.